
Financial Settings
Stripe Payment Settings
Stripe is the most comprehensive integration WP EasyCart offers — full payment processing plus an extensive subscription and recurring payment system. It delivers European Strong Customer Authentication (SCA) compliance, Apple Pay, Google Pay, and Microsoft Pay, Bank Redirects, and Buy Now & Pay Later systems — many providers in one easy-to-use system.
Watch the Walkthrough
Prefer to watch? The full Stripe setup, covered in one short video.
Stripe Payment Setup
Setup the popular Stripe payment system in EasyCart, including mobile wallet payments and advanced settings.
Stripe in Every Edition
Stripe is available in every WP EasyCart license — the only difference is the application fee.
- Free Edition: Stripe is included with a 2% application fee + Stripe fees.
- Pro & Premium Editions: Stripe is included with 0% application fees + Stripe fees.
Helpful Quick Links
Jump straight to the Stripe topic you need — on this page or in the companion gateway guides.
- Stripe Setup: Connecting Stripe in Free Edition · Pro & Premium One-Click Connect · Adding Your Webhook · Enabling 3D Secure & SCA · Testing Payments
- Wallet & Quick Payments: Setup Guide · Apple Pay/Google Pay/Microsoft Pay · AliPay · GrabPay · WeChat Pay · Link Payments
- Buy Now & Pay Later: Setup Guide · Affirm · AfterPay · Klarna
- Bank Redirects: Setup Guide · Bancontact · BLIK · EPS · GiroPay · iDeal · Przelewy24
- Real-Time Payments: Setup Guide · Pix · PayNow · PromptPay
- Bank Debits: Setup Guide · BECS Direct Debit in Australia
Connecting Stripe in Free Edition
Connecting Stripe in the Free edition only takes a few steps — connect it from our setup wizard while setting up, or from the Payment settings page.
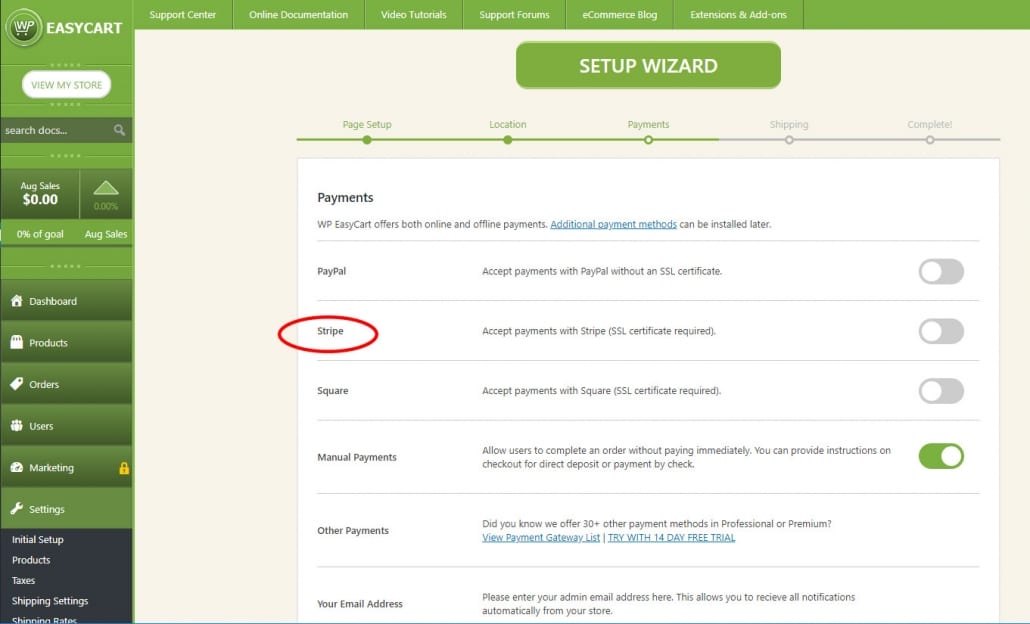
Enable Stripe in the Setup Wizard
The fastest route: while running our setup wizard, connect Stripe right from the payment step.
WP EasyCart — Stripe in the Setup Wizard
Or Connect It in Settings
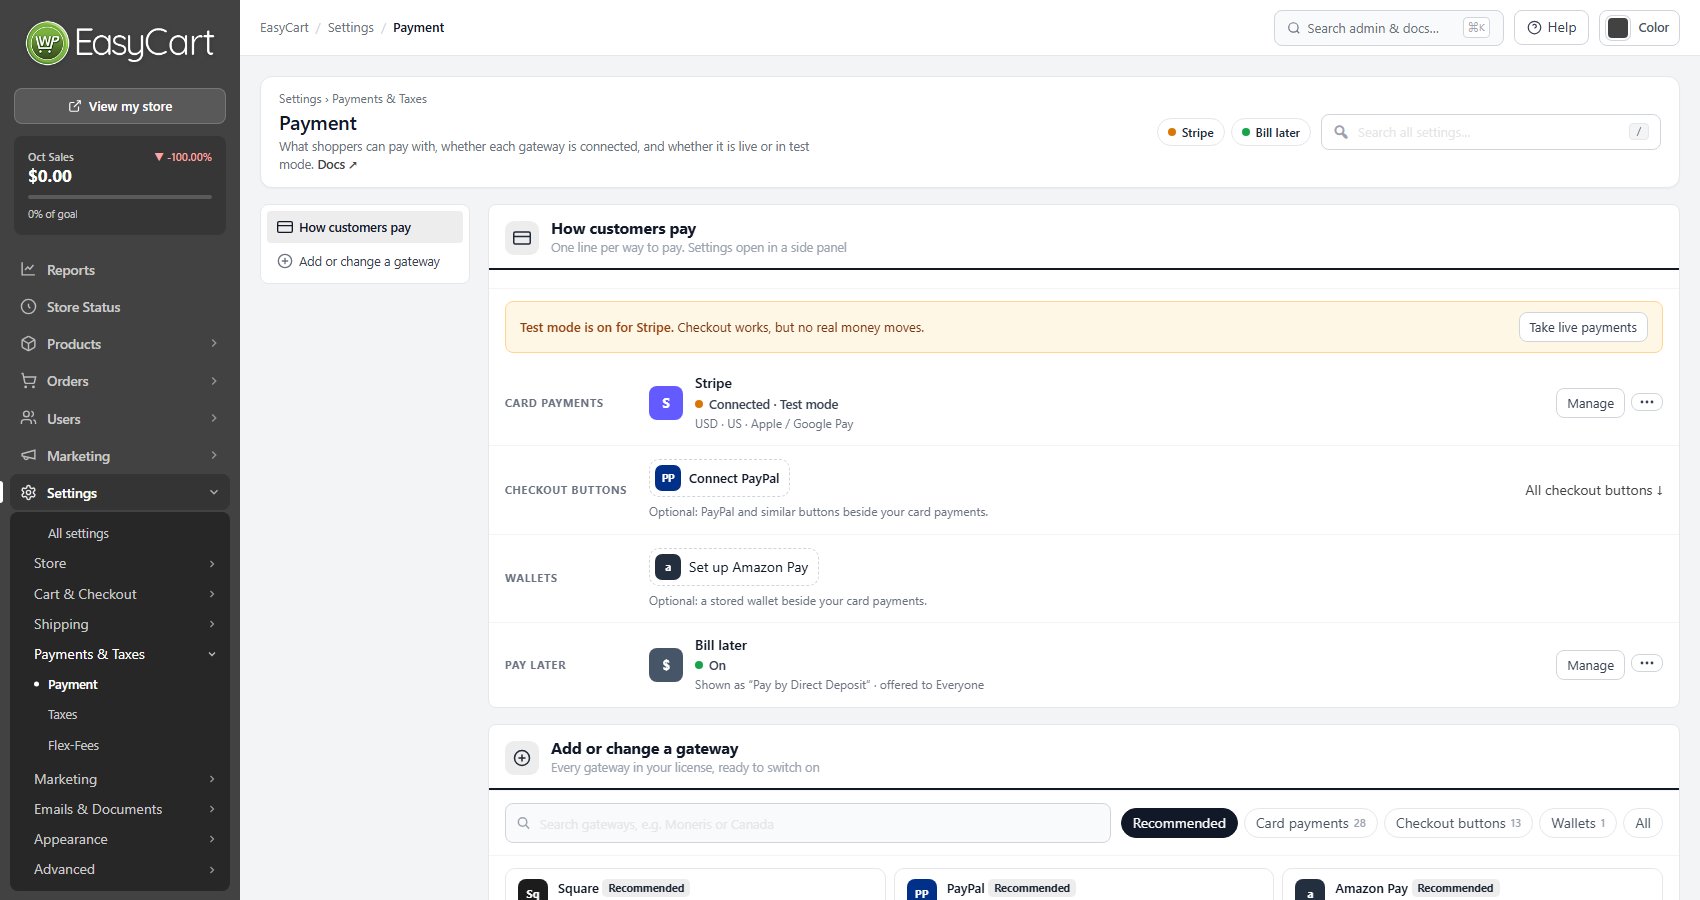
Go to WP EasyCart › Settings › Payments & Taxes › Payment. On the Card payments line press Connect Stripe. To start with a Stripe test account instead, press Try sandbox on Stripe under Add or change a gateway. The first time, you are asked to accept the EasyCart Connect terms.
WP EasyCart — Settings › Payment
Log In & Pick Your Account
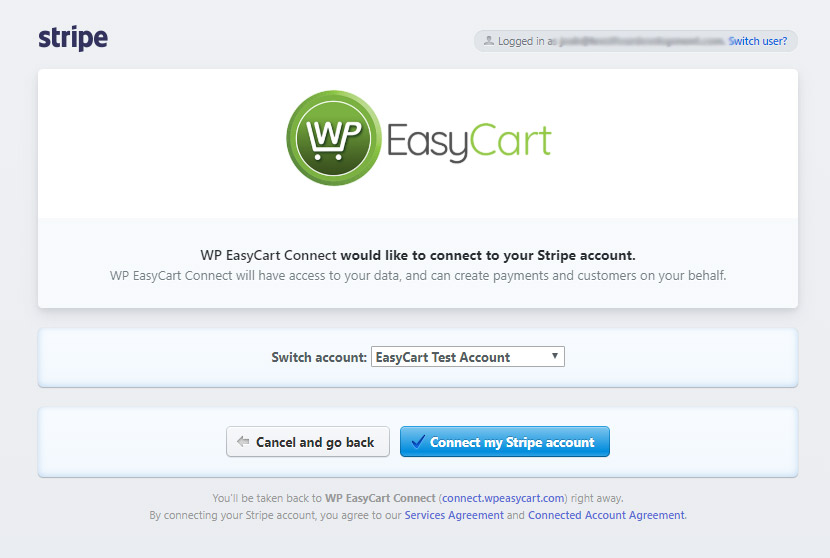
Stripe asks you to log in and choose which Stripe account to connect… that’s it! The Stripe line then says Connected · Live or Connected · Test mode. Its … menu connects the other account ( Connect live account or Connect a sandbox account ) and moves between them with Take live payments and Switch to test mode.
Stripe — Choose Your Account to Connect
Connecting Stripe in Pro & Premium
With WP EasyCart Professional & Premium licenses, you can connect to over 30+ different payment gateways — and Stripe connects in one click.
One-Click Connect
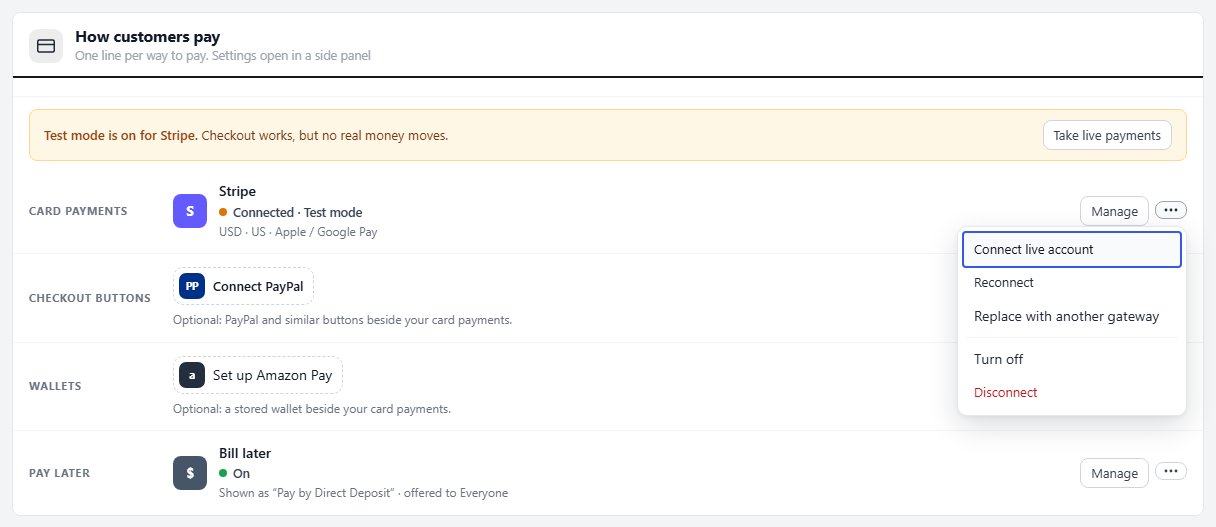
Go to WP EasyCart › Settings › Payments & Taxes › Payment and press Connect Stripe on the Card payments line, or Try sandbox on Stripe under Add or change a gateway to connect a Stripe test account first. Once Stripe is on, the … menu on its line holds every other action.
WP EasyCart — The Stripe Line and Its Menu
Select Your Stripe Account
Stripe will ask you to log in and pick which account to connect with. Simply select your account and you are now connected.
Stripe — Choose Your Account to Connect
Align Currency & Country
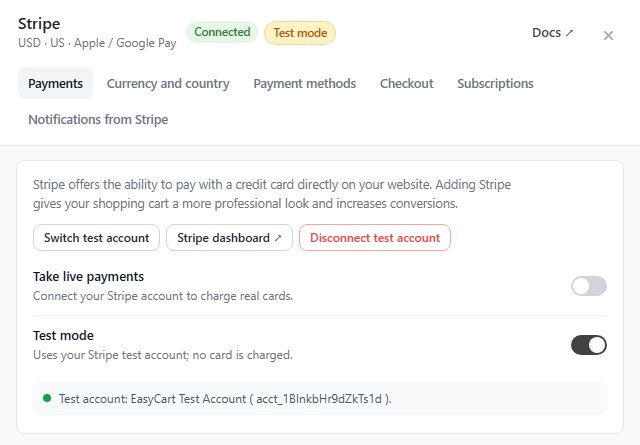
Manage on the Stripe line opens Stripe’s settings in a side panel, in tabs. On Currency and country you set the currency and business country for processing. It is important to keep consistent currency and country settings between your Stripe account and EasyCart. Check the Settings › Store › Store details panel to make sure your default country and currency align with what you’ll be processing here for Stripe. You can usually only process in one currency, so it should all be consistent. Changes wait for the Save button at the foot of the panel.
💡 Note to Sandbox Users: With a test account connected, turn on Test mode on the Payments tab, or use Switch to test mode in the Stripe line’s … menu, to test with Stripe test cards. Both accounts can stay connected.
WP EasyCart — Stripe Settings, Payments Tab
Prefer Your Own API Keys? ( PRO )
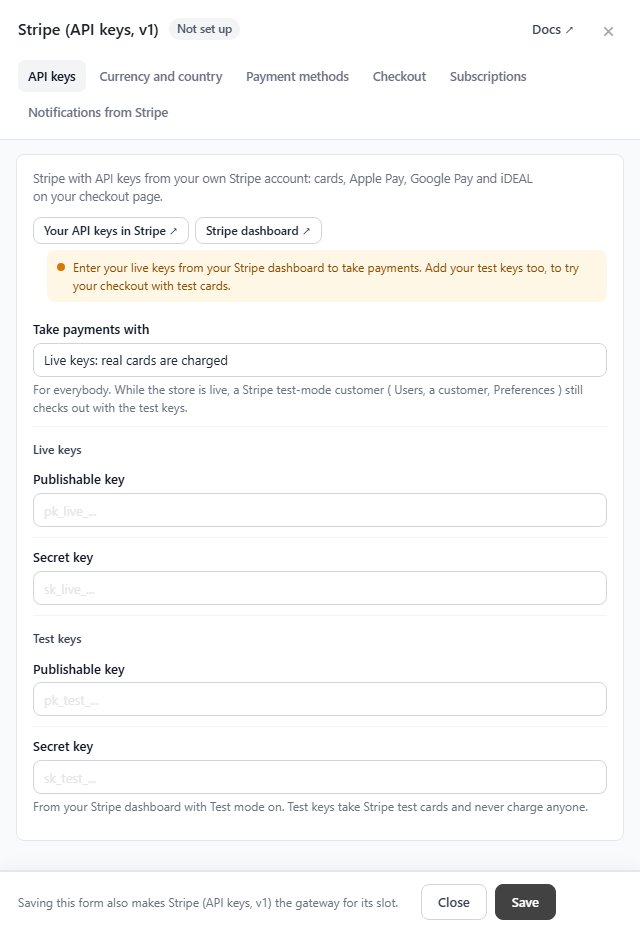
Stripe (API keys, v1) connects with the keys from your own Stripe account instead. Its API keys tab keeps Live keys and Test keys side by side, each a publishable key and a secret key, and Take payments with picks the pair the store uses. A note above the keys says how payments will run before you save, and a key in the wrong pair, or half a pair, is refused. You find it under Add or change a gateway, among the older gateways.
WP EasyCart — Stripe (API keys, v1)
Adding Your Webhook
A properly set up webhook lets Stripe talk back to your EasyCart on subscriptions, refunds, and other order processes. Now more than ever, a proper webhook setup with Stripe is critical.
Copy Your Webhook URL
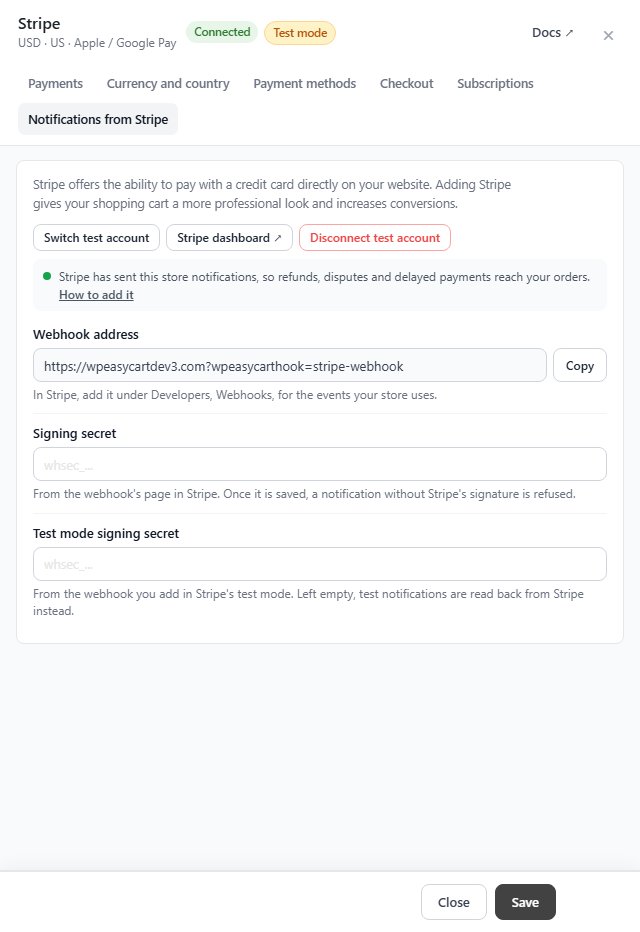
Find your webhook URL on Settings › Payments & Taxes › Payment: press Manage on the Stripe line and open the Notifications from Stripe tab, where it sits with a Copy button. That group also says whether Stripe has sent your store any notifications yet. Example webhook URL: https://www.yourwebsiteURL.com/?wpeasycarthook=stripe-webhook
Add the Endpoint on Stripe
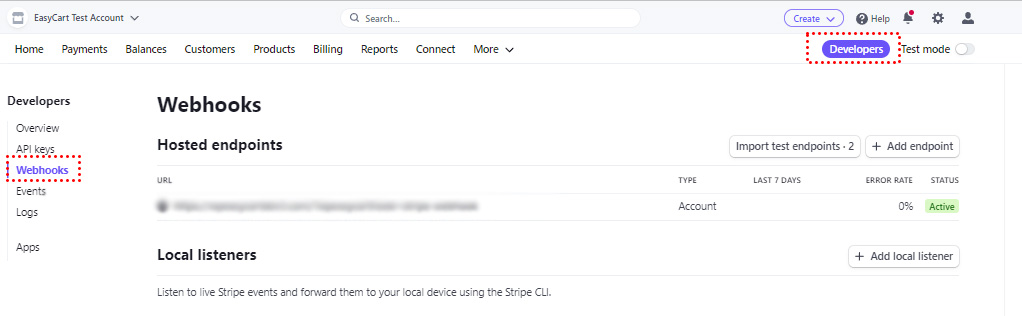
Visit Stripe › Developers › Webhooks and click +Add Endpoint. Here you can paste in the URL provided.
Stripe — Developers › Webhooks › Add Endpoint
Choose the Events to Send
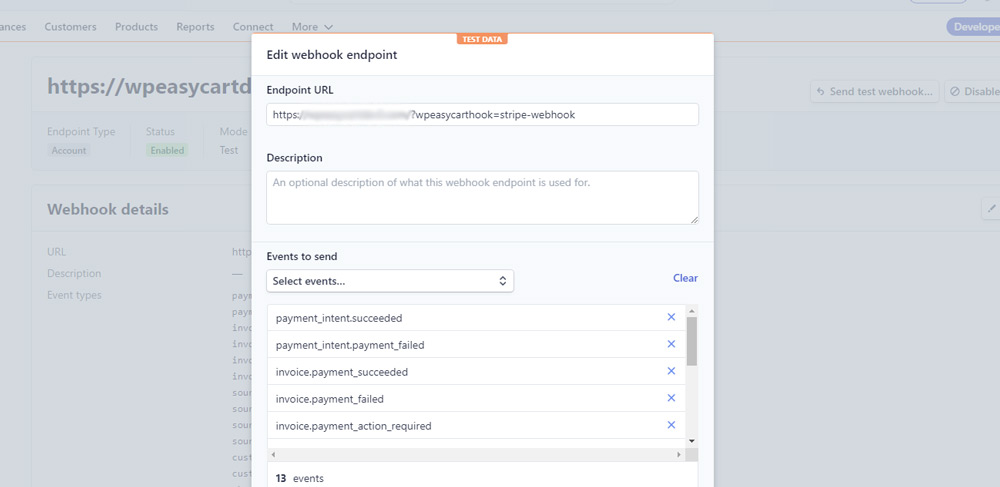
You must also set up which ‘Events’ to send — add every event listed below. Note that source.chargeable is important if you are using iDeal payments.
Required Webhook Events
payment_intent.succeededpayment_intent.payment_failedinvoice.payment_succeededinvoice.payment_failedinvoice.payment_action_requiredinvoice.createdsource.refund_attributes_requiredsource.failedsource.chargeablesource.canceledcustomer.subscription.trial_will_endcustomer.subscription.deletedcharge.refundedStripe — Webhook Events Selection
Enhance Stripe Webhook Security
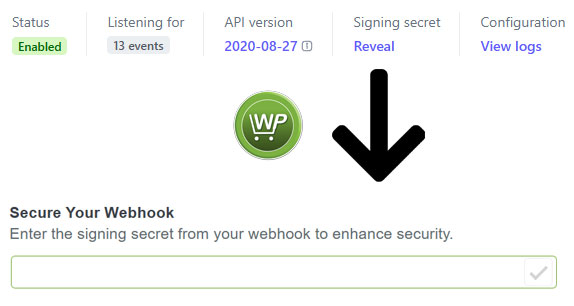
It is highly recommended that you use the “Webhook Signing Secret” to prevent unauthorized access of your webhook endpoint. You’ll find this value in your Stripe account while editing the webhook endpoint (after it is created) — it’s near the top of the screen, labeled “Signing Secret”, and clicking “Reveal” shows the value. Copy and paste that into the Signing secret field under Notifications from Stripe in WP EasyCart, and press Save. Testing too? Add the same webhook address in Stripe’s test mode and paste its secret into Test mode signing secret; left empty, test notifications are read back from Stripe instead.
WP EasyCart — Notifications from Stripe
Stripe — Webhook Signing Secret
Enabling 3D Secure & SCA
With the latest Stripe API, you can enable 3D Secure and the European Strong Customer Authentication (SCA) system for card approval. Once enabled, your payments automatically detect and display the proper two-part authentication needed during a payment.
Open the 3D Secure Settings on Stripe
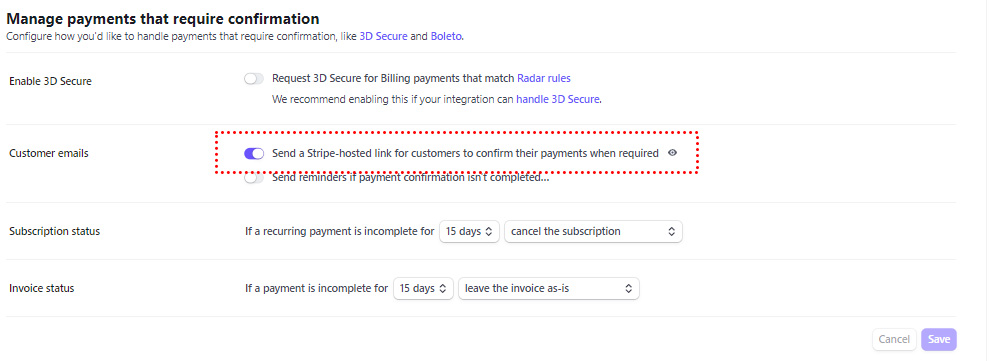
Visit Stripe › Settings › Subscriptions and Emails (Stripe Apps Section) › Manage payments that require 3D Secure.
Enable Stripe-Hosted Authentication Emails
You will need to enable Customer Emails › Send a Stripe-hosted link for cardholders to authenticate when required. This step is required in order to allow 3D Secure to work with all areas of EasyCart and its subscription system with Stripe.
Stripe — 3D Secure Settings
Testing Payments
Stripe makes it easy to switch between testing mode and live mode — but keep in mind that customers, products, subscriptions, and other data you build in test mode may also need to be built in live mode. For the most part, testing is fairly seamless: switch EasyCart to test mode, use Stripe test cards to see it in action, then take live payments again and it all goes live.
Switch EasyCart to Test Mode
Go to WP EasyCart › Settings › Payments & Taxes › Payment and press Switch to test mode in the Stripe line’s … menu, or turn on Test mode on the Payments tab of Stripe’s settings. A line above the ways to pay then says Test mode is on for Stripe, and its Take live payments button switches back.
WP EasyCart — Stripe in Test Mode
View Test Data on Stripe
Visit Stripe and move the slider to ‘Viewing Test Data’ — Stripe provides an easy switch on their interface to see live and test mode data and transactions.
Stripe — Viewing Test Data Slider

Run Stripe Test Cards
Stripe provides test cards at stripe.com/docs/testing#cards, which you can easily read through — or use the cards below for easy reference in test mode.
- Test VISA Card:
4242 4242 4242 4242(any expiration date in the future and any CVC #) - Test SCA Card:
4000 0000 0000 3220(any expiration date in the future and any CVC #) — you should receive an extra authentication window with this card while testing.
Or Test on Your Live Store
Already live? Open a staff customer account under Users › User Accounts and turn on Stripe test-mode customer on its Tax & Preferences tab. While that customer is signed in, checkout uses your Stripe test account or test keys and takes test cards only, and the payment step says so; every other customer and guest still pays live. Their orders are flagged Test payment on the order screen and refund in test mode, and your admin screens stay live. Without a test account or test keys, that customer pays live and is warned.
💡 Good to know: The card form does not ask for a ZIP or postal code of its own. Stripe takes it from the billing address the shopper entered at checkout, so the two always match.
Try the PRO features free for 14 days
Anything marked PRO comes with WP EasyCart PRO or Premium. Take the whole thing for a run on your own store before you decide.