How customers pay
One line for each way to pay, with its gateway and its state
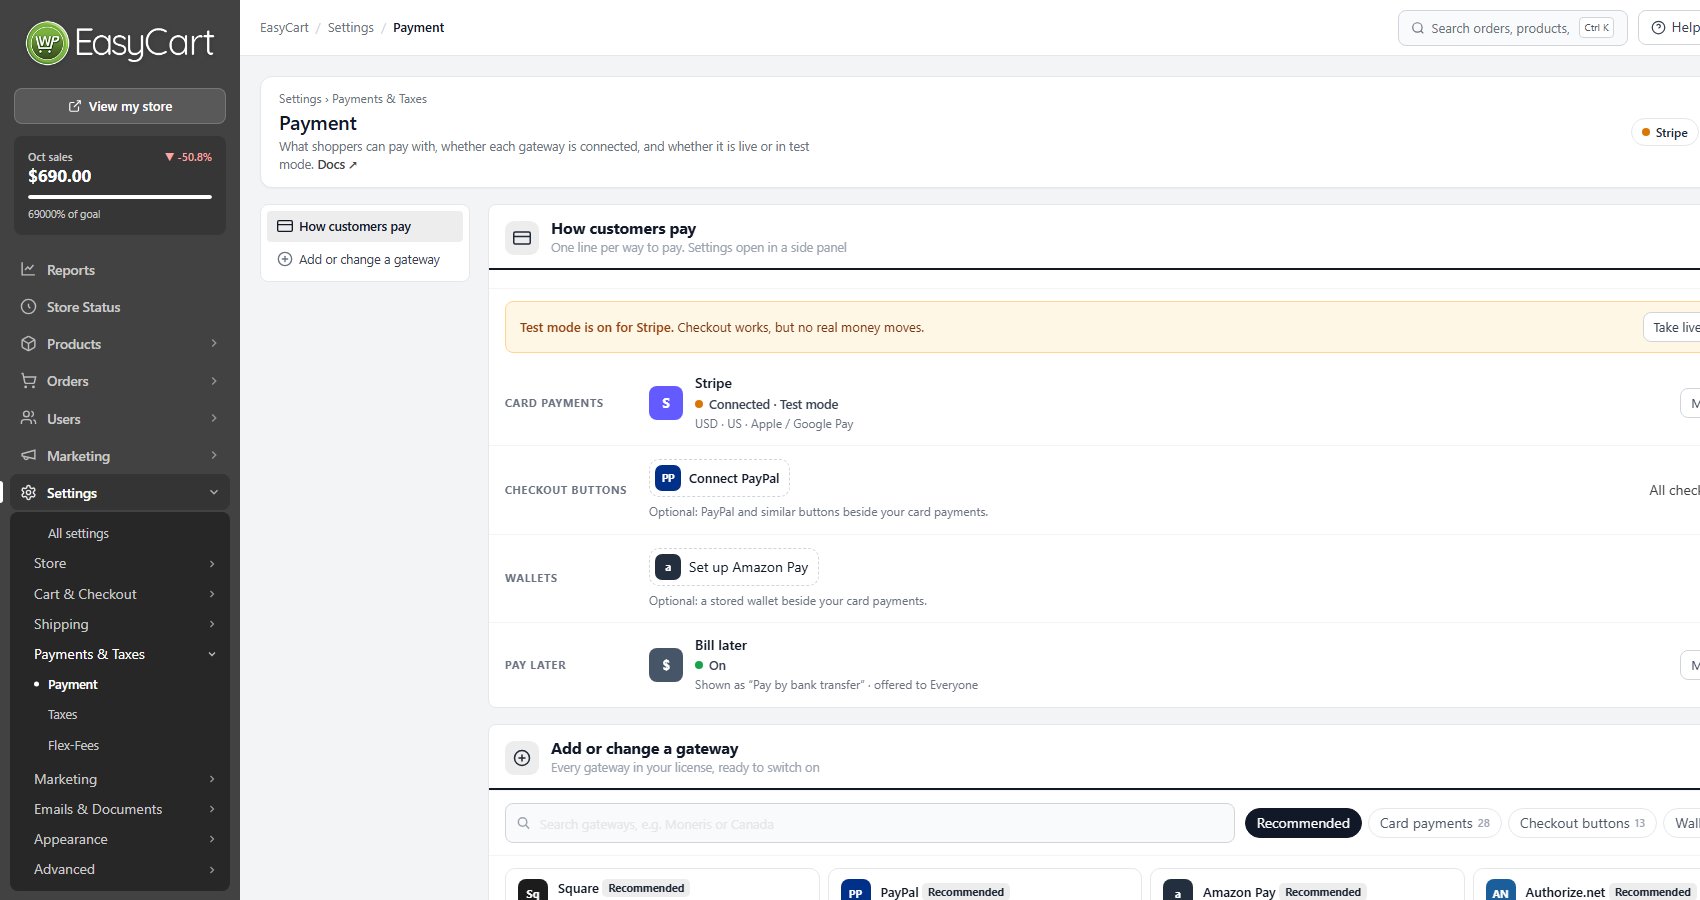
no stored settingsThe first card lists the ways a shopper can pay, one line each, named the way shoppers think of them:
Card payments: cards entered on your checkout page, through one card gateway such as Stripe or Square.
Checkout buttons: shoppers finish paying on the provider’s site, such as PayPal.
Wallets: a stored account such as Amazon Pay, alongside the gateways above.
Pay later: the order is placed now and the shopper pays you offline, with Bill later. Its line says what shoppers see, Pay by bank transfer unless you rename it, and who it is offered to.
Each line shows the gateway, its state in plain words, and the account and main choices behind it. The states are Connected · Live, Connected · Test mode, Selected, not set up, Off, a gateway that needs a PRO or Premium licence, and Needs a newer WP EasyCart PRO. The same gateways sit as small pills beside the page title, so you can check them from the top of the page.
A line with nothing chosen suggests the recommended gateways instead: Connect Stripe or Connect Square for card payments, Connect PayPal for checkout buttons. All card gateways and All checkout buttons open the full list below. Until a card gateway is on, the card payments line says Shoppers can’t pay by card on your site yet. The suggestions follow your store country, set in Settings › Store details: Square is only suggested where Square takes payments.
Apple Pay with Square. With Square taking live payments and its digital wallets on ( PRO ), WP EasyCart sets Apple Pay up on your domain by itself: it puts Square’s Apple Pay file on your site, registers the domain with Square and keeps the file up to date. The Square line says when anything still needs doing, such as Apple Pay needs https, Apple Pay needs your live domain or Apple Pay blocked by your host, with what to do and a Check again button. When a host’s firewall stops Square checking the domain, the note says what to ask your host to allow. A Square sandbox account is never set up for Apple Pay.
For a step by step walkthrough, see How to Take Your First Payment.
Manage, and the … menu
Settings in a side panel, every other action one click away
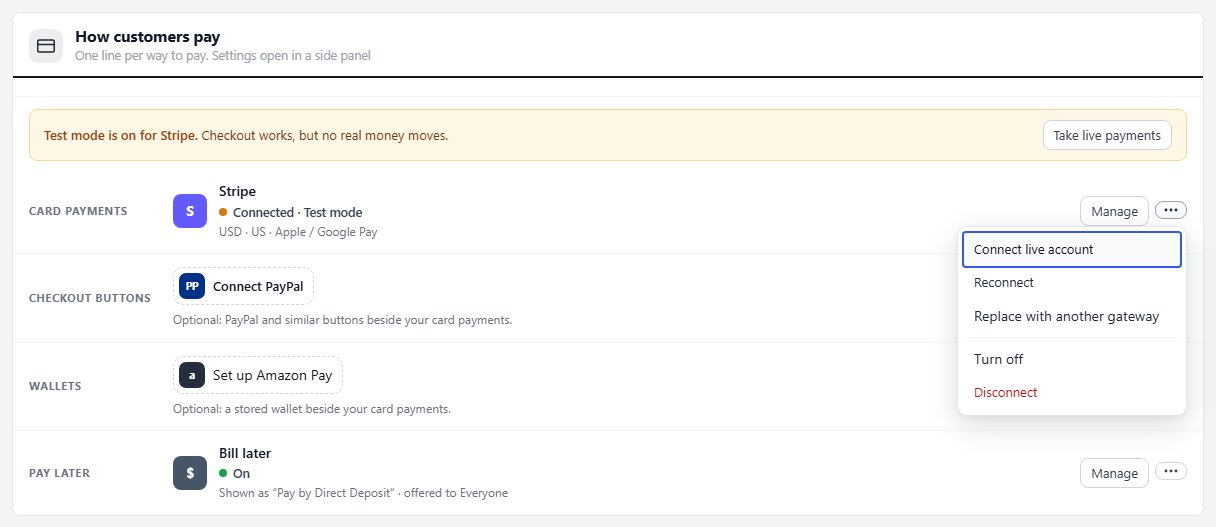
no stored settingsManage opens the gateway’s settings in a side panel. A gateway that is chosen but not ready shows Connect or Finish setup there instead.
The … button beside it holds everything else the gateway can do:
Take live payments or Switch to test mode: moves the gateway between its live and test accounts, when both are set up.
Connect live account and Connect a sandbox account: for Stripe, Square and PayPal, connect the account that is still missing. A store that started in a sandbox connects its live account here.
Reconnect: signs in to the provider again. Square also has Renew access.
Replace with another gateway: opens the list to pick a different one for the same line.
Turn off or Turn on: takes the gateway off the checkout, or puts it back, without losing its settings.
Disconnect: removes the stored keys from this site, after you confirm. Revoke access in your account with the provider too.
Turning a gateway on or off and switching test mode update the page in place. Connect, Reconnect and Disconnect take you to the provider and back. On the free edition, the first Connect asks you to accept the EasyCart Connect terms.
A gateway’s settings
One side panel, one Save button
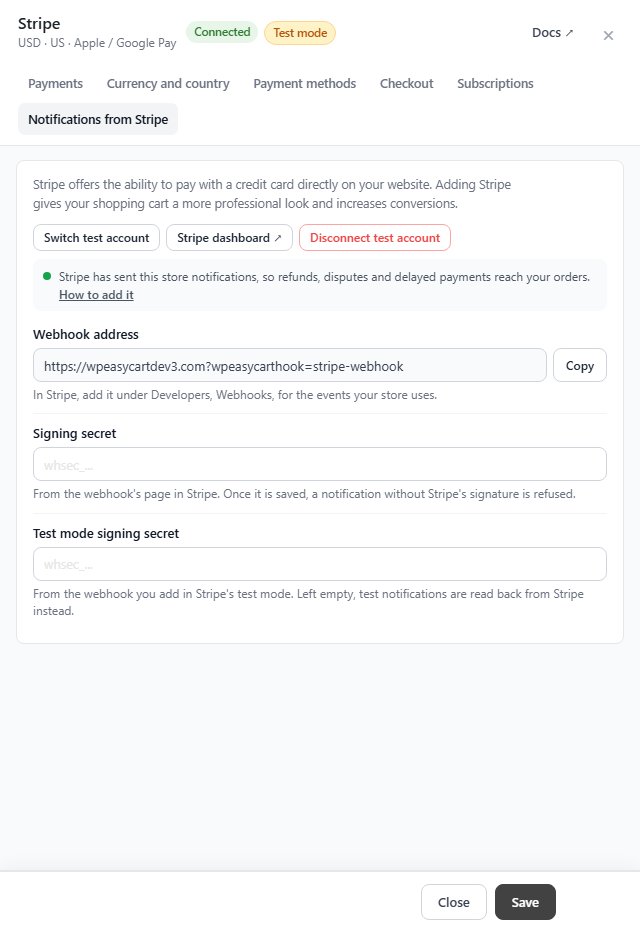
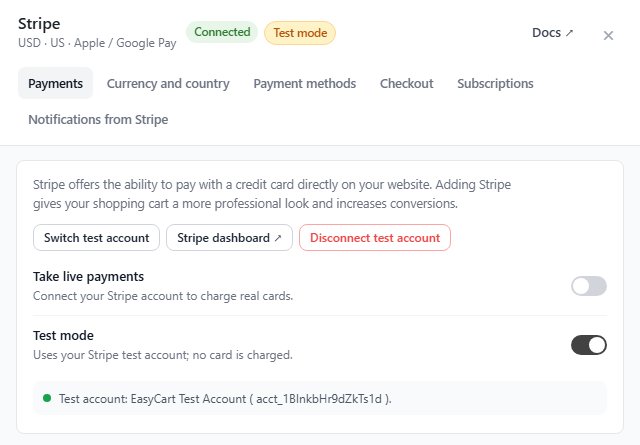
no stored settingsEvery gateway’s settings open in the same side panel. Its header repeats the state, such as Connected and Test mode, and a panel with three or more groups shows them as tabs. Stripe’s are Payments, Currency and country, Payment methods, Checkout, Subscriptions and Notifications from Stripe.
Changes wait for the one Save button at the foot of the panel, so you can change several things and save them together. The exceptions are the live and test switches that connect or choose an account, which act straight away. Close the panel with changes still unsaved and it asks before throwing them away. Some gateways that are not on yet offer Save and turn on, which does both. Where saving also makes the gateway the one on its line, the panel says so beside the buttons, and replacing another gateway asks first.
Where a gateway needs its provider to send notifications back, the address to give the provider is shown with a Copy button. Stripe’s panel also takes the Signing secret of that webhook and a separate Test mode signing secret for the webhook you add in Stripe’s test mode. Without notifications, your store never hears about refunds, disputes and delayed payments made on the provider’s side.
When a payment fails, see How to Fix Payment Failed and Gateway Errors.
Test mode
The single most important thing to check before going live
no stored settingsA gateway in test mode takes no real money. That is exactly what you want while building, and exactly what you must not leave behind.
While any gateway is in test mode, a line above the ways to pay says so, for example Test mode is on for Stripe. Checkout works, but no real money moves. Its Take live payments button switches every gateway that has a live account to live. A gateway without one stays in test mode and the page names it, with the reason. When nothing is in test mode, the line is gone.
To switch one gateway, use Take live payments or Switch to test mode in its … menu, or the Take live payments and Test mode switches in its settings. A gateway with no live account yet asks you to connect one first.
Place one real order end to end before you announce the store. A gateway that connects successfully and authorises in sandbox can still fail live for reasons the connection check cannot see, such as an account not yet approved for live processing.
Stripe: test-mode customers and your own keys
Try your live store with test cards, and keep live and test keys apart
no stored settingsTest-mode customers. With Stripe live, a customer account switched to Stripe test-mode customer ( Users › User Accounts, the customer’s Tax & Preferences ) checks out with your Stripe test account or test keys, while every other customer and guest pays live. It is meant for staff test accounts, so you can try the real store with a test card. The payment step tells that customer they are in test mode. Their orders carry a yellow Test payment flag on the order screen, and refunding one runs in test mode too. Admin screens always stay in the store’s own mode. If no test account or test keys are set up, the customer pays live, and the payment step warns them.
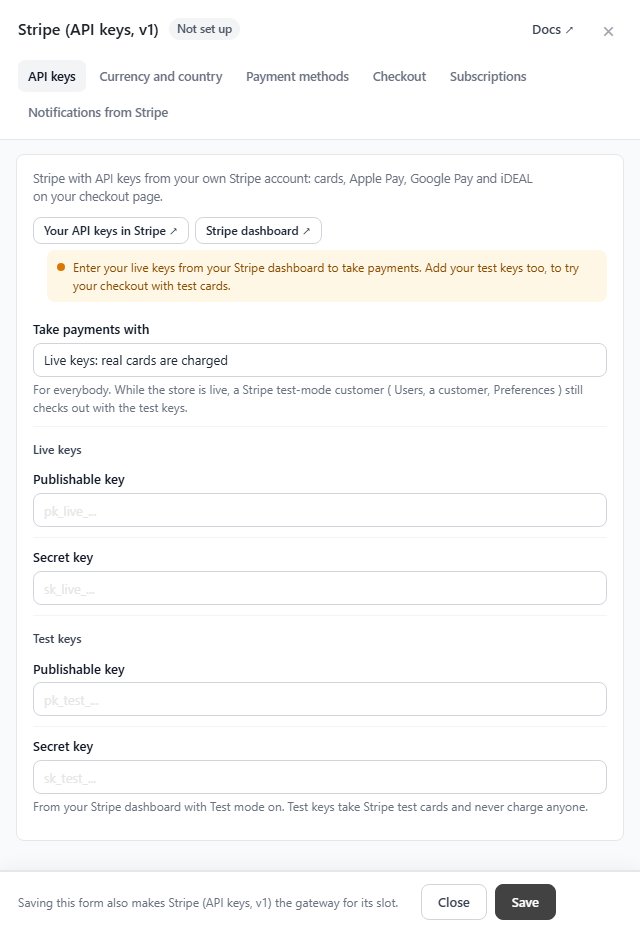
Your own API keys ( PRO ). Stripe (API keys, v1) is Stripe with keys from your own Stripe account instead of a connected account. Its API keys tab keeps Live keys and Test keys side by side, each a Publishable key and a Secret key, and Take payments with chooses the pair the store uses. A note above them says how payments will run, including how many accounts are test-mode customers, and it updates before you save. Saving is refused when a key is in the wrong pair, half a pair is missing or the chosen pair is empty. Its line on the page says which keys are saved.
Diagnostics shows the same thing: whether Stripe is live, how many test-mode customers there are, and a warning when test mode is chosen without test keys.
Bill later ( Pay by bank transfer )
Take the order now, collect payment yourself, for everyone or chosen roles
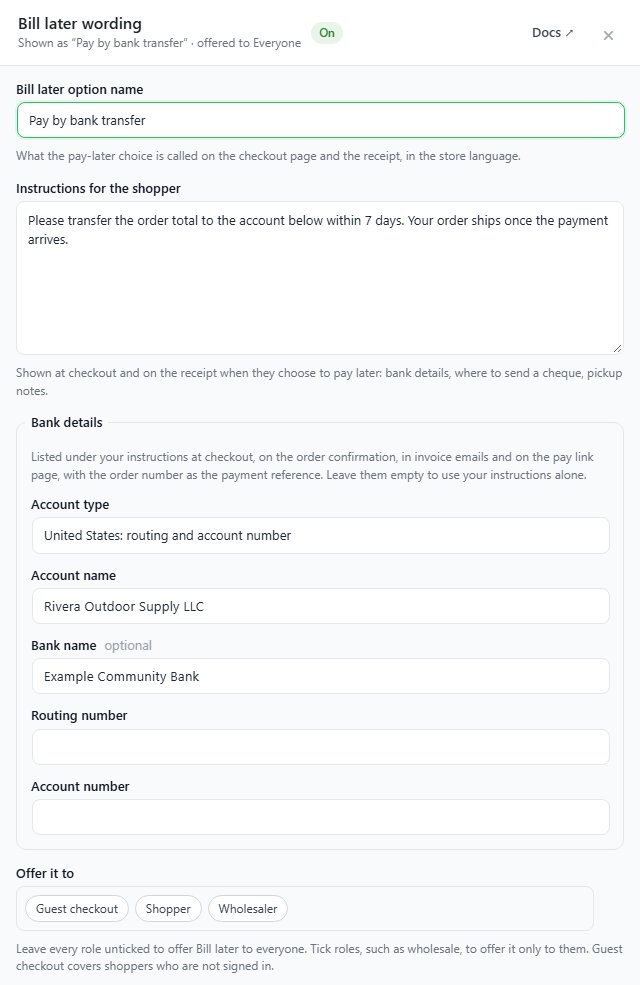
no stored settingsBill later is the offline option on the Pay later line: the order is placed and you collect payment yourself, by bank transfer, cheque or on pickup. Shoppers see it as Pay by bank transfer unless you rename it. It is free in every edition and can be on at the same time as a card gateway and checkout buttons.
Manage on its line opens the Bill later wording. The Bill later option name is what shoppers pick at checkout and what the receipt shows, in the store language. The Instructions for the shopper appear at checkout and on the receipt when they choose it: where to send a cheque, pickup notes, how soon to pay.
Bank details take your account in the format your country uses. Account type starts on your store country’s and offers United Kingdom ( sort code and account number ), IBAN for Europe and other IBAN countries, Australia ( BSB and account number ), New Zealand, United States ( routing and account number ), Canada ( an Interac e-Transfer email or transit and account numbers ) and another country ( account number and SWIFT ). Only the fields for that type show, and a mistyped IBAN, BIC, sort code or BSB is refused before anything saves. The details are listed under your instructions at checkout, on the order confirmation, in invoice emails and on the pay link page, with the order number as the payment reference. Leave them empty to use your instructions alone.
Offer it to limits who sees it. Leave every role unticked and everyone can choose Bill later. Tick roles, such as a wholesale role, and only customers signed in with one of them see it. Guest checkout covers shoppers who are not signed in. The line repeats the name and who it is offered to, so you can check it at a glance.
That makes it the tidy way to give trusted trade accounts invoice terms without letting every retail shopper skip payment.
For a step by step walkthrough, see How to Invoice Trade Customers on Net 30.
Add or change a gateway
Search by name or country, recommended gateways first
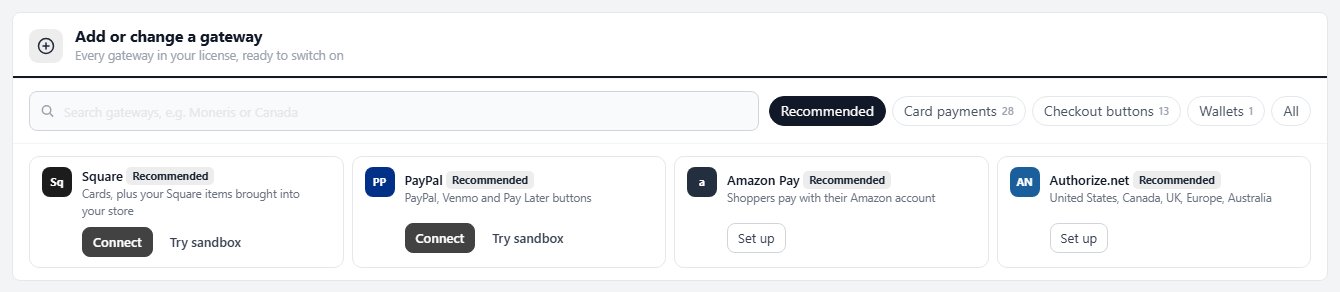
no stored settingsThe second card lists every gateway that is not already in use. Type in Search gateways to find one by name or by the country it works in, such as Moneris or Canada. The filters show Recommended, Card payments, Checkout buttons, Wallets or All, with a count on each.
The list follows your store country, set in Settings › Store details. The recommended gateways come first: Stripe, Square, PayPal and Amazon Pay, then the ones stores in your country choose most, such as Moneris for Canada, eWay for Australia or Redsys for Spain, and Authorize.net where there is no local favourite. Gateways made for your country come next. A gateway that does not take payments for stores in your country, Square outside its eight countries for example, is folded away and marked Not offered to stores in your country. Rarely chosen gateways are folded away under Show older gateways; they still work, and a search finds them too. Each gateway shows one short line on what it is or where it works, and the button that fits: Connect and Try sandbox for Stripe, Square and PayPal, Set up for the rest, or Turn on for one already set up.
On the free edition, gateways that need PRO or Premium carry a lock and open a short preview, and a note says that EasyCart Connect adds a 2% fee to Stripe, Square and PayPal payments, which a PRO or Premium licence removes.
Subscriptions need Stripe. Subscription and membership products are billed through Stripe only, so they can only be bought while Stripe takes your card payments. On another card gateway, Square for example, shoppers see a message instead of a checkout on a subscription product, and the page shows a Subscriptions need Stripe row with how many subscription products cannot be bought.
For subscriptions step by step, see How to Sell Subscriptions on WordPress.
Ready to run your store on WP EasyCart?
Everything in this guide works with the free plugin. PRO and Premium add subscriptions, memberships, wholesale pricing and more. Try every PRO feature free for 14 days.