Shipping Setup
Live USPS Shipping Rates
USPS is a popular shipper and one of the easiest live rate systems to set up with WP EasyCart. Here’s every way to connect — and exactly how the USPS rate system behaves once you do.
How Live Shipping Rates Work
Know what live rates CAN and CAN NOT do before you connect.
Live rates come straight from the carrier, based on specific data your site sends. When you create a product in EasyCart, assign it default package Length, Width, and Height dimensions plus a Weight value. EasyCart uses these to build a ‘best fit’ package and combined weight from every shippable item in the cart — then, at checkout, it sends the customer’s ship-to postal code and your ship-from postal code to get rates.
What Live Shipping Rates Won’t Do
Rates stop at the price — label purchasing is a separate step.
Live rates provide customer shipping prices directly from the carrier — they don’t submit a package or purchase shipping labels as part of post-order fulfillment. WP EasyCart Premium offers options to connect with providers who specialize in that, such as ShipStation or Stamps.com, where you can purchase actual labels and match them against what the customer paid. Live rates also won’t reflect discounted pricing from third-party systems like ShipStation, Stamps.com, GoShippo, or PirateShip.
Setting Up USPS Live Shipping
No more building your own USPS developer app — it’s an easy ON/OFF switch now.
In the past, you had to create your own developer account and build an app within USPS to get credentials. That’s been replaced with an easy ON/OFF system that uses the EasyCart USPS connected app for rates. There are three ways to connect to USPS live rates. As of January 2026, the old connection method has been discontinued by USPS. To get started, log into WordPress and visit WP EasyCart › Settings › Shipping Settings.
Three Ways to Connect
1. Enable USPS (recommended)2. Enter Your Own Credentials3. Revert to Webtools (legacy)Method 1 — EasyCart USPS Connected App
The recommended and easiest method. No developer account required.
Enable USPS
Simply switch ‘Enable USPS’ on and enter the origin zip code you’ll ship from. This uses our EasyCart USPS connected app to get rates without any messy developer sign-up or API key process. Look for a green ‘Connected’ status light once it’s successfully communicating with USPS.
WP EasyCart — Enable USPS (screenshot pending upload)
Method 2 — USPS Developer Credentials & App
Prefer your own direct developer account? Here’s the path.
Register & Generate Your Client ID/Secret
Visit developer.usps.com and create an account for your site. Register at the levels required and generate your Client ID and Client Secret. It’s a good idea to follow their own procedures at developers.usps.com/getting-started. Once you have both values, enter them in EasyCart under ‘Enter Your Own Credentials’.
WP EasyCart — USPS Client ID & Secret (screenshot pending upload)
Method 3 — Old Webtools Method
A legacy fallback, kept alive only as long as USPS keeps it running.
Discontinued by USPS as of January 2026
We’ve left this method here as a backup in case USPS continues to operate or keep it running. It’s their old webtools system and requires you to obtain and request access to USPS API rates. We may remove this section in the near future once we’re confident their new V3 system is running smoothly.
Register & Request Webtools Access
Visit usps.com/business/web-tools-apis. Create an account, register, and email webtools@usps.gov to request API access to their webtools system. You should receive a userid and MID via email during registration.
WP EasyCart — Legacy USPS Web Tools Credentials (screenshot pending upload)
Setting Up Individual Rates
Now that you’re connected, choose which live rates customers actually see.
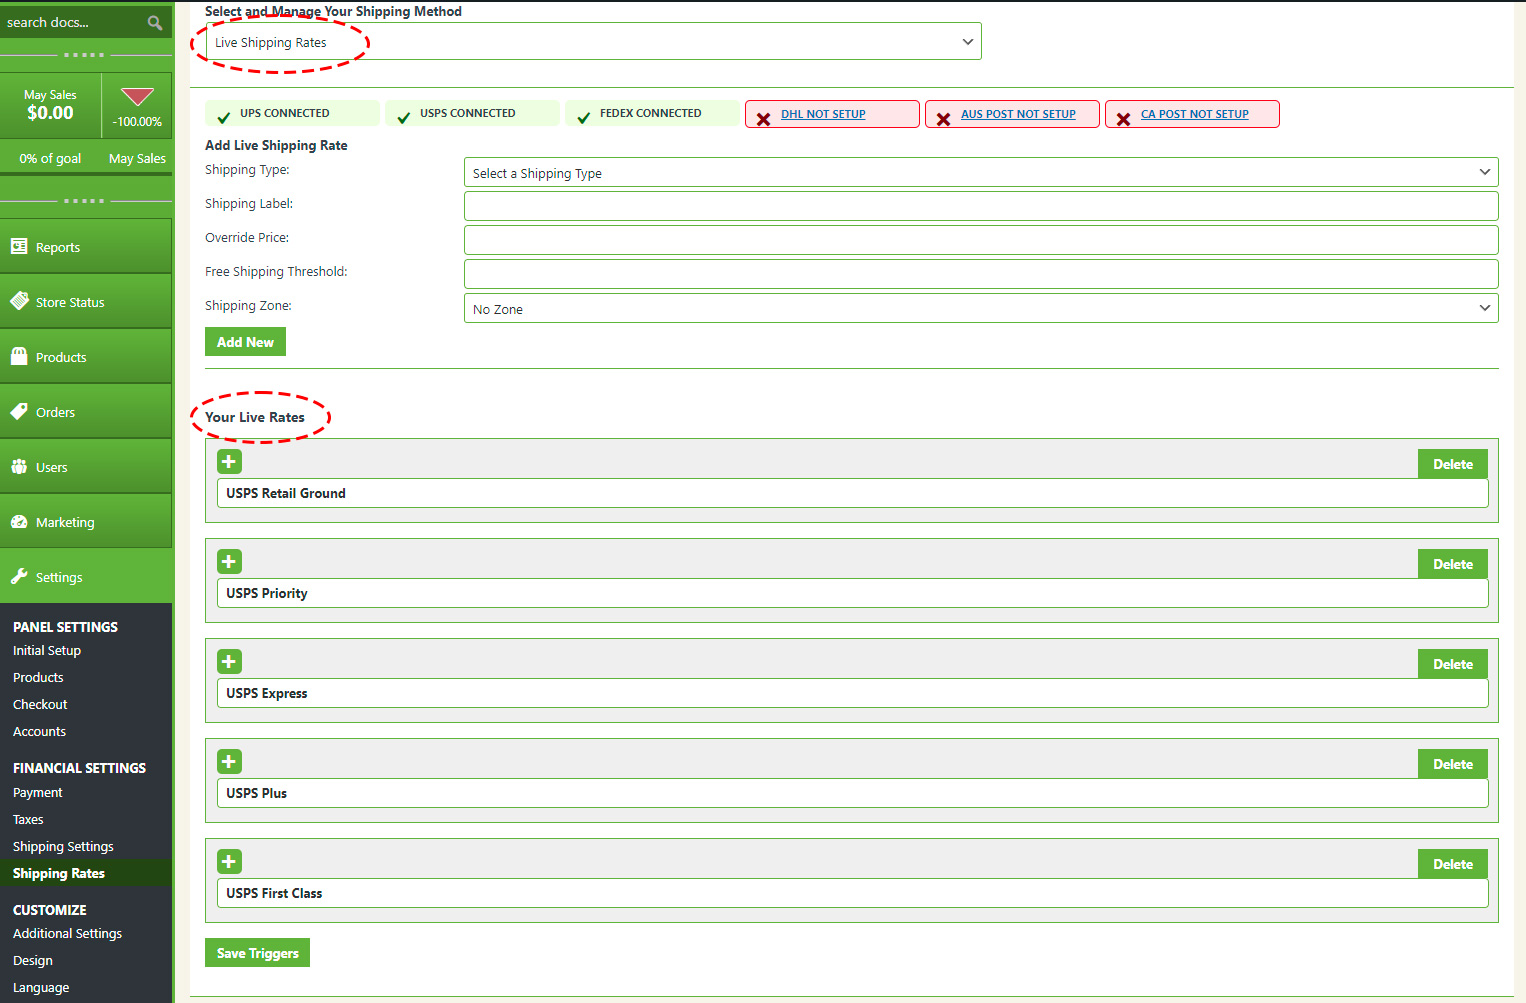
Go to WP EasyCart › Settings › Shipping Rates and engage ‘Live Shipping Rates’ as your store’s shipping choice. In this example, we’ve turned on Live Shipping Rates at the top, and some Live Rates have already been pre-installed below — add to or remove them based on your situation.
- Override Price: Make the rate show a set price you establish here.
- Free Shipping Threshold: Make one specific live rate free once a cart value is reached — for example, $100+ orders qualify for free USPS ground shipping.
- Shipping Zones: Use carefully. Zones are simply a post-address filter, not a way to limit shipping — the API is smart enough to only show a rate if it actually ships to that location. We recommend ‘No Zone’ unless you explicitly know what you’re doing.
💡 Special Considerations: Setting up a shipping rate doesn’t mean every customer will see it — ground shipping to an island may not work, some locations never offer 2nd or next day air, and some rates only apply internationally. Start out by adding as many rates as possible and test with various important addresses and locations you plan to ship to. Make sure ‘SOME’ of the rates return in each situation — you may have 10 rates set up, but a customer at a certain address may only see 2 or 3 of them.
WP EasyCart — Live Shipping Rates
Product Considerations
A couple of product-level checks make sure live rates calculate correctly.
Go to WP EasyCart › Products and edit one of your shippable items — make sure it’s shippable and has weight and dimensions set. Choose ‘Standard’ or ‘Metric’ units in WP EasyCart › Settings › Shipping Settings: Standard units (lb/in) or Metric (oz/cm) are sent to carriers depending on your selection. Also make sure ‘Enable Shipping’ is on under Shipping Options so this item factors into the calculation. A neat feature: you can add a handling fee — per item or one time — that stacks on top of the shipping rate. You can also set a global handling fee in your shipping settings panel.
WP EasyCart — Product Shipping Options

You’re Connected!
Your cart now pulls live USPS rates based on every shippable item inside it. Every order shows you the customer’s selected shipping choice and what they paid for it — use any shipper service and pay for shipping accordingly. Want post-order fulfillment and label purchasing too? Check out the PRO and Premium editions, which connect to third-party shipper services for exactly that.
Get Accurate USPS Rates Today
One click connects you to live USPS rates — no developer account, no API keys, no hassle. Need a hand along the way?