
Financial Settings
Stripe Bank Redirect Payments
Bank redirects let customers pay online using their bank account — and they drive more than half of online commerce in Germany, the Netherlands, and Malaysia. Enable each one with two quick toggles: one in EasyCart, one in Stripe. The right option then appears at checkout automatically.
Who Bank Redirects Are For
A conversion booster in the markets where shoppers already pay by bank. Bank redirects are often used by:
- Retailers that want to improve conversion and reduce fraud with consumers in Europe and Asia Pacific.
- Software or service businesses collecting one-time payments from other businesses.
💡 Heads up: Bank redirects might not be a good fit for your business if you sell subscriptions.
Country, Currency & Customer Rules Apply
These special payment options are heavily dependent on the country your Stripe account is established in, as well as the customer and currencies involved. Be sure to check the special considerations next to each gateway so you understand when and where the payments will appear. The Payment methods tab lists the methods shoppers in your store’s country use most first, such as iDEAL for a store in the Netherlands, Bancontact in Belgium or BLIK in Poland.
Helpful Quick Links
Everything Stripe in one place — from first connection to every special gateway EasyCart supports.
- Get Connected: Connecting Stripe in Free Edition or Connecting Stripe in Pro & Premium Edition — including One-Click Connect, Adding Your Webhook, Enabling 3D Secure & SCA, and Testing Payments
- Wallets & Quick Payments: Enabling Stripe Wallet & Quick Payments — Apple Pay/Google Pay/Microsoft Pay, AliPay, GrabPay, WeChat Pay, Link Payments
- Buy Now, Pay Later: Enabling Buy Now, Pay Later Gateways — Affirm, Afterpay / Clearpay, Klarna
- Bank Redirects (this page): Enabling Bank Redirects — Bancontact, BLIK, EPS, iDeal, Przelewy24
- Real-Time Payments: Enabling Real-Time Payments — Pix, PayNow, PromptPay
- Bank Debits: Enabling Bank Debits — BECS Direct Debit in Australia
Enabling Bancontact
With the latest Stripe API + EasyCart, you can offer Bancontact easily and effectively. First, the special considerations — be sure you meet these country and currency restrictions and any other special cases for this gateway.
- Available Countries: Australia, Austria, Belgium, Bulgaria, Canada, Croatia, Cyprus, Czech Republic, Denmark, Estonia, Finland, France, Germany, Gibraltar, Greece, Hong Kong, Hungary, Ireland, Italy, Japan, Latvia, Liechtenstein, Lithuania, Luxembourg, Malta, Mexico, Netherlands, New Zealand, Norway, Poland, Portugal, Romania, Singapore, Slovakia, Slovenia, Spain, Sweden, Switzerland, UK, US
- Available Currencies: EUR
- Customer’s Required Location: Belgium
Enable Bancontact in EasyCart
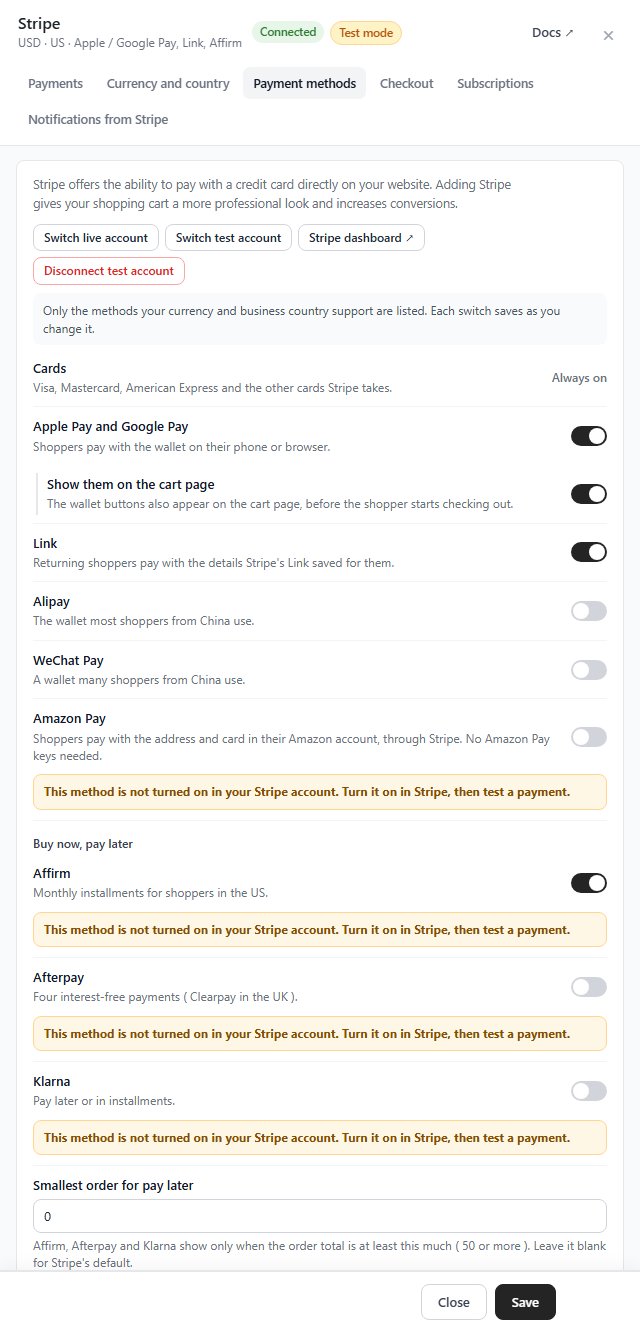
In WordPress, go to WP EasyCart › Settings › Payments, press Settings on Stripe’s card, open the Payment methods tab, turn on Bancontact and press Save. The tab lists only the methods your Stripe currency and business country support. With PRO, the ones shoppers in your country use most also have their own switch in What shoppers can pay with on the same page, which saves as you flip it. That’s all that’s required to enable Bancontact in the EasyCart checkout process.
WP EasyCart — Stripe’s Payment Methods Tab ( a US store; bank redirects show for accounts in their countries )
Enable Bancontact in Stripe
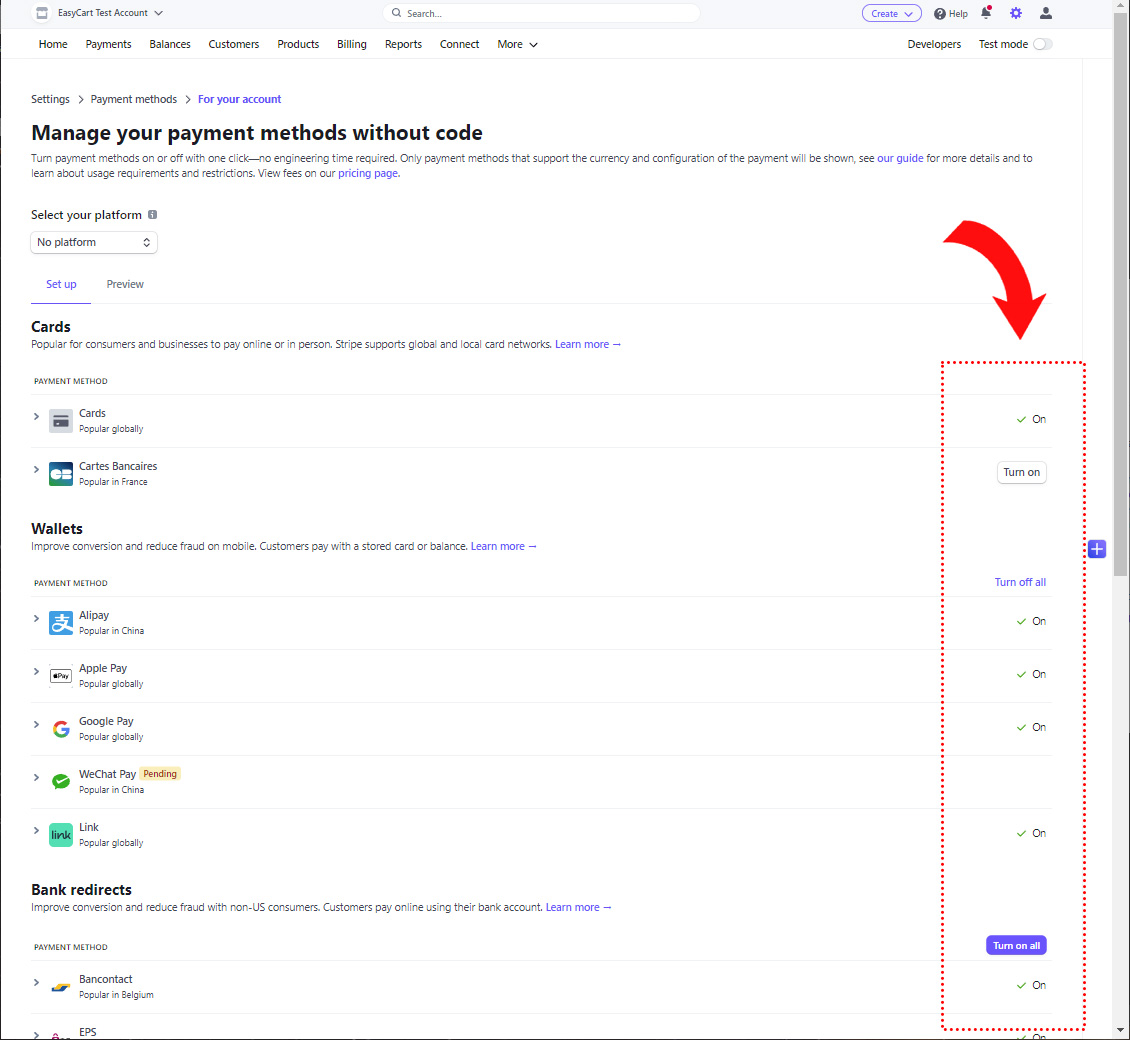
Next, visit Stripe › Settings › Payment Methods › Bancontact. Here you can enable the payment system within your Stripe account.
Stripe — Payment Methods Panel
Watch It Appear at Checkout
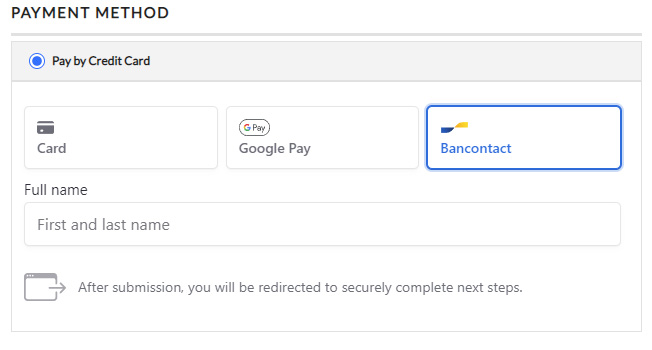
Now when customers go to checkout, they get the choice of Stripe credit card processing — and the Bancontact option appears whenever the order and parameters meet the requirements.
EasyCart Checkout — Bancontact Option
Enabling BLIK
With the latest Stripe API + EasyCart, you can offer BLIK easily and effectively. First, the special considerations — be sure you meet these country and currency restrictions and any other special cases for this gateway.
- Available Countries: Austria, Belgium, Bulgaria, Croatia, Cyprus, Czech Republic, Denmark, Estonia, Finland, France, Germany, Gibraltar, Greece, Hungary, Iceland, Ireland, Italy, Latvia, Liechtenstein, Lithuania, Luxembourg, Malta, Netherlands, Norway, Poland, Portugal, Romania, Slovakia, Slovenia, Spain, Sweden
- Available Currencies: PLN
- Customer’s Required Location: Poland
Enable BLIK in EasyCart
In WordPress, go to WP EasyCart › Settings › Payments, press Settings on Stripe’s card, open the Payment methods tab, turn on BLIK and press Save. The tab lists only the methods your Stripe currency and business country support. With PRO, the ones shoppers in your country use most also have their own switch in What shoppers can pay with on the same page, which saves as you flip it. That’s all that’s required to enable BLIK in the EasyCart checkout process.
Enable BLIK in Stripe
Next, visit Stripe › Settings › Payment Methods › BLIK. Here you can enable the payment system within your Stripe account.
Stripe — Payment Methods Panel
Watch It Appear at Checkout
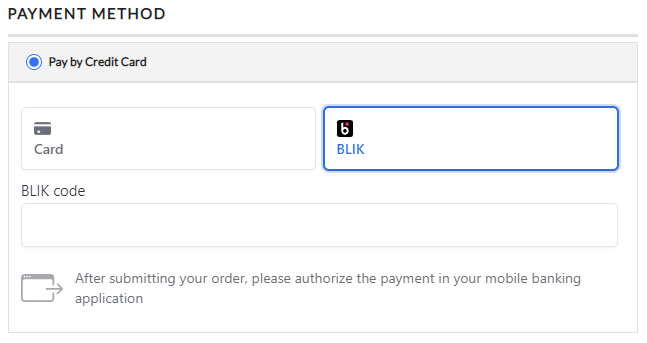
Now when customers go to checkout, they get the choice of Stripe credit card processing — and the BLIK option appears whenever the order and parameters meet the requirements.
EasyCart Checkout — BLIK Option
Enabling EPS
With the latest Stripe API + EasyCart, you can offer EPS easily and effectively. First, the special considerations — be sure you meet these country and currency restrictions and any other special cases for this gateway.
- Available Countries: Australia, Austria, Belgium, Bulgaria, Canada, Croatia, Cyprus, Czech Republic, Denmark, Estonia, Finland, France, Germany, Gibraltar, Greece, Hong Kong, Hungary, Ireland, Italy, Japan, Latvia, Liechtenstein, Lithuania, Luxembourg, Malta, Mexico, Netherlands, New Zealand, Norway, Poland, Portugal, Romania, Singapore, Slovakia, Slovenia, Spain, Sweden, Switzerland, UK, US
- Available Currencies: EUR
- Customer’s Required Location: Austria
Enable EPS in EasyCart
In WordPress, go to WP EasyCart › Settings › Payments, press Settings on Stripe’s card, open the Payment methods tab, turn on EPS and press Save. The tab lists only the methods your Stripe currency and business country support. With PRO, the ones shoppers in your country use most also have their own switch in What shoppers can pay with on the same page, which saves as you flip it. That’s all that’s required to enable EPS in the EasyCart checkout process.
Enable EPS in Stripe
Next, visit Stripe › Settings › Payment Methods › EPS. Here you can enable the payment system within your Stripe account.
Stripe — Payment Methods Panel
Watch It Appear at Checkout
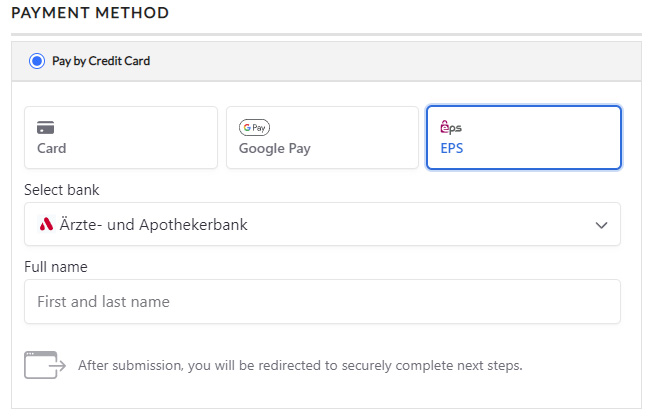
Now when customers go to checkout, they get the choice of Stripe credit card processing — and the EPS option appears whenever the order and parameters meet the requirements.
EasyCart Checkout — EPS Option
Enabling iDeal
With the latest Stripe API + EasyCart, you can offer iDeal easily and effectively. First, the special considerations — be sure you meet these country and currency restrictions and any other special cases for this gateway.
- Available Countries: Australia, Austria, Belgium, Bulgaria, Canada, Croatia, Cyprus, Czech Republic, Denmark, Estonia, Finland, France, Germany, Gibraltar, Greece, Hong Kong, Hungary, Ireland, Italy, Japan, Latvia, Liechtenstein, Lithuania, Luxembourg, Malta, Mexico, Netherlands, New Zealand, Norway, Poland, Portugal, Romania, Singapore, Slovakia, Slovenia, Spain, Sweden, Switzerland, UK, US
- Available Currencies: EUR
- Customer’s Required Location: Netherlands
Enable iDeal in EasyCart
In WordPress, go to WP EasyCart › Settings › Payments, press Settings on Stripe’s card, open the Payment methods tab, turn on iDeal and press Save. The tab lists only the methods your Stripe currency and business country support. With PRO, the ones shoppers in your country use most also have their own switch in What shoppers can pay with on the same page, which saves as you flip it. That’s all that’s required to enable iDeal in the EasyCart checkout process.
Enable iDeal in Stripe
Next, visit Stripe › Settings › Payment Methods › iDeal. Here you can enable the payment system within your Stripe account.
Stripe — Payment Methods Panel
Watch It Appear at Checkout
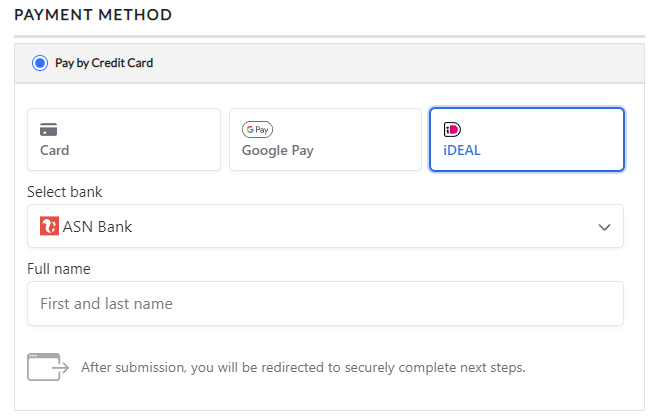
Now when customers go to checkout, they get the choice of Stripe credit card processing — and the iDeal option appears whenever the order and parameters meet the requirements.
EasyCart Checkout — iDeal Option
Enabling Przelewy24
With the latest Stripe API + EasyCart, you can offer Przelewy24 easily and effectively. First, the special considerations — be sure you meet these country and currency restrictions and any other special cases for this gateway.
- Available Countries: Australia, Austria, Belgium, Bulgaria, Canada, Croatia, Cyprus, Czech Republic, Denmark, Estonia, Finland, France, Germany, Gibraltar, Greece, Hong Kong, Hungary, Ireland, Italy, Japan, Latvia, Liechtenstein, Lithuania, Luxembourg, Malta, Mexico, Netherlands, New Zealand, Norway, Poland, Portugal, Romania, Singapore, Slovakia, Slovenia, Spain, Sweden, Switzerland, UK, US
- Available Currencies: EUR, PLN
- Customer’s Required Location: Poland
Enable Przelewy24 in EasyCart
In WordPress, go to WP EasyCart › Settings › Payments, press Settings on Stripe’s card, open the Payment methods tab, turn on Przelewy24 and press Save. The tab lists only the methods your Stripe currency and business country support. With PRO, the ones shoppers in your country use most also have their own switch in What shoppers can pay with on the same page, which saves as you flip it. That’s all that’s required to enable Przelewy24 in the EasyCart checkout process.
Enable Przelewy24 in Stripe
Next, visit Stripe › Settings › Payment Methods › Przelewy24. Here you can enable the payment system within your Stripe account.
Stripe — Payment Methods Panel
Watch It Appear at Checkout
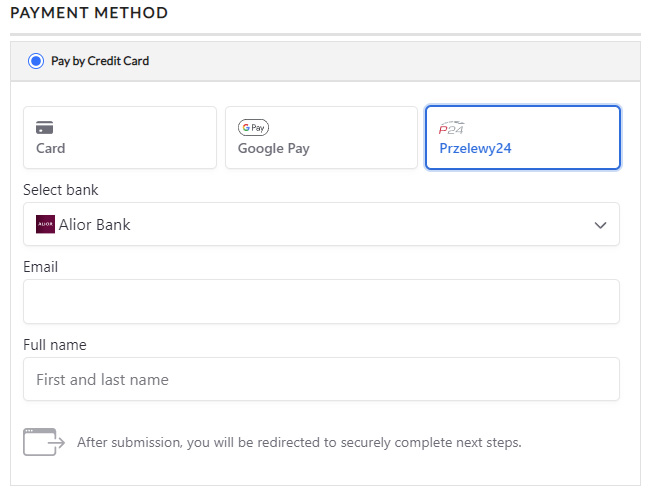
Now when customers go to checkout, they get the choice of Stripe credit card processing — and the Przelewy24 option appears whenever the order and parameters meet the requirements.
EasyCart Checkout — Przelewy24 Option
Try the PRO features free for 14 days
Anything marked PRO comes with WP EasyCart PRO or Premium. Take the whole thing for a run on your own store before you decide.