How to Create a New Basic Option Set
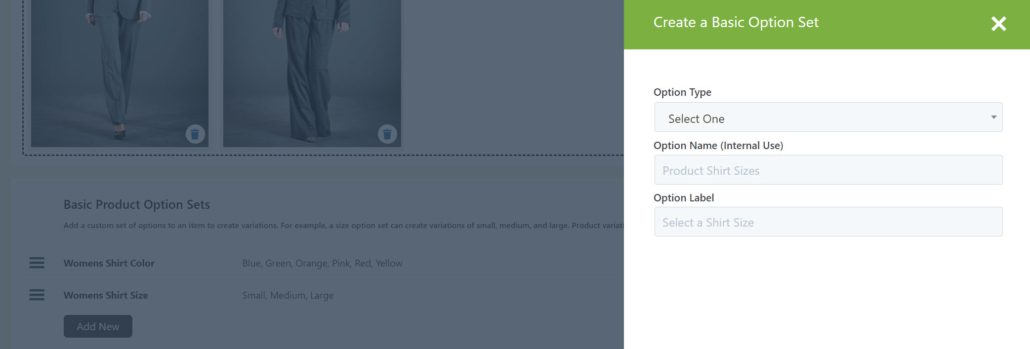
When editing a product, you can create a whole new basic option set, without ever leaving the page. To start, click the “+ Create New Option Set” button in the top right corner of the basic product option sets box.

NOTE: Clicking the ‘Create New Option Set’ button will open a slide-out panel based on if you have selected advanced options or not. To manage option sets, edit option sets, or edit and manage option items you may do so on the WP EasyCart -> Products -> Option Sets panel.
First create the option set. The first step is to decide what type of option. Do you want a combo box or swatches? Swatches are icons a user can click and a combo box is a select box the customer can choose one option from.
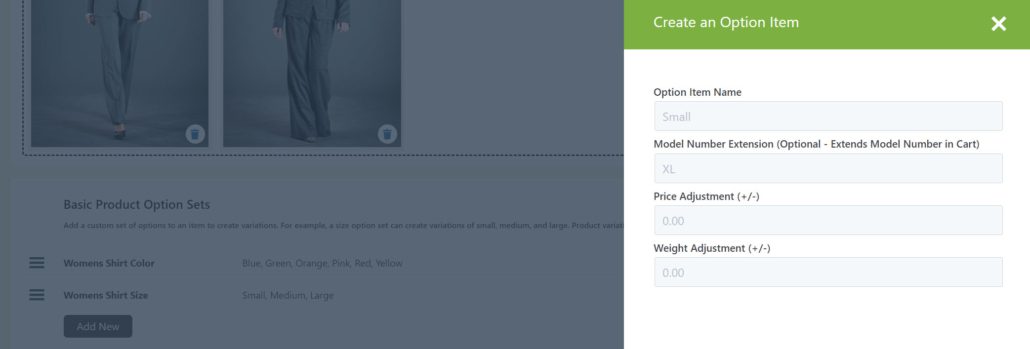
Once you do this you can enter option items one at a time. The best example of what you are building is first saying I want to give my product multiple sizes. Second you tell the EasyCart what sizes you are selling. Option sets can be reused if you have similar products.
Basic Option Set Types: Combo boxes and swatches
Examples: Sizes, colors, material, etc… Things like Medium, Large, Green, Wood, Metal are common option items.
Advantages to using Option Sets:
- Option Sets track individual variants.
- Option Set variants can have unique SKU or Model Numbers
- Option Sets can have individually tracked inventory values
Disadvantages to using Option Sets:
- The maximum limit is 5 different option sets, each can contain unlimited option items.
- Variants are created for every combination, so 2 option sets with 50 option items is 2,500 variants. Can get large quickly!
- Limited to combo box or image swatch types.
Once the basic option set is created, it is automatically added to your product. You should now create the items for the option set, along with any price adjustments that will always apply to the product.
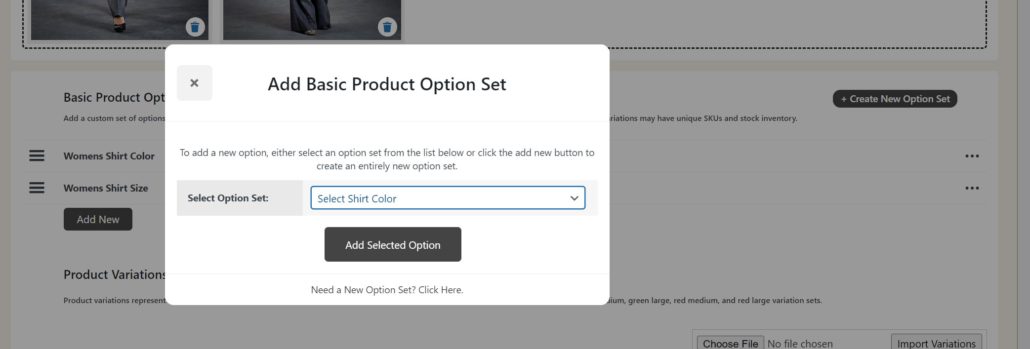
How to Add Existing Basic Option Set
There are times where you can reuse option sets on multiple products and in this case you can click the ‘add new’ button. This also applies to situations where you build the option set first in the WP EasyCart -> Products -> Option Sets panel. Simply select the option set and add it. Notice that anytime you add or change the basic option sets you will reset your variation data. This is because variations rely on the combination of the option items listed above.
How to Edit, Remove, or Manage Items for an Option Set from a Product
Each option row has a three dot icon to the right that has a menu. This menu offers a way to edit the option set, manage items, or remove the option set. Click the three dots and select the action you wish to take. Remember, editing option items or removing an option set from a product will regenerate / reset your variation data.

Product Variations
How to Manage Product Variations
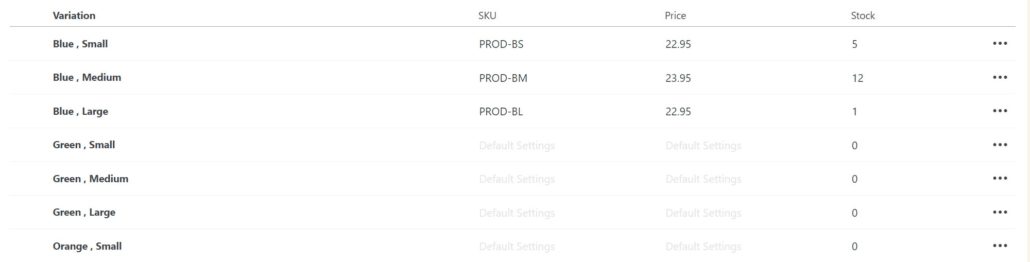
Product variations represent all combinations of your basic product option sets. For example, a size and color option might create a blue small, blue medium, green medium, green large, red medium, and red large variation set. Each combination is essentially it’s own item and can be customized to have a special SKU (model number), price, and stock total. To update the SKU, price, or stock, simply click into the text box and enter the information. Once you change the field, it will automatically be saved. Tab through the content to quickly edit.
How to Manage Lots of Variation Data
In some cases the manual entry of data is just too much to manage. In this case we recommend exporting the variation set, editing the CSV file, then upload using the import variations form. This will allow you to mass-update inventory data, skus, or custom pricing.

How to Enable Variation Inventory Tracking
There are several ways to do this. The easiest way is to click the label ‘Tracking Items Disabled’ and change the preferred stock tracking type. You may also scroll down and expand the quantity options box, then change the quantity tracking method.
![]()
Option Sets & Variant Limitations
Because option sets and variants are designed to allow unique SKU, price, and stock quantity tracking, they create more overhead by combining every possible combination into a line item. This should be used knowing that it adds exponentially. If you offer 3 basic option sets each with 20 option items…. that is 20^3 or 20 x 20 x 20 combinations… or 8,000 different combinations.
EasyCart will paginate the variant section for you but it will also warn you that you might want to switch to modifiers as they can handle that much better by not producing individual line items for each one. It is doubtful anyone will enter individual SKU or quantities for 8,000 combinations.
Switching from Basic Option Sets & Variants to Modifiers
In order to switch, we make it easy. This way you can go from a variant based option system to just modifiers for more flexibility and better/faster operations.
- First, it’s easiest to edit your product and remove the basic option sets that you will be switch from the product. Click the 3 dots on the right side to remove the basic option set.
- Next, use the left menu under ‘Product -> Option Sets’. This is the main option set manager.
- Find and edit your option set. Notice the picture below shows us editing a “Basic Swatch” and we can use that first drop down to change it to an ‘Advanced Swatch’.
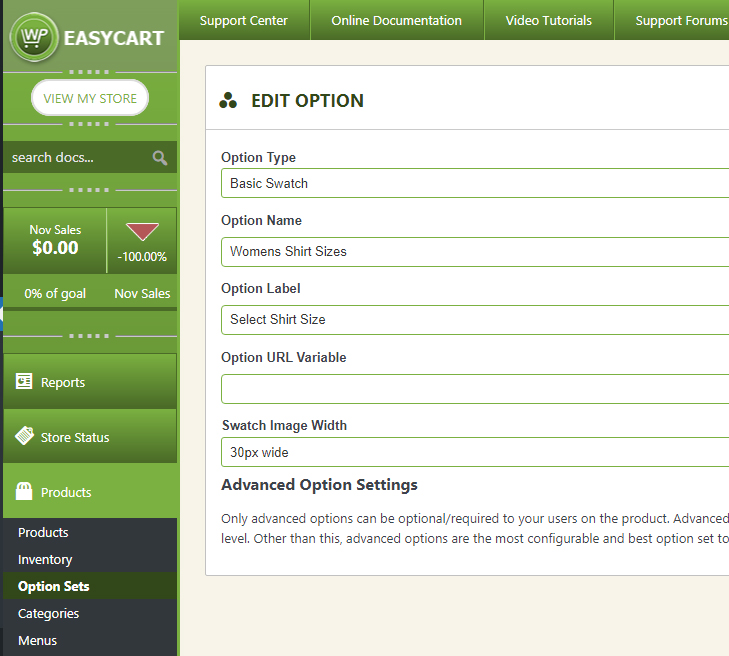
4. Save the option and it is now an advanced option, all we need to do is attach this to our product.
5. You can go back to your product and edit it at this time, you will find this is now in the ‘Modifier’ section ready to attach to your product. Simply click ‘Add New’ and locate it and attach. You have now switched from a Basic option set to an Advanced modifier.
Product Modifiers (Advanced Options)
How to Manage Product Modifiers (Advanced Options)
Modifier Types: Combos, Swatches, Textboxes, Text Areas, Check Boxes, Radio Groups, File uploads, Dimensional, Numeric, and more.
Examples: Collect registration information, event dates, size combinations on big orders, reservation date ranges, and many more. Think anything you need to collect for a product when a customer buys this item and modifiers will take care of it for you.
Advantages to using Modifiers:
- Unlike options where you are limited to 5, Modifiers are unlimited.
- Modifiers include combo and swatches, but also many other types such as text boxes, check boxes, file uploads and more.
- Modifiers can have conditional logic to show or hide based on another option choice.
- Modifiers have more flexible price, weight, even file download configurations.
Disadvantages to using Modifiers:
- The only disadvantage is you can not track quantity individually for each combination of modifier. This is due to the inability to really quantify some such as text boxes, file uploads and others.
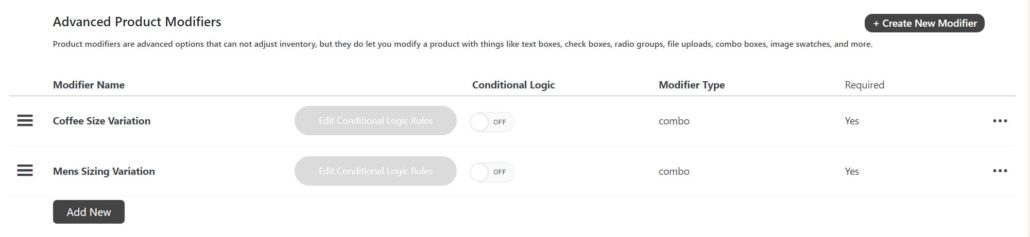
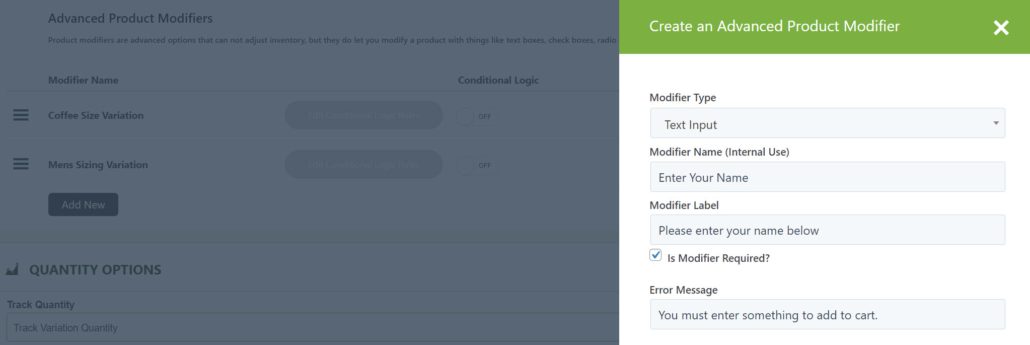
To add product modifiers, use the ‘+ Create New Modifier’ button and follow the steps to create your new modifier. You may use the ‘add new’ button to attach a pre-existing modifier to the product.
Once you click “+ Create New Modifier”, a slide out will appear for you to create the option set. Select the type, enter a name, enter a label, and enter requirements if necessary.
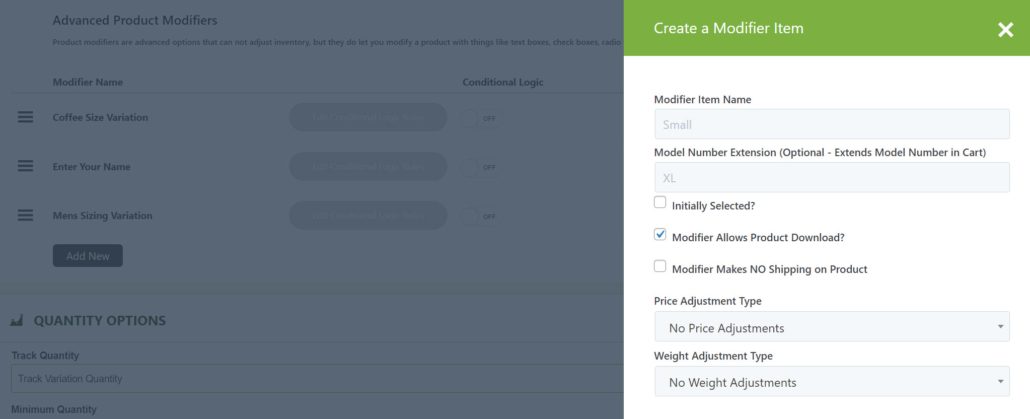
After you create the modifier, it is automatically added to your product’s modifier list. You will also be given the chance to add option items, when necessary. This applies to things like select box, swatches, radio buttons, checkboxes, and more.
Note: Advanced options are usually the best choice to use, unless you need to track individual option quantities, then you must use basic options.
How to Sort Your Product Modifiers
Sorting of modifiers can be done by hovering over the three bar icon to the left of the modifier row. Click and drag the entire row up and down to set the sort to your liking.
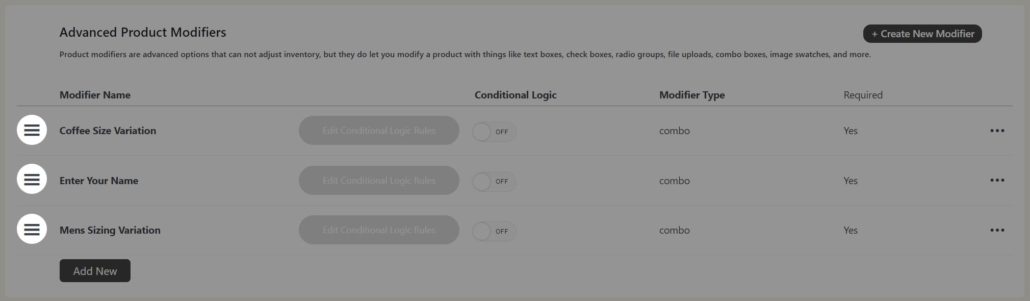
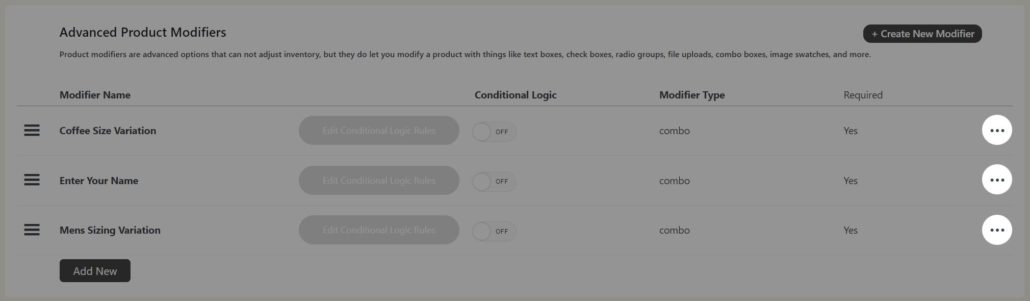
How to Edit, Remove, or Manage Modifier Items from a Product
To manage the modifier you have already created, use the three dot icon to the right in the row for a modifier. By clicking the icon, you will get a secondary menu to allow you to edit, remove, or manage the modifier items.
How to Manage Modifier / Advanced Option Conditional Logic
Conditional logic is available for modifiers to help you show/hide other modifiers when a specific value is selected. This feature allows you to completely customize your products based on customer selections. A good example of how to use this feature would be to offer a combo box that gives a customer an option to select if they want to customize their merchandise. If they select yes, we make a text box appear to have them enter their custom message. If they select no, we keep it hidden.
Video Guide – Using Conditional Logic Option SystemsAdvanced option sets sometimes require conditional logic to best display across your EasyCart products. Learn more in this video how to best setup and create conditional logic option sets and variants. |  |
To enable conditional logic, toggle it on within the line item of the modifier.
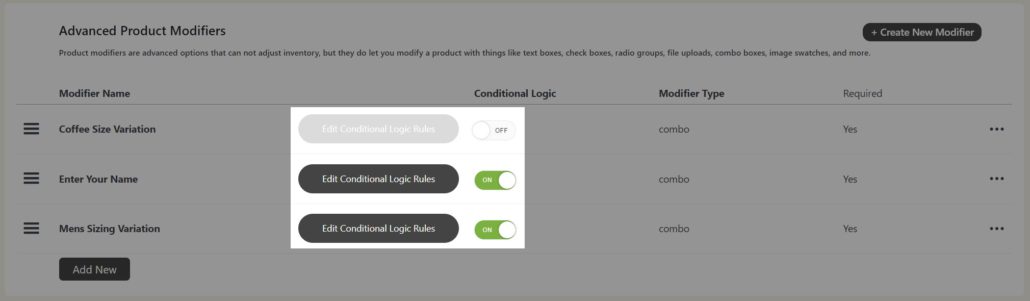
To add / edit / delete rules for a modifier, click the edit conditional logic rules button. Note that you can manage these rules with the rules disabled and enable them later. When editing rules for an item, you should consider if you want to hide or show the element WHEN some conditions are met. Most cases you will wish to show only if some or all conditions are met.
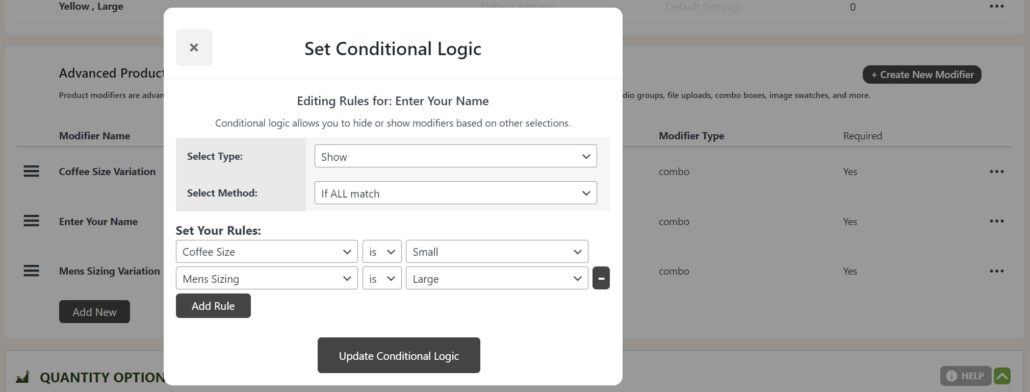
You may have as many rules as you need, but keep in mind that there are really no guidelines for your rules, meaning there are cases where you could set your rules and the option set never shows due to the combination selected being impossible to create for the customer. Keeping it as simple as possible is always a smart way to go to prevent these types of logic errors.