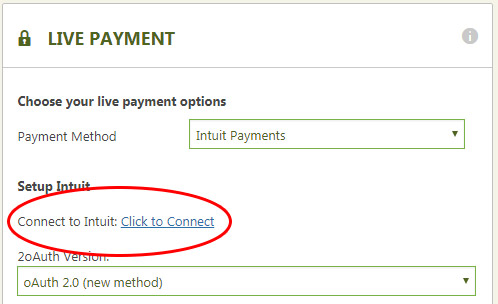
Financial Settings
Intuit Payment Settings
Take payments through Intuit and sync with your QuickBooks Online file. There are two paths: a 1-click authorization through the WP EasyCart App — the fast lane — or a direct oAuth connection you build yourself in the Intuit developer console. Both are covered below, start to finish.
Intuit Setup V3 (WP EasyCart 4.0.20+)
The recommended route. WP EasyCart offers a 1-click authorization with Intuit — two steps and you’re connected.
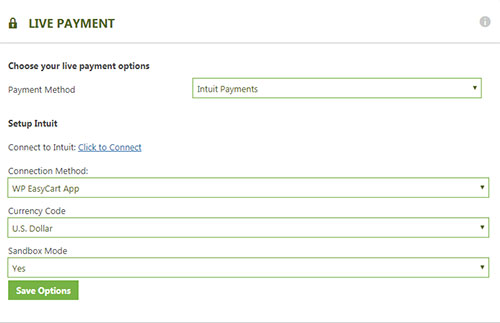
Select ‘WP EasyCart App’ & Connect
Select the connection type ‘WP EasyCart App’. Once you select this, also choose sandbox or production and click save, then refresh the page. Once you do, click to connect.
WP EasyCart — Intuit V3 Connection Type
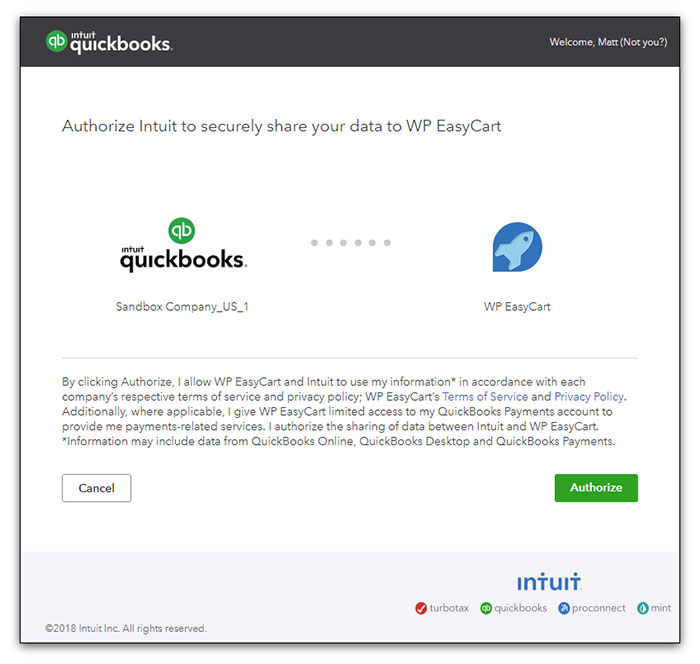
Authorize Your QuickBooks Online File
Now authorize your QuickBooks Online file when Intuit prompts you.
Intuit — Authorize QuickBooks Online

💡 That is it! Just try checking out and make sure your connection is working.
Intuit Setup V1 & V2 — Direct Connection
Prefer a direct connection to Intuit instead of relying on WP EasyCart servers to authorize your app? You’re welcome to use it — it’s definitely a more complicated setup, so we’ve provided a full series of screenshots and information to make it as easy as possible. If you run into any difficulties, contact our support staff through the support ticket system.
Important: PHP oAuth Module Required
Your server must support PHP’s oAuth module, which can be enabled by your host if you do not have it. Missing it becomes apparent in the final step of setup when you try to authorize your site on Intuit — you’ll see a blank white screen or an error message describing the issue.
Create Your Intuit Developer App
Steps 1–7 apply to both V1 and V2. You start on the developer site to create the keys that connect your WP EasyCart store to your payments account — once testing is complete, you apply for live keys.
Log In & Create a New App
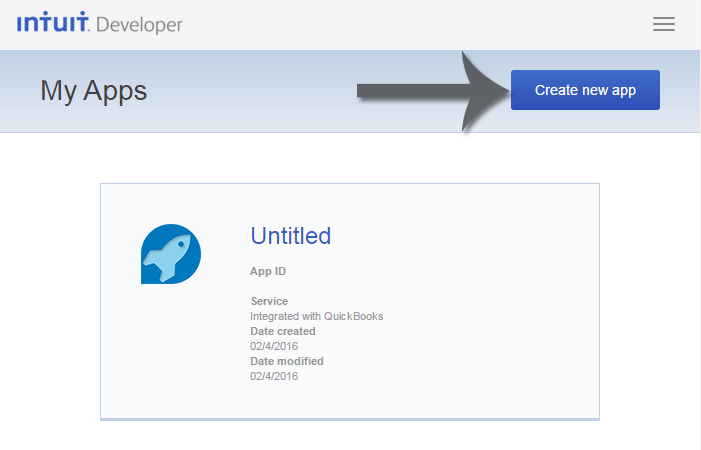
Navigate to developer.intuit.com and log in with your Intuit Payments account. Once logged in, click “Create new app”.
Intuit Developer — Create New App

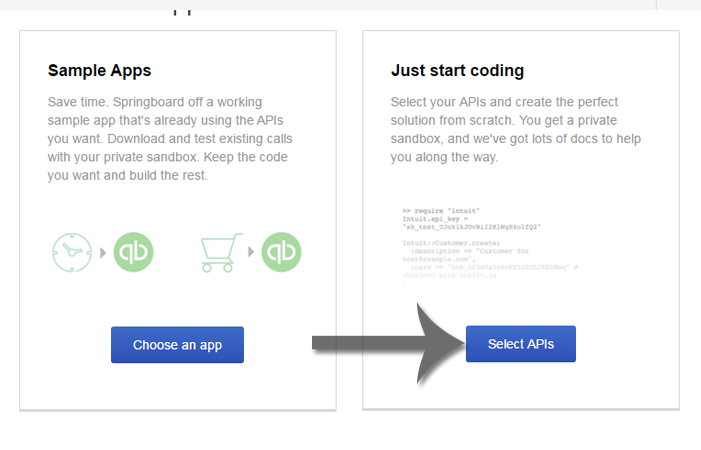
Click Select APIs
Click the Select APIs button when prompted.
Intuit Developer — Select APIs

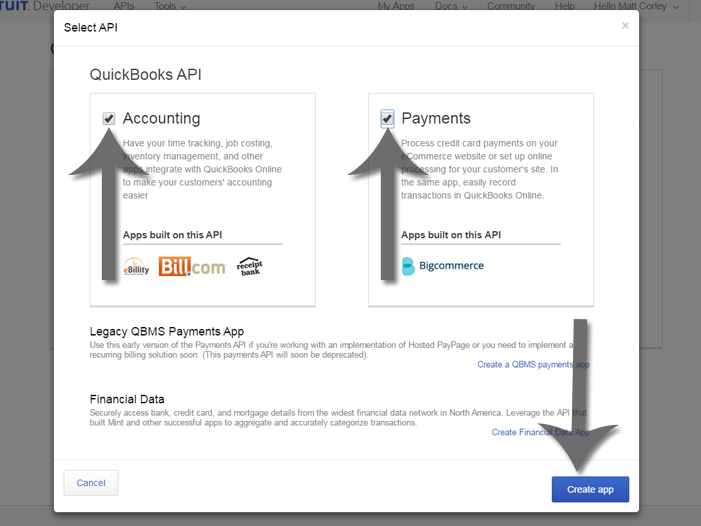
Select BOTH Accounting & Payments
Select both Accounting and Payments, then click Create app.
Intuit Developer — Accounting & Payments APIs
Open the Settings Tab & Start Editing
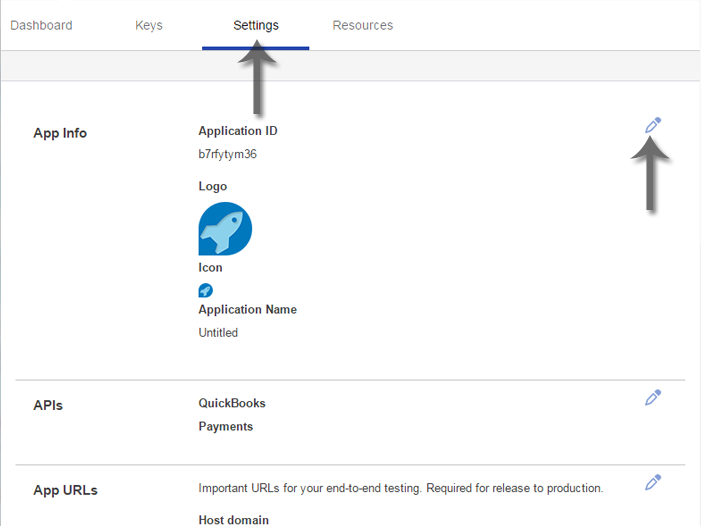
Now that your new app is created, go to the settings tab to begin editing the required information. Click the pencil icon to edit the app info. The first time through you’ll be working with the development application and development keys — once things are confirmed working, switch to production mode and repeat steps 4–10.
Intuit Developer — App Settings Tab

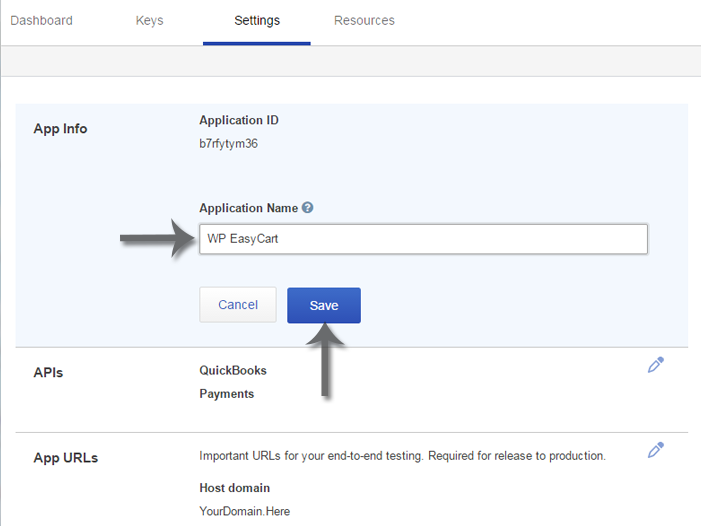
Name Your App
Enter a name that identifies this application as WP EasyCart — and if you use Intuit Payments on multiple sites, name it for the specific site it will be connected to. This is for your reference only, but very useful when running Intuit Payments in multiple instances.
Intuit Developer — App Name

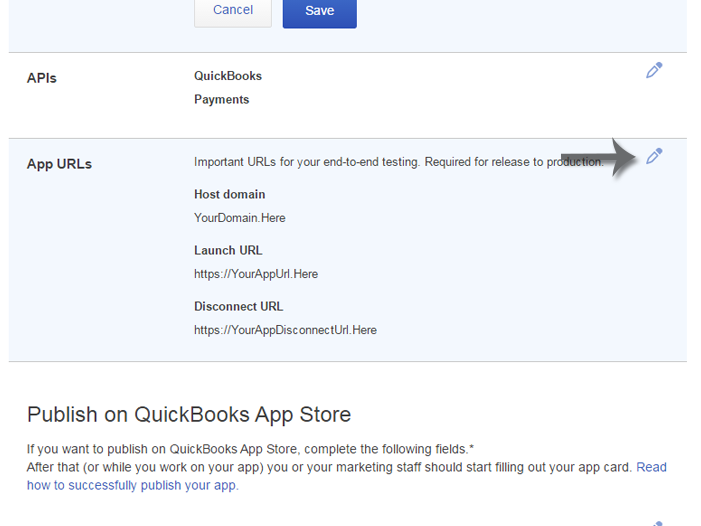
Edit the App URLs
Next, click the pencil icon next to the App URLs section.
Intuit Developer — App URLs Section

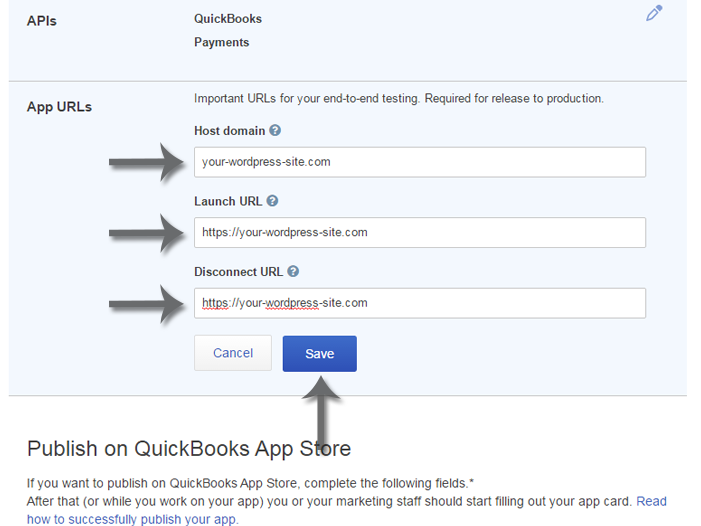
Enter Your Site URLs — Very Important
Enter the home URL of the WordPress site you plan to sell from. For example, if you are selling on www.mysite.com/store, enter www.mysite.com. In addition, for the Launch URL and Disconnect URL, be sure to include https:// in front of the URL.
Intuit Developer — Home, Launch & Disconnect URLs
Version 1 — Intuit Payments with oAuth 1.0
This is where your setup splits based on when you created your Intuit account. If you do not see the ‘App Token’ line item in your keys panel, skip to Version 2: Intuit Payments with oAuth 2.0 below.
Copy Your Keys
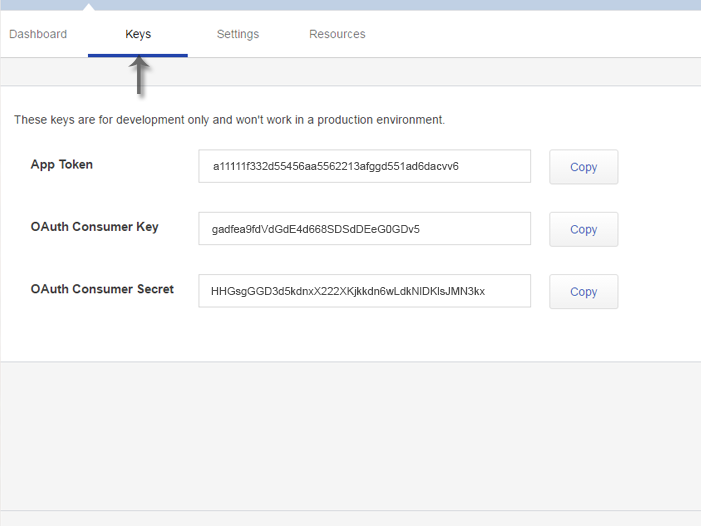
With your app set up, it’s time to copy the keys into the EasyCart system and connect the cart to your Intuit Payments account. Go to the Keys section and copy down this information for the next step.
Intuit Developer — Keys Section (oAuth 1.0)
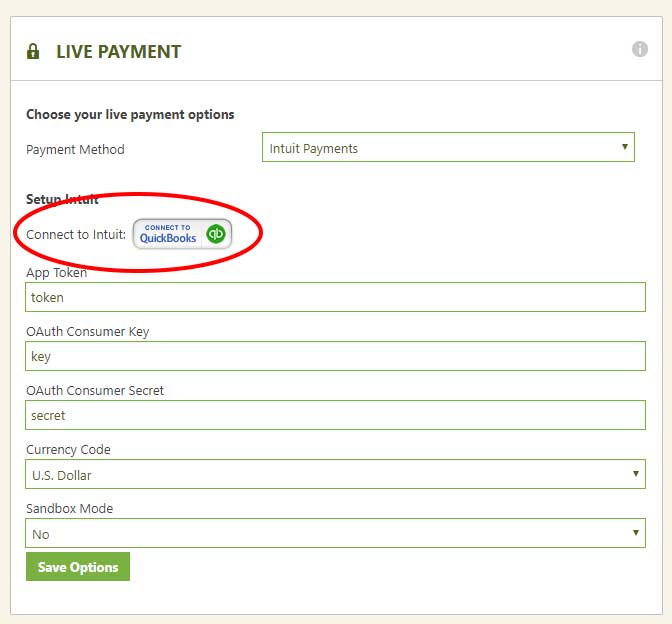
Enter the Keys in EasyCart & Save
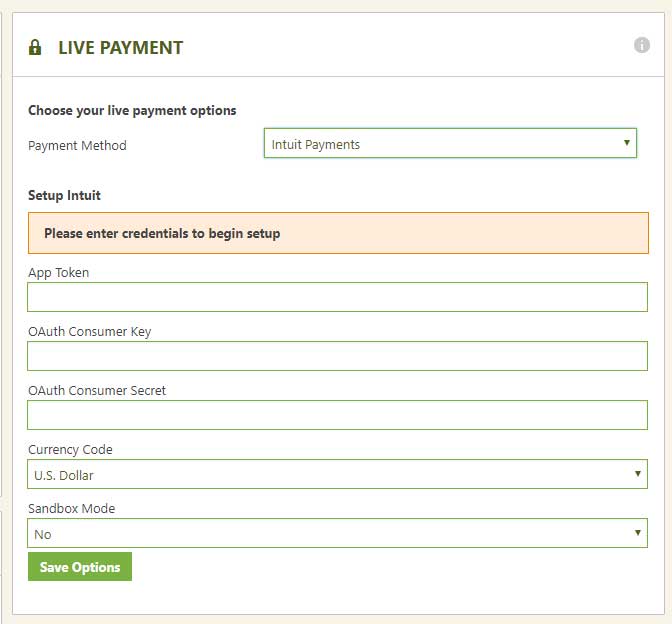
Enter the information from step 8 into the boxes provided. Turn sandbox mode on if you are using the development keys — or if you have already completed testing, select sandbox mode off. Press Save to update your settings. Once updated, the “Connect to Quickbooks” button appears in the live gateway settings box — click it now.
WP EasyCart — Intuit Key Fields & Connect to Quickbooks
Click Authorize
The last setup step is to click Authorize when prompted. This step will fail if your server does not support PHP’s oAuth — a requirement from Intuit Payments for connection.
Intuit — Authorize Connection Prompt

💡 Done with Version 1? You may now skip ahead beyond the Version 2 information below, straight to Final Steps.
Version 2 — Intuit Payments with oAuth 2.0
On a newer Intuit account without the ‘App Token’ line item? These are your steps 8–11.
Copy Your Keys
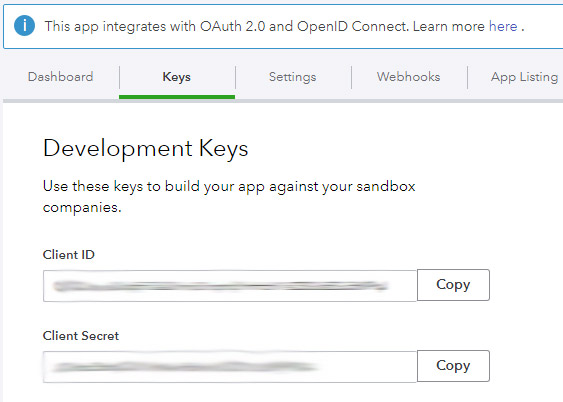
With your app set up, copy the keys into the EasyCart system to connect the cart to your Intuit Payments account. Go to the Keys section and copy down this information for the next step.
Intuit Developer — Keys Section (oAuth 2.0)
Enter the Keys, Choose oAuth Version 2 & Save
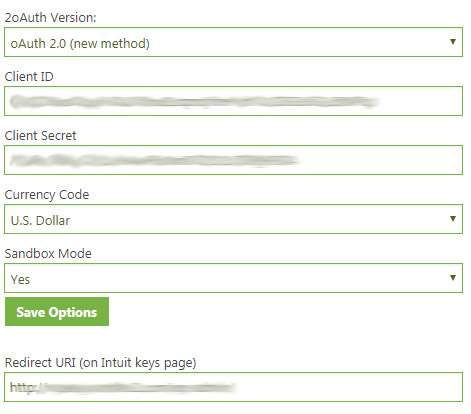
Enter the information from step 8 into the boxes provided. Turn sandbox mode on if you are using the development keys — or if you have already completed testing, select sandbox mode off. You will be using oAuth version 2. Save the options and refresh the page once complete.
WP EasyCart — Intuit oAuth 2.0 Key Fields
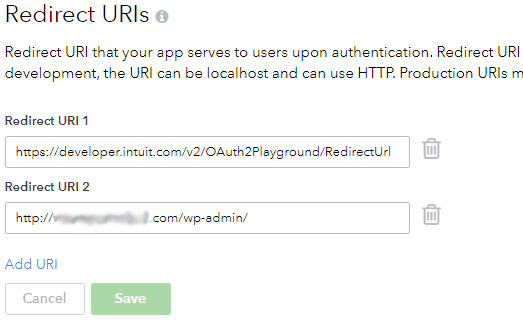
Copy the Redirect URI Into Your Keys Page
You must now copy the Redirect URI from the box in the setup into your keys page before you can connect.
WP EasyCart — Redirect URI

Click to Connect
Return to your payments setup and click the ‘Click to Connect’ link. This takes you to Intuit to allow access to your Intuit Payments account. Accept, and it will return you to the setup page.
WP EasyCart — Click to Connect

Final Steps — Test the Connection
Now that you are authorized, test the connection: go to your store, add an item to the cart, and check out with the test card below. If the order goes through successfully, you are ready to go live with your payments account.
Sandbox Test Card
4242 4242 4242 4242Security code: 333Expiration: any future dateIntuit Connection Being Stubborn?
oAuth setups have a lot of moving parts — keys, URLs, server modules. If your connection won’t authorize, our support team will help you track down the missing piece.