
Integration Guide
WP EasyCart × Google Analytics 4
Track ecommerce performance in Google Analytics 4 with WP EasyCart. We push transaction data — total revenue, products purchased, conversion paths — straight into GA4 so you can see what’s actually driving sales. Works with either GA4 directly or Google Tag Manager.
What This Integration Does
WP EasyCart sends transaction events to GA4 after each purchase — revenue, line items, order data. It does not handle site-wide page tracking, to avoid conflicts with other plugins or themes that already inject the base analytics code. The recommended setup pairs EasyCart with Google Site Kit — Site Kit handles page tracking, EasyCart handles transaction tracking.
Step 1 — Install Google Site Kit for Page Tracking
Site Kit handles the page-view side of analytics and verifies your site ownership with Google.
Set Up Site Kit First
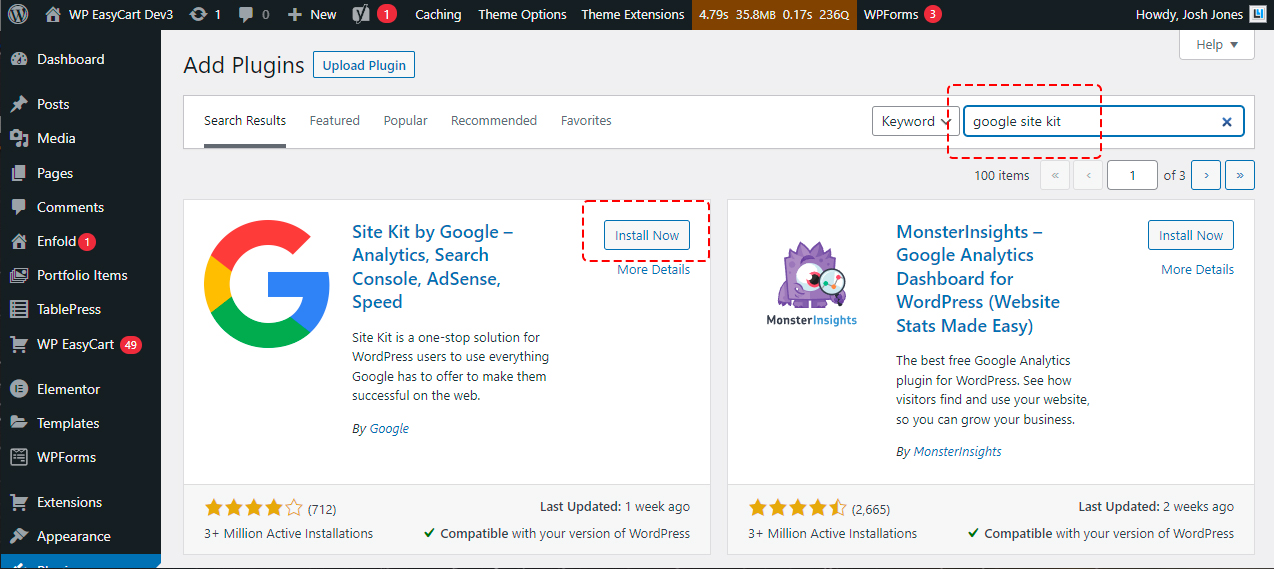
In WordPress, install and activate the Google Site Kit plugin from the plugins directory. Walk through Site Kit’s setup wizard — it’ll connect to your Google account, verify site ownership, and start collecting page-view data. Site Kit also adds a dashboard widget so you see traffic stats right in WordPress. This step gets the foundation in place before EasyCart adds the transaction layer on top.
Google Site Kit — WordPress Plugin
Step 2 — Find Your GA4 Measurement ID
Get the Google Tag ID that uniquely identifies your GA4 property — EasyCart needs this to send transactions to the right account.
Locate Your Tag ID
Once Site Kit is connected, go to WordPress › Site Kit › Settings › Analytics. Your Google Tag ID is listed there — it starts with G- followed by 10 characters (example: G-WPGKSK5555). Copy that ID. Alternative path: if you prefer Google Tag Manager for dynamic tag control, visit tagmanager.google.com, set up a GTM container, and grab your GTM ID instead (starts with GTM-). Either ID works with WP EasyCart.
Step 3 — Paste the Tag ID into EasyCart
Drop your GA4 Measurement ID or GTM ID into EasyCart and ecommerce events start flowing.
Enter the Tag & Save
In WordPress, go to EasyCart › Settings › Third Party. Find the Google GA4 section (not the older Universal Analytics section — that’s deprecated, see below). Paste your Google Tag ID into the field. If you’re using Google Tag Manager instead of GA4 directly, toggle “Enable Tag Manager Type” to ON before saving. From this point on, every completed purchase fires a transaction event to GA4 with the full line-item data attached.
What You’ll See in GA4
Reports You Can Now Build
With Site Kit handling page views and EasyCart handling transactions, you get the full ecommerce reporting suite inside GA4. A few of the most useful reports:
- Acquisition reports — see which traffic sources convert into actual revenue, not just clicks
- Page Value — identify pages that drive purchases vs pages that don’t, by attributing revenue to each page in the user’s path
- Product performance — top sellers, average price, average quantity, total sold over time
- Order trends — order counts and revenue totals across any date range, with comparisons across periods
Deprecated
Older Universal Analytics
Google has fully retired the older Universal Analytics system in favor of GA4. The Universal Analytics section in EasyCart’s settings still exists for compatibility, but Google is no longer accepting new data through that channel. Use the GA4 section instead — it’s the only path that still works.
Measure What Actually Drives Sales
Combine WP EasyCart with Google Analytics 4 to see which traffic sources, pages, and products actually convert — then double down on what works.