
Integration Guide
WP EasyCart × Amazon S3
Amazon S3 provides scalable, secure cloud storage for the web. WP EasyCart connects to your S3 bucket to deliver downloadable products securely — offloading large file transfers from your hosting server while keeping every file behind authenticated download links.
Before You Begin
An Amazon Web Services account is required. If you don’t have one yet, sign up at aws.amazon.com/s3. You’ll also need an active WP EasyCart PRO or Premium license — downloadable products are part of those plans.
Part I
Create Your AWS User, Group & Access Keys
Set up a dedicated AWS user with read-only S3 permissions so EasyCart can fetch files without exposing your full AWS account. This is the most involved part — take your time with each step.
- Sign up for an account at the Amazon Web Services site, or log into your existing account at aws.amazon.com.
- Go to the AWS dashboard once you’re signed in.
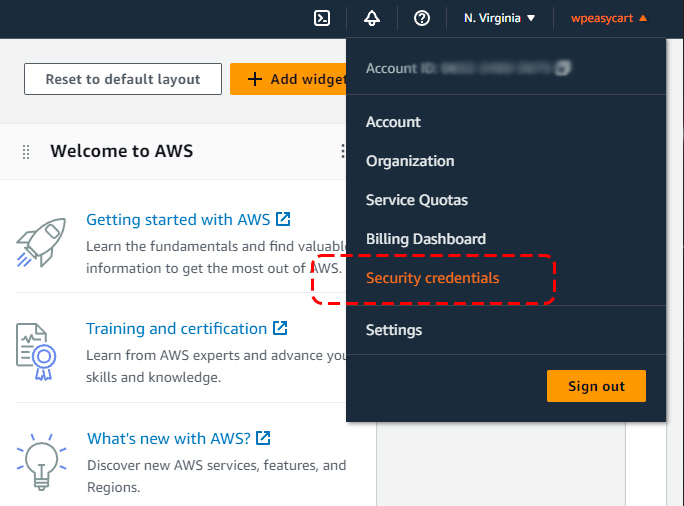
- Set up your connection key and secret — click your name in the top-right corner and select Security Credentials from the dropdown.
AWS — Security Credentials Menu
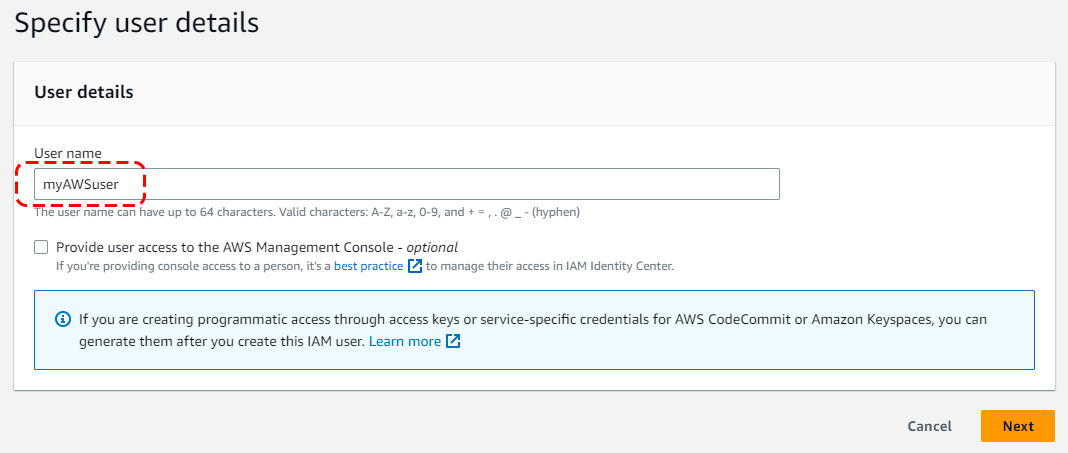
- Select Users from the left menu of the AWS Dashboard.
AWS — Users Menu

- Click Add User from the top left of the users panel.
AWS — Add User Panel
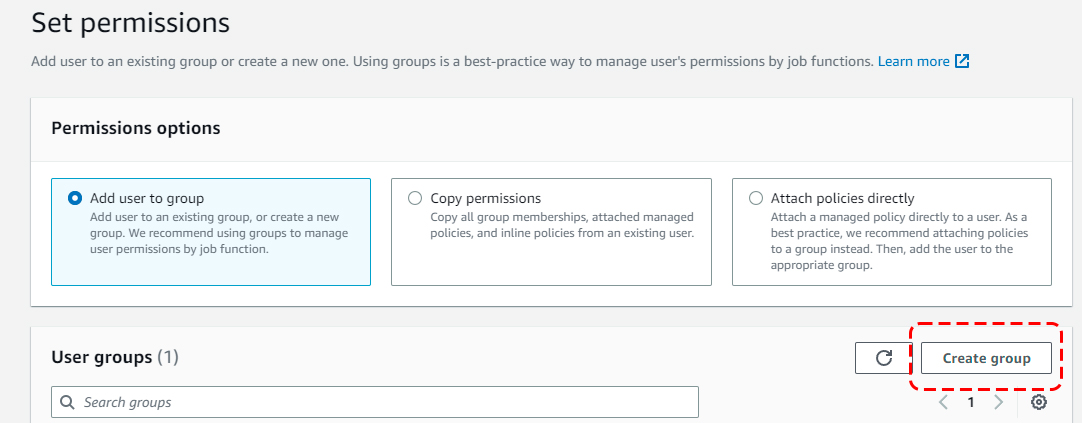
- Click Create Group in the middle of the screen. Using a group lets you scope the user’s permissions as tightly as possible, preventing unauthorized access within your AWS account.
AWS — Create Group
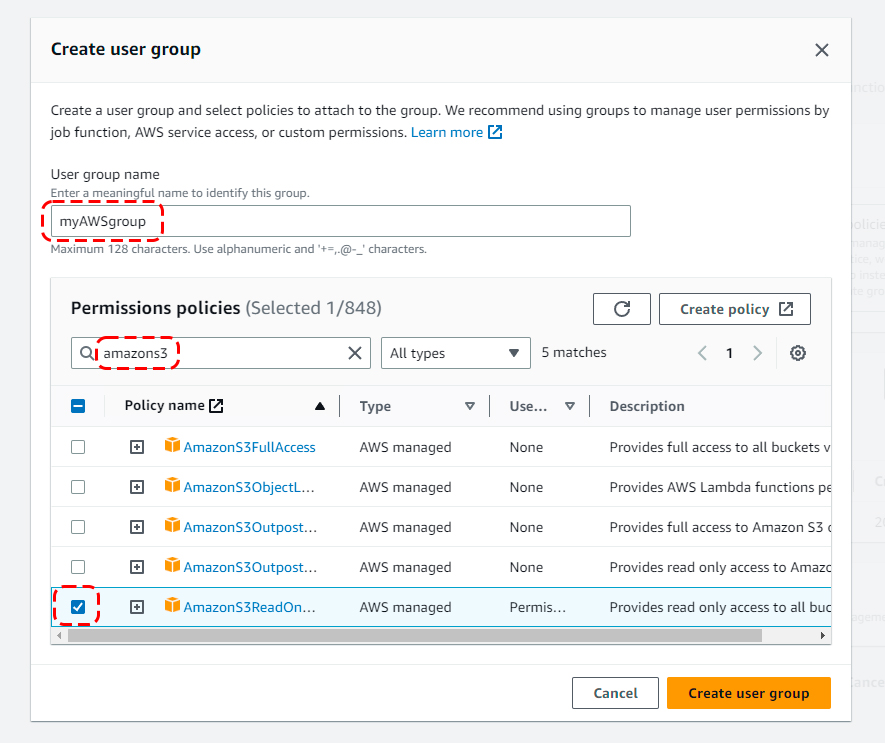
- Set up your group by entering any group name, then searching for amazons3 in the policy list. Select ONLY the AmazonS3ReadOnlyAccess policy — do not check any other permissions. Click Create group.
AWS — Group Permissions (AmazonS3ReadOnlyAccess Only)
- Select your new group and click Next: Review.
AWS — Save Group

- Click Create user to complete the user setup.
- Click your new user to open its properties. You’ll need to create an Access Key ID and Secret for this user — click the Security Credentials tab.
AWS — User Security Credentials Tab

- Scroll down to the Access Keys section and click Create Access Key.
AWS — Create Access Key

- Click Third-Party Service as the key type. Click Next — AWS may prompt for an optional description, which you can fill in or skip. Then click Create Access Key.
AWS — Third-Party Service Key Type

- Save your Access Key ID and Secret Access Key — AWS only shows the Secret Key once. Copy both to a secure location now; you’ll paste them into EasyCart in Part II.
AWS — Access Key ID & Secret Access Key

Part II
Create Your AWS S3 Bucket
Set up a private S3 bucket where your downloadable product files will live, then paste your AWS credentials into EasyCart to complete the connection.
- Return to the main S3 management page by selecting S3 from the top-left Services menu, under Storage.
- Create a new bucket by clicking Create bucket.
AWS — Create Bucket

- Enter a bucket name — any name will work. Click Next.
AWS — Name Your Bucket

- Set Properties — nothing needed here unless one of the properties helps your specific setup. Click Next in most cases.
- Set Permissions — the default permissions are correct. Critically, keep “Block all public access” turned ON so the bucket stays private. Even though there’s no public access, the IAM credentials you created in Part I let EasyCart fetch files on behalf of paying customers.
- Create Bucket — click Create bucket to finish setup.
- Return to WP EasyCart settings and add your Access Key, Secret Access Key, Bucket Name, and Bucket Region to the system settings. This is found in WP EasyCart › Settings › Third Party › Amazon S3.
EasyCart — Amazon S3 Settings Panel

That’s it! You can now upload your downloadable goods to your new bucket. Continue to Part III for the upload process.
Part III
Upload Files to Your S3 Bucket
Move your downloadable product files into the bucket so EasyCart can connect them to specific products.
- Navigate to your bucket by clicking its name in the buckets list. If you just created the bucket, you’re already there.
- Click the Upload button. Do not create folders inside the bucket for WP EasyCart files — subfolders cause issues on the EasyCart product-setup side.
AWS — Upload Files to Bucket

- Click Add Files, or drag and drop files directly into the upload area — both methods work.
- Set Permissions — leave the defaults. The owner (your IAM user and API key) retains access, while public access stays blocked. EasyCart uses your credentials to deliver files to paying customers; nothing more is needed here.
- Upload File — click upload and you’re done. Your file appears in the bucket and is ready to attach to a product.
That’s it! Your uploads are now available to choose from in the EasyCart product setup. Continue to Part IV for the final connection.
Part IV
Attach an S3 File to a Downloadable Product
Connect any uploaded S3 file to an EasyCart product so paying customers download it securely from Amazon’s servers — not your web host.
Create or edit any product in EasyCart and open the Download Options section. Choose Download Product, set Download Location to Amazon S3, then pick the file you want from the S3 File dropdown — it lists every file currently in your bucket. If your AWS setup is incorrect, you’ll see an error here; fix the credentials in Part II before continuing.
EasyCart — Product Download Options with S3

That’s it! Your product now has a secure Amazon S3 download attached. When a customer purchases, they’ll access the download through their account — and the file comes from Amazon S3 servers, not your hosting platform. This is a great way to offload the burden of large downloads from your main server, distributing the transfer load and keeping your site responsive.
For more on configuring downloadable products in EasyCart, see the Download Options guide. All digital download features require WP EasyCart PRO or Premium — view pricing.
Offload Heavy Downloads to AWS
Combine WP EasyCart with Amazon S3 to deliver large digital products without slowing down your web server — scalable, reliable, and secure.