Live FedEx Shipping Rates

6 min read

Shipping Setup

Live FedEx Shipping Rates

FedEx is a popular shipper and fairly easy to connect for live shipping rates. Here’s how to create a FedEx developer account, generate the right credentials, and establish the connection inside EasyCart.

Watch the Walkthrough

Prefer to watch? Live carrier setup, covered in one short video.

Live Shipping with USPS, FedEx, UPS & More!

Professional and Premium editions come with live carrier rates from USPS, FedEx, UPS, DHL, Australia Post, and Canada Post. Note: this video shows the older API key method — Oauth is much simpler!

How Live Shipping Rates Work

Know what live rates CAN and CAN NOT do before you connect.

Live rates come straight from the carrier, based on specific data your site sends. When you create a product in EasyCart, assign it default package Length, Width, and Height dimensions plus a Weight value. EasyCart uses these to build a ‘best fit’ package and combined weight from every shippable item in the cart — then, at checkout, it sends the customer’s ship-to postal code and your ship-from postal code to get rates.

What Live Shipping Rates Don’t Do

Rates stop at the price — label purchasing is a separate step.

Live rates provide customer shipping prices directly from the carrier — they don’t submit a package or purchase shipping labels as part of post-order fulfillment. WP EasyCart Premium offers options to connect with providers who specialize in that, such as ShipStation or Stamps.com, where you can purchase actual labels and match them against what the customer paid. Live rates also won’t reflect discounted pricing from third-party systems like ShipStation, Stamps.com, GoShippo, or PirateShip.

Setting Up FedEx Live Shipping with oAuth

Required as of August 2024 — and the newest, fastest way to connect.

The latest method to connect to FedEx requires setting up a developer account to access their services. It’s a fairly easy process — follow these steps and your FedEx integration will be running on the newest offering available.

1

Visit the FedEx Developer Portal

Visit the developer portal on FedEx’s website and make sure you have an account: developer.fedex.com.

Step 2 — Create a Project

2

Create a New Project

Use ‘My Project’ on the side menu, then ‘Create a New Project’. Select a third-party software solution requesting API keys.

FedEx Developer Portal — Create a New Project
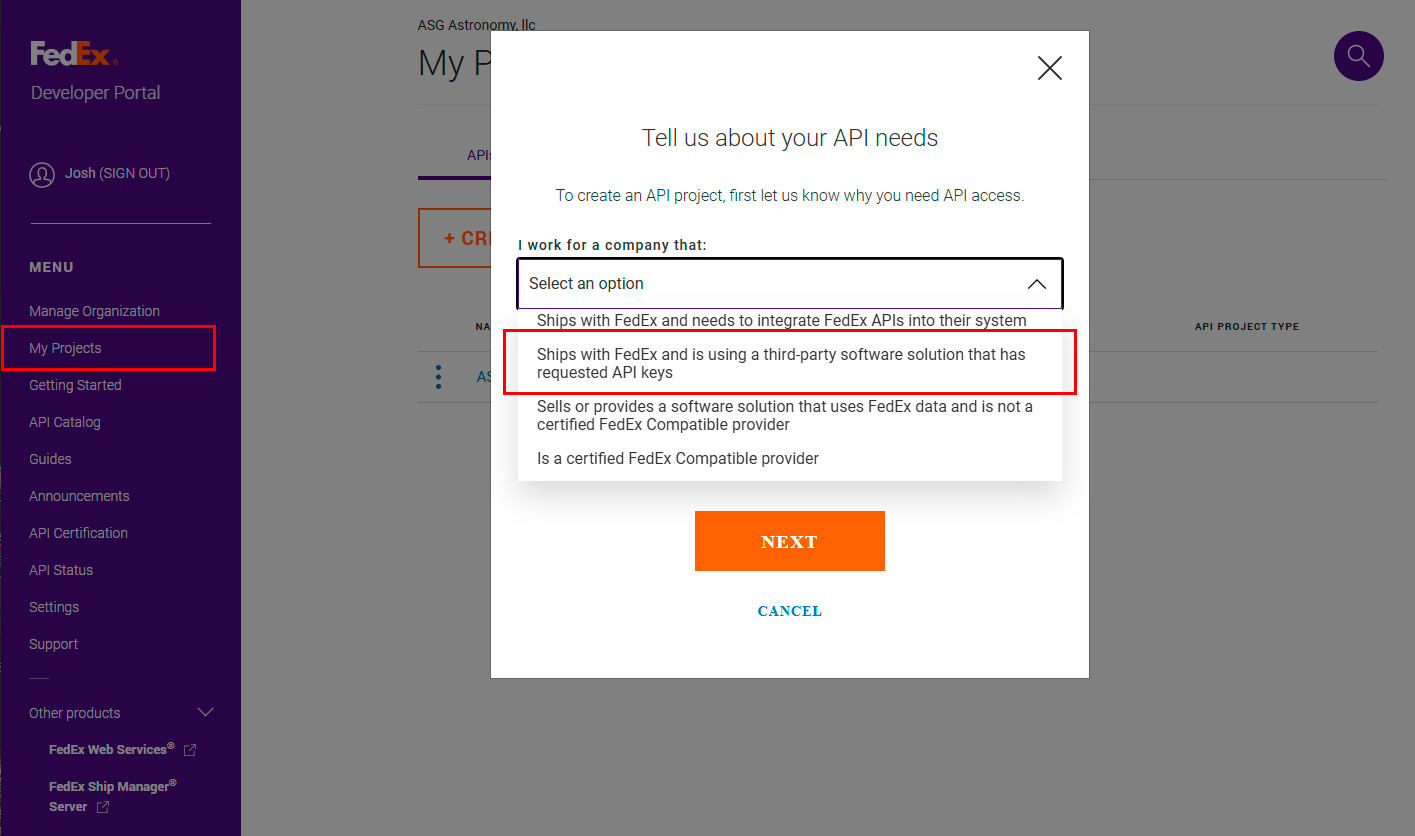
FedEx developer portal create a new project screen

Step 3 — Select Ship, Rate & Other APIs

3

Choose Ship, Rate & Other API’s

From the list of API choices, select Ship, Rate & Other API’s.

FedEx Developer Portal — Ship, Rate & Other API’s
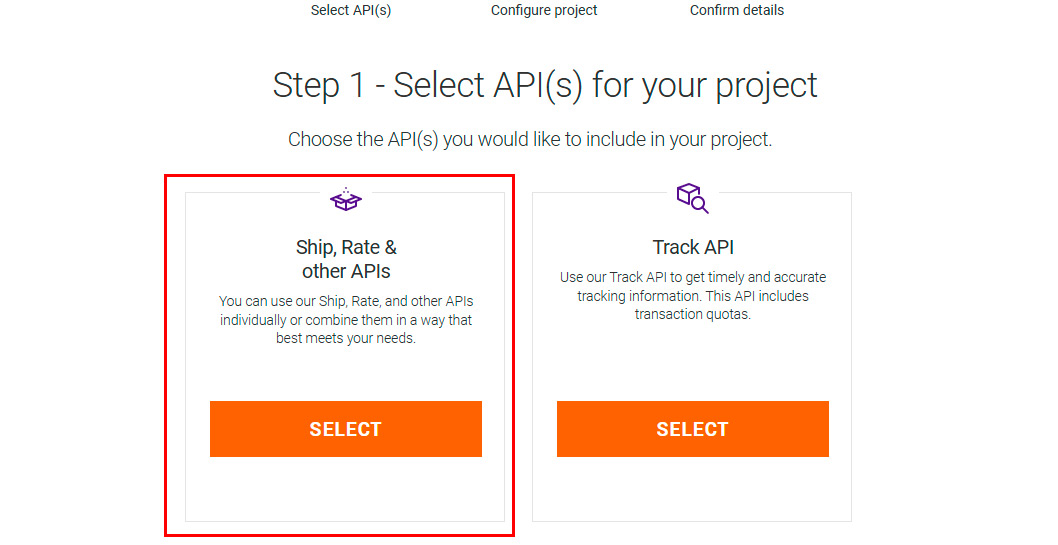
FedEx developer portal Ship Rate and Other APIs selection

Step 4 — Choose Your Services

4

Select Address Validation & Rates/Transit Times

Choose Address Validation API & Rates and Transit Times API as the services you’ll be using.

FedEx Developer Portal — Address Validation & Rates/Transit Times API
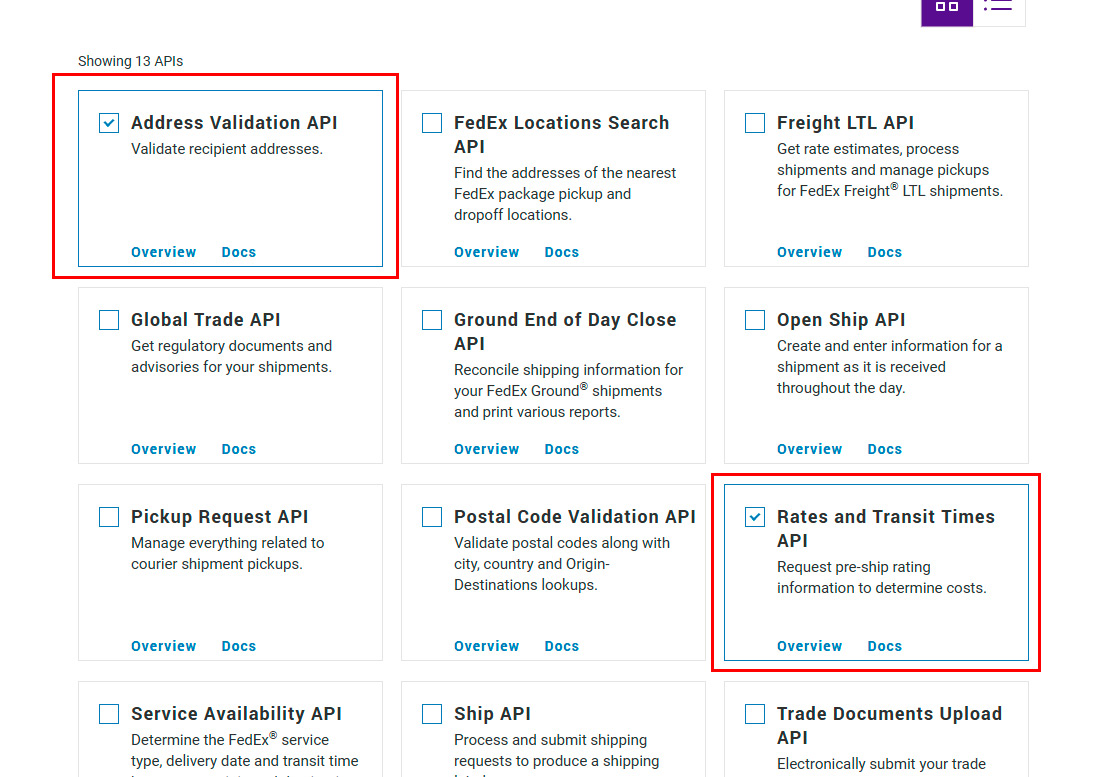
FedEx developer portal Address Validation and Rates Transit Times API selection

Step 5 — Name Your Project

5

Give Your Project a Name & Country

Give your project a name and select a country of origin.

FedEx Developer Portal — Project Name & Country of Origin
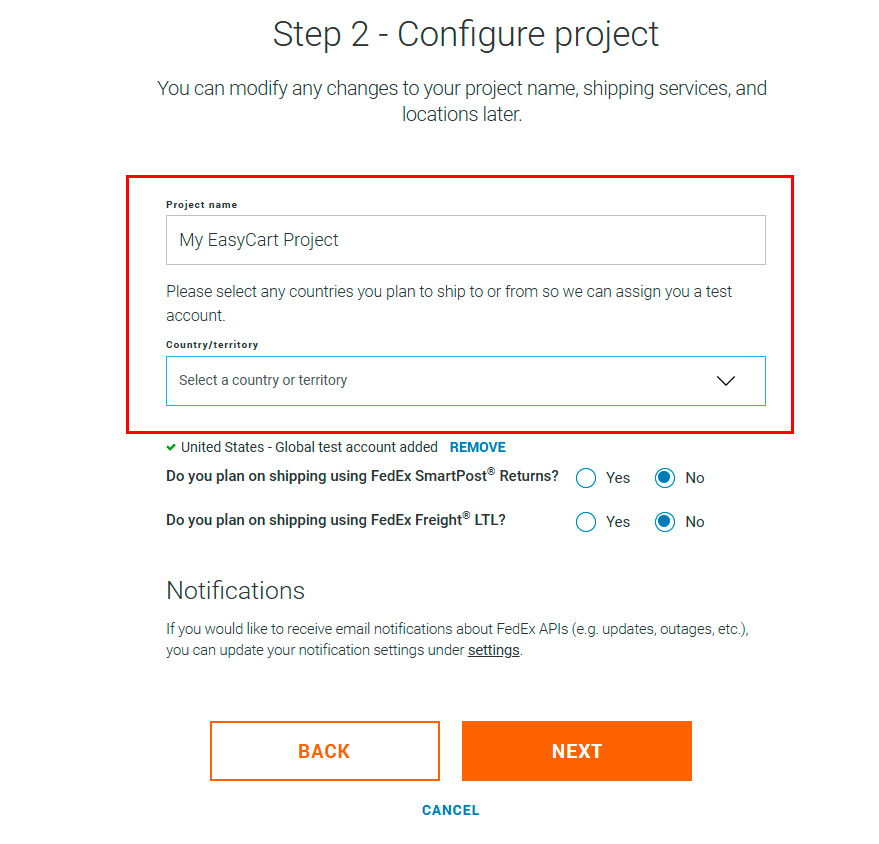
FedEx developer portal project name and country of origin fields

Step 6 — Confirm & Accept Terms

6

Confirm Your Details & Check Both Boxes

Confirm your details and be sure to check both terms & integration options.

FedEx Developer Portal — Confirm Details & Terms
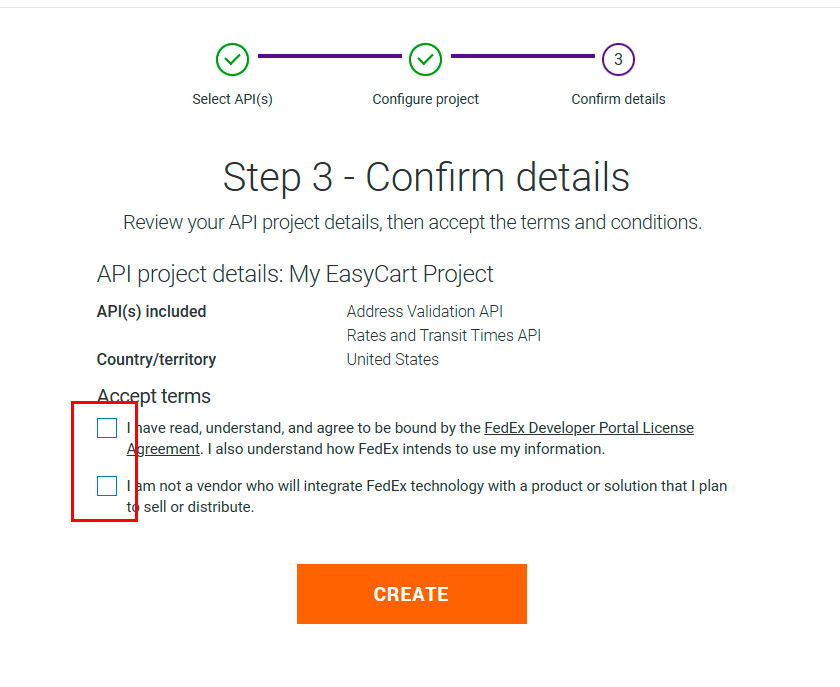
FedEx developer portal confirm details and accept terms screen

Step 7 — Grab Your Test Keys

7

Copy Your Test API Key & Secret

Test Keys are then provided and you may use these in WP EasyCart. In WP EasyCart Settings › Shipping Settings for FedEx, slide Test Mode to ON for these API Key and Secret to work. Be sure to copy/paste the credentials correctly and check for extra spaces before or after each value.

FedEx Developer Portal — Test API Key & Secret
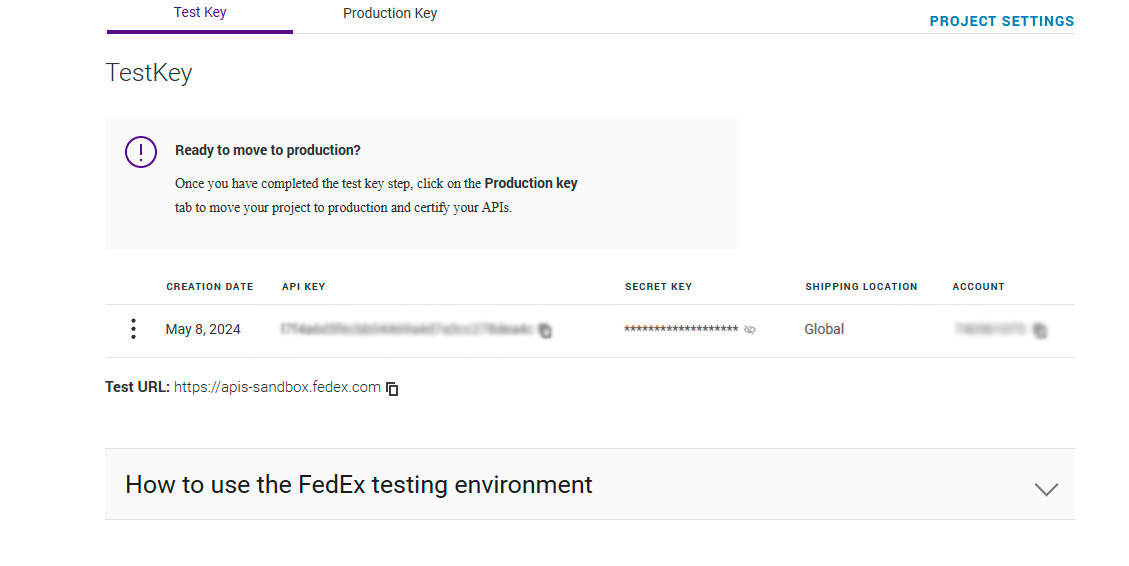
FedEx developer portal test API key and secret key

Step 8 — Create a Production Key

8

Generate Your Production Key

Production keys are just as easy to create — click the ‘Product Key’ tab, enter a key name, and choose the account to utilize.

FedEx Developer Portal — Production Key
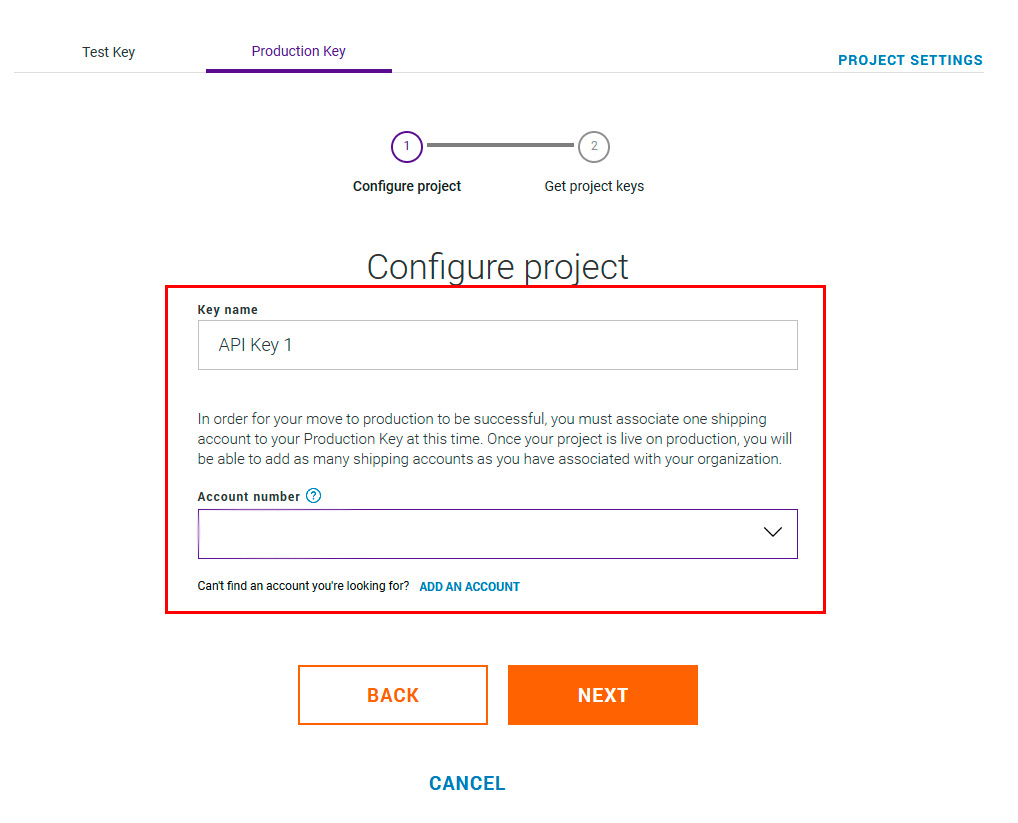
FedEx developer portal create production key screen

Step 9 — Copy Your Keys Into EasyCart

9

Paste Your API Key & Secret Key

Copy and paste the API Key and Secret Key into WP EasyCart Settings › Shipping Settings for FedEx. When you click done, also grab your account number and verify it’s correct — it will be different from your testing account. Be sure to copy/paste credentials correctly and check for extra spaces before or after each value.

FedEx Developer Portal — API Key, Secret Key & Account Number
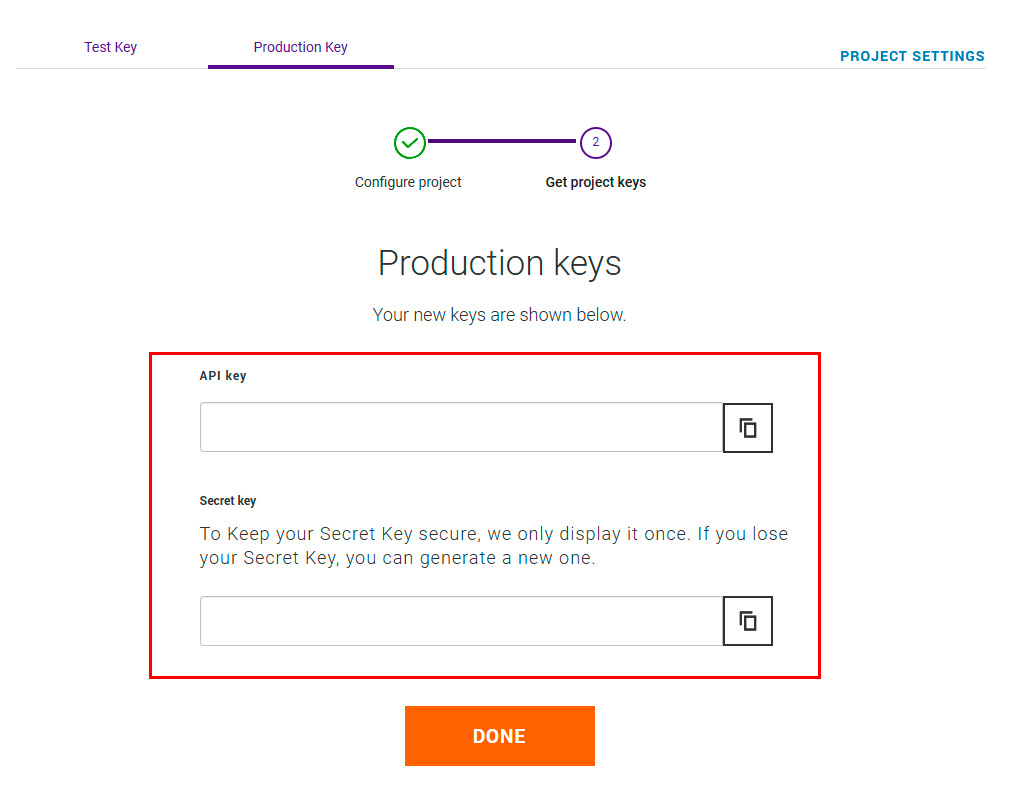
FedEx developer portal API key secret key and account number

Step 10 — Finished!

10

Check for the Green ‘Connected’

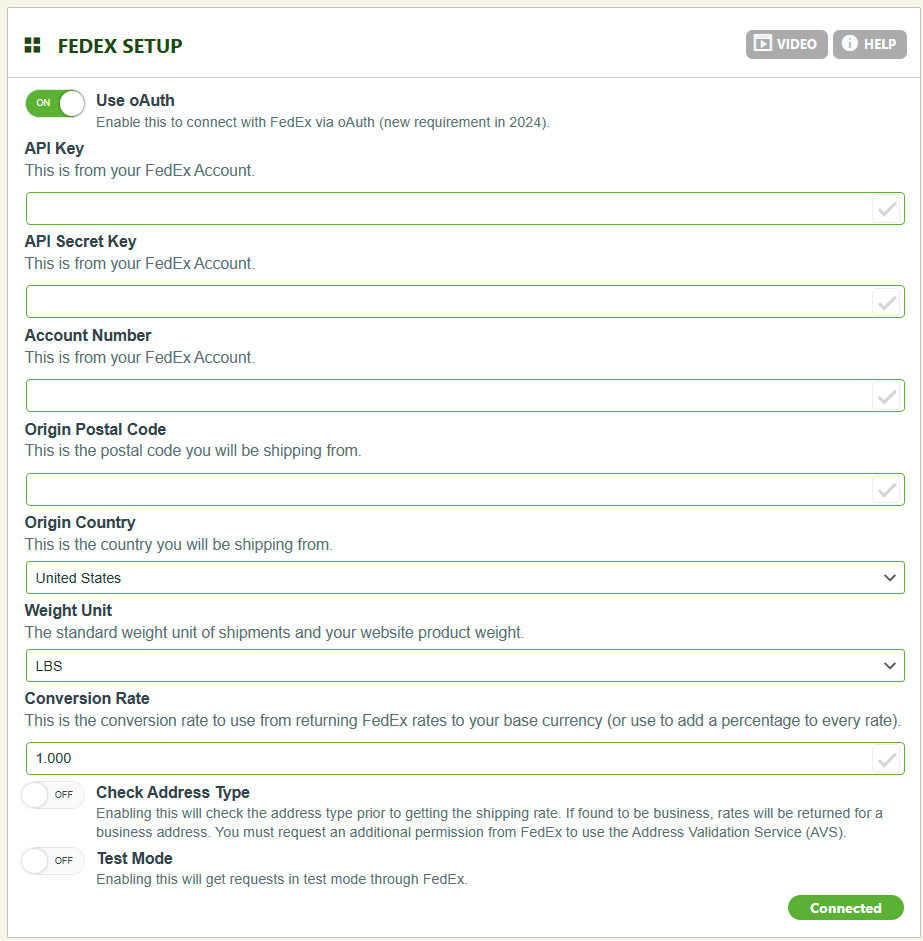
That’s it — your oAuth connection should be complete, with API Key, API Secret Key, and Account Number all filled in. Enter your origin postal code, country, and other details, and you should see a green ‘Connected’ at the bottom right corner. See a red ‘Error’ instead? Double-check for spaces before or after your keys, and create new ones if needed. From here, visit WP EasyCart › Shipping Rates and engage ‘Live Rates’ to set up any FedEx rates you want to use.

WP EasyCart — FedEx Connected

WP EasyCart FedEx settings showing green connected status

Older FedEx Web Services Method

Ended August 2024 — kept here only for reference.

This connection method has ended

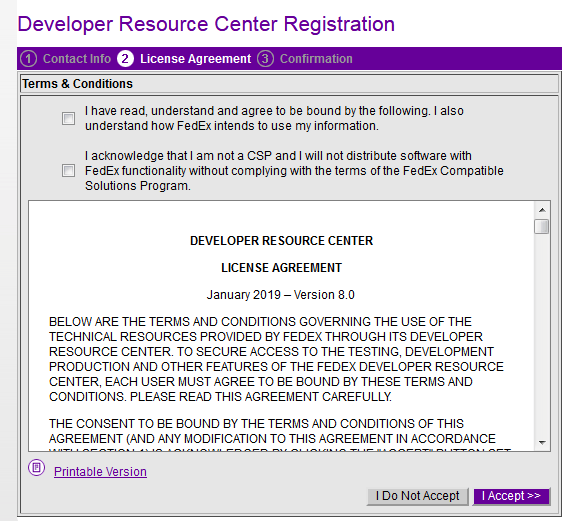
FedEx Web Services is an older configuration that ended in August 2024 in favor of the newer oAuth connection above. If you’re setting up FedEx for the first time, use the oAuth instructions instead — these steps are provided only for reference if you’re still running an existing Web Services connection.

1

Visit the Web Services Developer Portal

Visit the web services developer portal on FedEx’s website and make sure you have an account: fedex.com/en-us/developer/web-services/process.html.

Step 2 — Get Your Production Key

2

Click Get Production Key

Click on Get Production Key and follow the link provided.

FedEx Web Services — Get Production Key
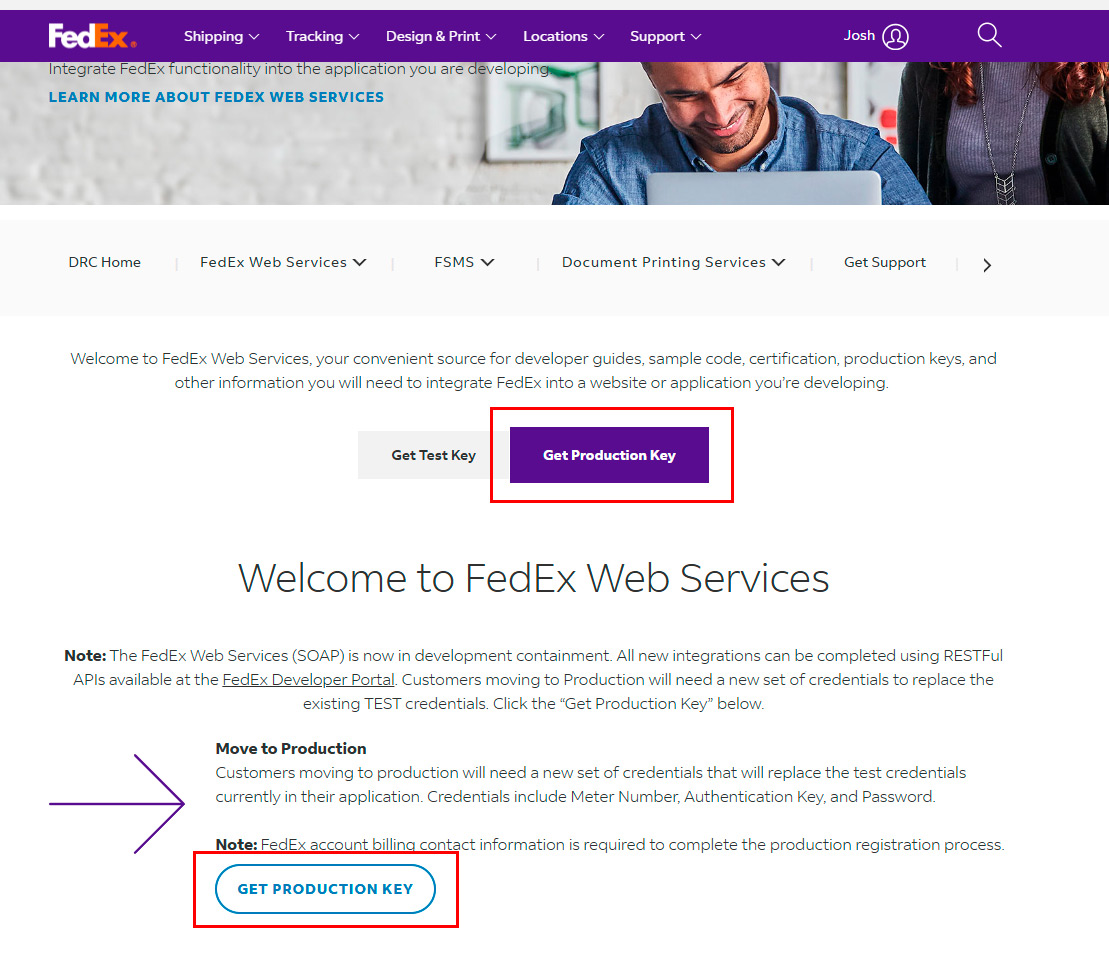
FedEx web services get production key link

Step 3 — Complete the Application Profile

3

Fill Out the Application Profile

Complete the application profile. You will not be reselling — FedEx web services for shipping is what you’re looking to get.

FedEx Web Services — Application Profile
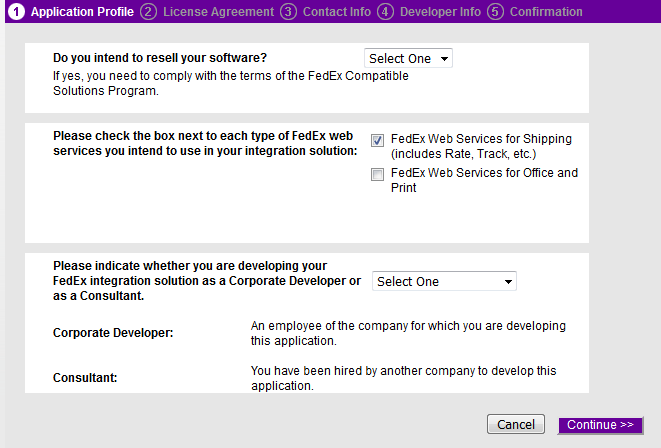
FedEx web services application profile form

Step 4 — Accept Their Terms

4

Check Both Agreement Options

Accept their terms by checking both options on their agreement.

FedEx Web Services — Accept Terms

FedEx web services accept terms agreement screen

Step 5 — Enter Contact Info & Account Number

5

Add Your 9-Digit Account Number

Enter your contact information, including the correct 9-digit account number for your FedEx account. You can find that account number back in your account or profile.

FedEx Web Services — Contact Info & Account Number
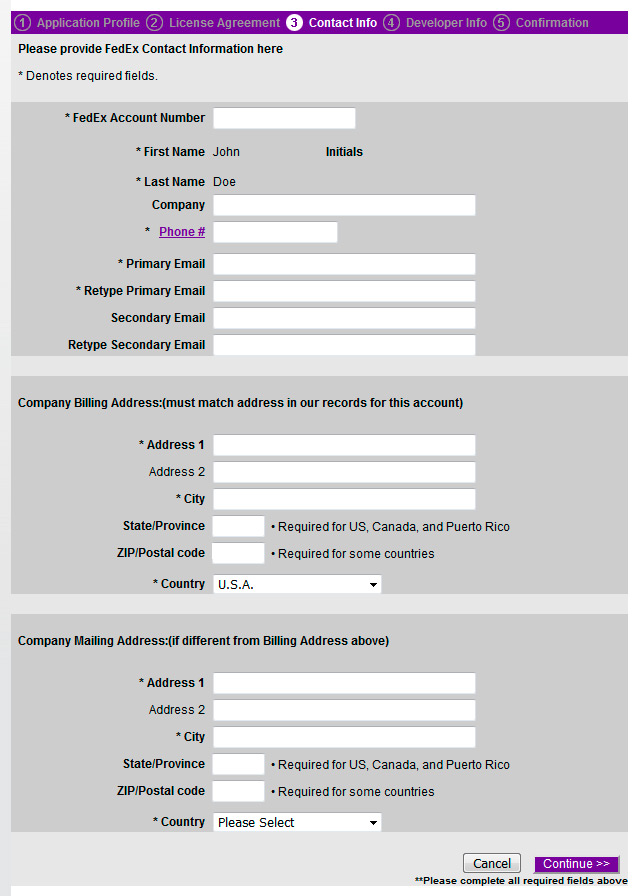
FedEx web services contact information and account number form

Step 6 — Save Your Authentication Key & Meter Number

6

Copy & Paste for Safe Keeping

You’ll be given an Authentication Key and Meter Number. Copy and paste these somewhere safe — you’ll need them shortly.

FedEx Web Services — Authentication Key & Meter Number
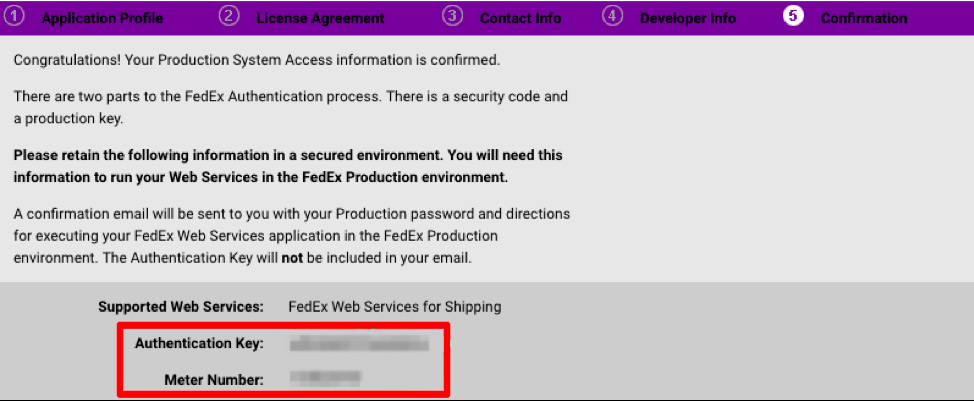
FedEx web services authentication key and meter number

Step 7 — Get Your Password by Email

7

Check Your Email for the Password

FedEx will email you with more credentials. You’ll need the Password from this email.

FedEx Web Services — Credential Email
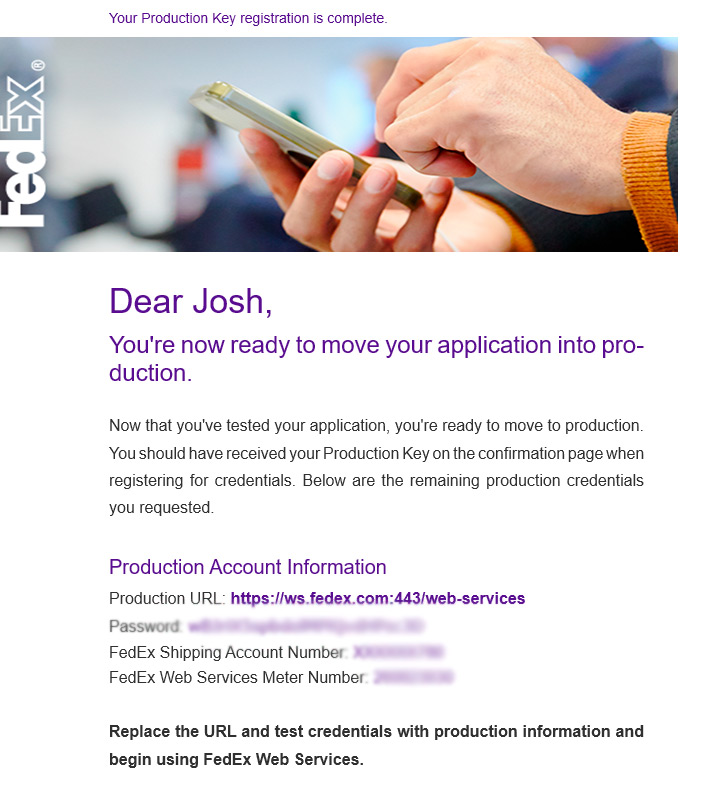
FedEx web services credential email with password

Step 8 — Enter Everything Into EasyCart

8

Fill In Your Credentials & Origin Info

You should now have the Access/Authentication Key, Account Number, Meter Number, and API Password from your email — enter them into WP EasyCart › Settings › Shipping Settings. Complete the other fields, such as origin postal code and country, and you should see a green ‘Connected’ in the bottom right corner. See a red ‘Error’ instead? Double-check your credentials, and watch for extra spaces before or after each value.

FedEx Web Services — Credentials in WP EasyCart
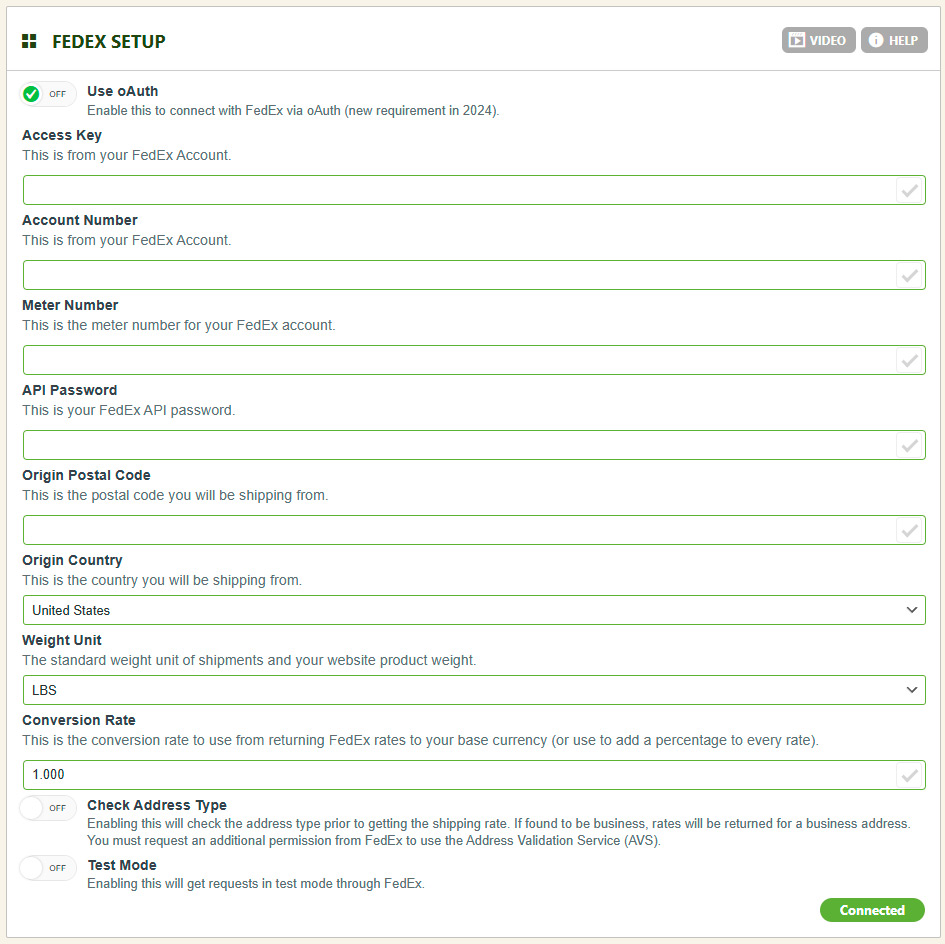
WP EasyCart FedEx web services credentials entry panel

Step 9 — Finished!

You should now see ‘Connected’. Go to WP EasyCart › Settings › Shipping Rates and be sure to select ‘Live Shipping’.

Get Accurate FedEx Rates Today

A quick oAuth connection is all it takes to start pulling live FedEx rates on every order. Need a hand along the way?

Updated on July 20, 2026