
Step 1. Create an option set
Products › Option Sets › Add option set
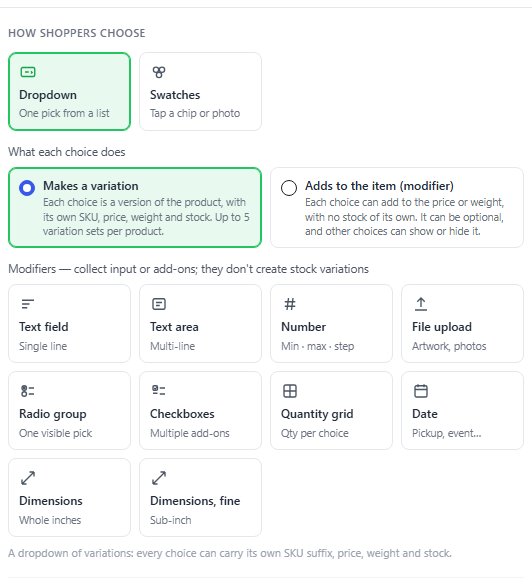
Go to EasyCart › Products › Option Sets and press Add option set. Choose how shoppers choose: Dropdown (one pick from a list) or Swatches (tap a chip or photo). Under What each choice does, leave Makes a variation chosen for sizes and colors you stock. With PRO, Adds to the item (modifier) makes the same list an add-on instead: each choice can add to the price or weight, with no stock of its own. Give it a Name for your own lists, such as Shirt size, and a Label shown to shoppers, such as Choose a size. Leave the label empty to use the name.
Then add the choices. Press Add choice, or press Paste a list and paste one choice per line. A line can hold a name, a price and a SKU suffix, so Large, 2.00, -L is a Large that costs 2.00 more with the SKU code -L.
Each choice has these columns:
Swatch: a color, or with PRO a photo or pattern.
Choice: the name shoppers see.
SKU suffix: added to the product’s SKU on cart lines and orders, joined by the separator in Settings › Products (a dash by default), so SHIRT plus RED plus L becomes SHIRT-RED-L.
Price: a choice can add to the price, replace it, add once per order, multiply it, or, on text inputs, charge per character. Pick Override when a choice sets a new price outright.
Weight: adds to the product’s shipping weight.
Default: the choice that starts selected.
Drag to reorder. A live storefront preview on the right shows how the set will look. Press Save. Dropdown and Swatch sets are always required, so shoppers cannot skip them.
With PRO you can skip this step for a quick set that only one product needs: step 2 shows how to make it on the product.
Step 2. Add option sets to the product
Options & variants › Option Sets
Open the product in EasyCart › Products and choose Options & variants in the list on the left, under Catalog. The section holds three numbered cards: Option Sets, Variations and Modifiers.
Free edition. The Option sets card has two slots. Choose a set in each, or press Create a new option set. The card counts the variations they make, and the slots save with the product’s Save.
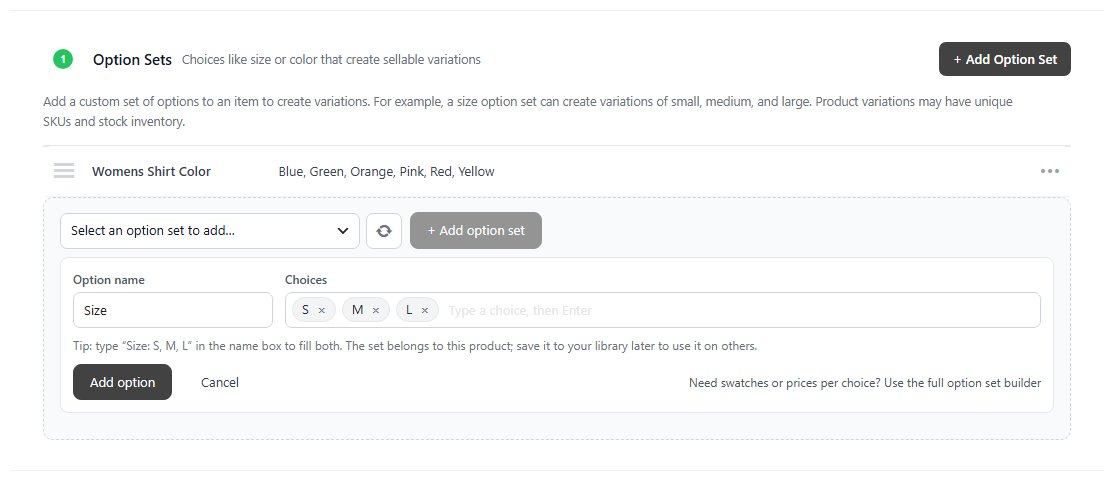
With PRO, from your library. Pick a set from Select an option set to add… and press + Add option set. You can attach up to five. At five the card says so and points you to modifiers, which are unlimited.
With PRO, made on the product. Press + Add Option Set at the top of the card, or + Create a new option set under the list. A small form opens. Type the Option name, such as Size, then each choice in Choices, pressing Enter after each one. Typing Size: S, M, L in the name box fills both at once. Press Add option.
A set made here belongs to this product, and its row says This product. Other products do not list it. To use it elsewhere, open the row’s ⋯ menu and choose Save to library. Need swatches or a price for each choice? The form’s Use the full option set builder link opens the editor from step 1 instead.
Sets apply at once. Adding, removing or reordering a set rebuilds the product’s variations straight away, not at Save. When the product already has variations, the editor first lists what will change and asks you to confirm.
Combinations multiply. Sets chain from the first one: the first set times the second, and so on. Two sets of three choices make nine variations.
You can also start from the set. In Products › Option Sets, the row menu has Assign to products…. That is the quick way to put a new set on a whole range.
Step 3. Price and stock each variation
PRO: the Variations table
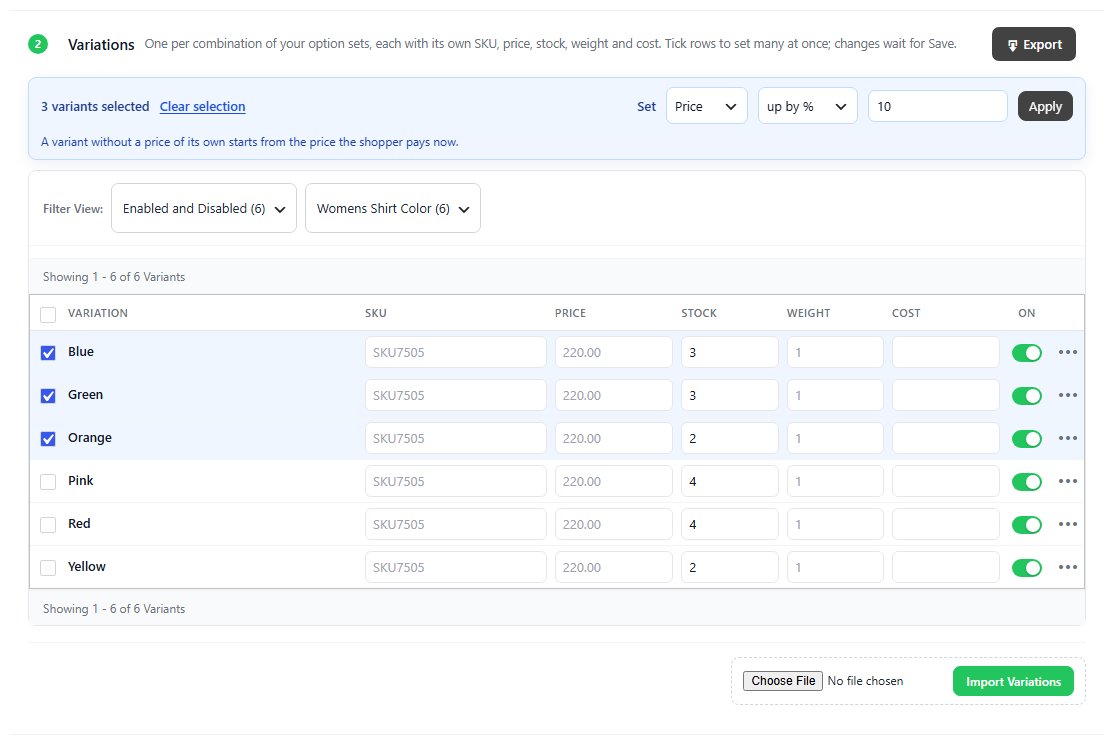
With PRO, the Variations card lists one row for every combination, built for you. The columns are Variation, SKU, Price, Stock, Weight, Cost and On.
A grey value in a cell is what applies while you leave it empty: the product’s SKU, the price the shopper pays and the weight the parcel gets. Fill in only what differs. Cost is what one costs you, which reports use for profit. On takes a combination off sale without deleting it.
Change many rows at once. Tick rows, or the box in the header for the whole page. A link then offers to select every matching variant. A bar opens: Set Price, Stock, Weight, Cost, SKU or On / off for the ticked rows, then press Apply. A price can be set to a value, or moved up by or down by an amount or a percent. A variant without a price of its own starts from the price the shopper pays now. Setting stock this way also starts counting it for those variants.
Build SKUs from a pattern. Choose SKU in the bar and type a pattern. {sku} is the product’s SKU, {options} is the variant’s choices, such as S-White, and {1} to {5} is one choice each. So {sku}-{options} gives SHIRT-S-White. Leave it empty to use the product’s SKU.
Copy a value down. A cell’s ↓ button, or Ctrl+D, copies its value to every row below it on the page. Enter and the arrow keys move between rows, and Escape puts a cell back.
Nothing is saved until you press Save. The card counts your edits, for example 3 variants changed. Save to keep them., with Undo changes. The product’s Save saves the table along with every other section, and Discard drops it all.
More on each row. The ⋯ menu has Count stock for this variant or Stop counting stock: it never runs out, and Google Merchant details. Filter View narrows the table to enabled or disabled variants, or to one choice. Export downloads the variations as a spreadsheet and Import Variations, under the table, reads it back.
Choose how stock is counted. In the Inventory section, Track stock can be Not tracked, Total (one number for the product) or Per variant (one number for each combination). Choose Per variant for sizes and colors you stock separately, then set each Stock in this table. Until then the Stock column says Whole product or Not tracked. Click it to change how stock is counted.
Changing the option sets later does not wipe your work. A variation whose choices still form a valid combination keeps its SKU, price and stock.
Step 4. Show a picture for each choice
Swatch images and a gallery per option
Swatches. A Swatch set can use a color for each choice. With PRO you can use a photo or pattern instead: press the swatch and choose an image. Set the size under Rules & validation as Swatch size: 20, 30, 40 or 60px, or 80px up to 200px for photo swatches big enough to show a fabric or a print.
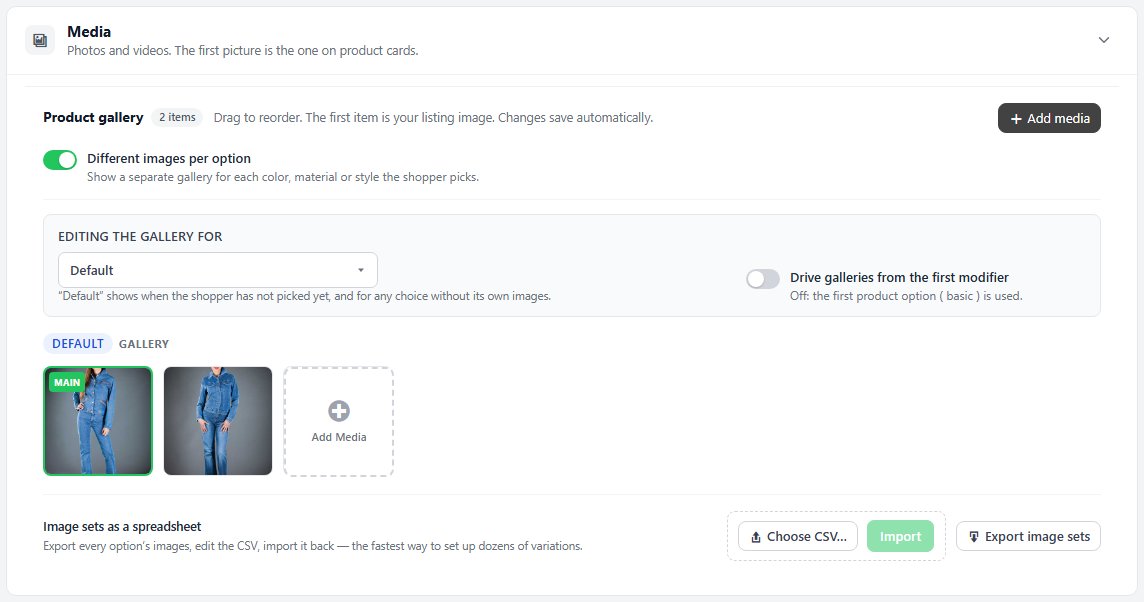
A gallery per choice (PRO). In the product’s Media section, turn on Different images per option. A picker named Editing the gallery for lets you build a separate gallery for each choice. The Default gallery shows until the shopper picks, and for any choice without its own photos. The galleries follow the first option set on the product, so attach Color first if you sell by color. Turn on Drive galleries from the first modifier to follow the first modifier instead.
The gallery and these switches save as you change them, without Save. For dozens of choices, Export image sets gives you a spreadsheet of every choice’s images to fill in and import back.
Step 5. Add personalization (PRO)
Text, files, dates and add-ons that never touch stock
In the Options & variants section, Modifiers is the third card. Pick one from Select a modifier to add… and press + Add modifier, or choose + Create a new modifier to build one. Modifiers are unlimited.
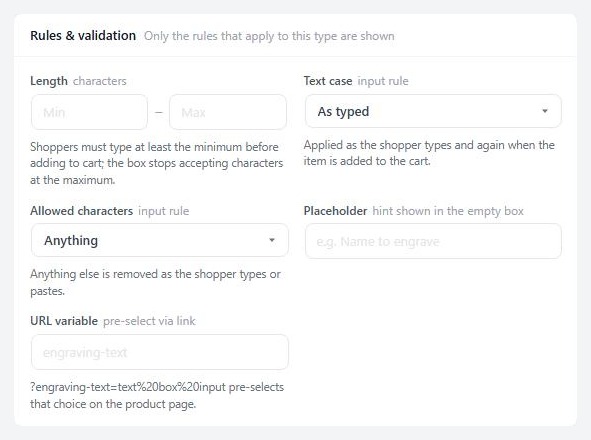
The set’s own editor holds the rules. Under Rules & validation, only the rules that fit the type show.
Text input and Text area. Set the length, Text case (as typed, UPPERCASE, lowercase, Title Case), Allowed characters (anything, letters, letters and spaces, numbers, letters and numbers) and a Placeholder. The rules apply as the customer types, and again when the item goes to the cart.
Number. A minimum, maximum and step.
File upload. Tick the file types you accept, or leave all unticked for the default list. Scripts, web pages and SVG files are always refused.
Requirement. Turn on Shopper must choose before adding to cart to make it required, and set the Error message shoppers see if they skip it.
URL variable. Lets a link pre-select a choice.
Show a field only when it matters. On a modifier, open Conditional Logic. It reads: Show or Hide this modifier when ANY or ALL of these rules match. Use it so an artwork upload only appears once the shopper ticks a personalization box. Press Save Rules.
The Option Set Manager doc lists every input type and its rules.
Ready to run your store on WP EasyCart?
Everything in this guide works with the free plugin. PRO and Premium add subscriptions, memberships, wholesale pricing and more. Try every PRO feature free for 14 days.
