
How-to › Design your store › Gutenberg

Design Your Store with Gutenberg Blocks

Build your store, category, cart and account pages with the WordPress block editor. You check your pages, add the WP EasyCart block and choose what it shows. 8 parts.

Quick links

Where to find it:WP Admin › Pages › Add New

Before you start

What the blocks do

What you need and how the blocks work.

How the blocks work

Three blocks, each one writing a shortcode

no stored settings

What you need. WP EasyCart and the block editor, which is standard in WordPress. The blocks are in the free plugin. They appear in the inserter under a group called WP EasyCart and only for administrators.

The three blocks. WP EasyCart does most of the work. You choose what to show, such as the store, the cart or one product, and the fields for that choice appear in the block. Store by Category shows a full store limited to the categories you pick. WP EasyCart Search adds a search button.

What they really do. Each block saves a shortcode into the page. That is why the same content works in the classic editor and in any builder that accepts shortcodes. It is also why the editor does not draw a live preview: it shows the block’s settings, and you look at the real page to see the result.

The steps: check your store pages, build the store page, show categories, put single products and buttons on any page, then set up the cart and account pages.

💡 Note: Prefer to design with drag and drop? The Elementor guides cover product, category, cart and account pages with EasyCart widgets. Both methods can live on the same site.

Build it

Six steps

Check your pages, add the block and build the store, categories, products, cart and account pages.

Step 1. Check your store pages

Settings › Store details › Store pages

no stored settings

WP EasyCart needs three pages: a store, a cart and an account page. When you first install it, three pages called Store, Cart and Account are made for you, each holding one shortcode, and their IDs are saved. Open EasyCart › Settings › Store details to see them.

Store page must contain [ec_store]. Product, category and manufacturer addresses are built under this page’s address, so renaming its slug changes those addresses.
Cart and checkout page must contain [ec_cart]. It runs the whole cart and checkout flow.
Account page must contain [ec_account]. Customers sign in, register and see their orders here.

Lost one? The Create store page, Create cart page and Create account page buttons under them make a new page with the right shortcode and select it for you. To use a page you already designed, pick it in the field and make sure the shortcode is on it.
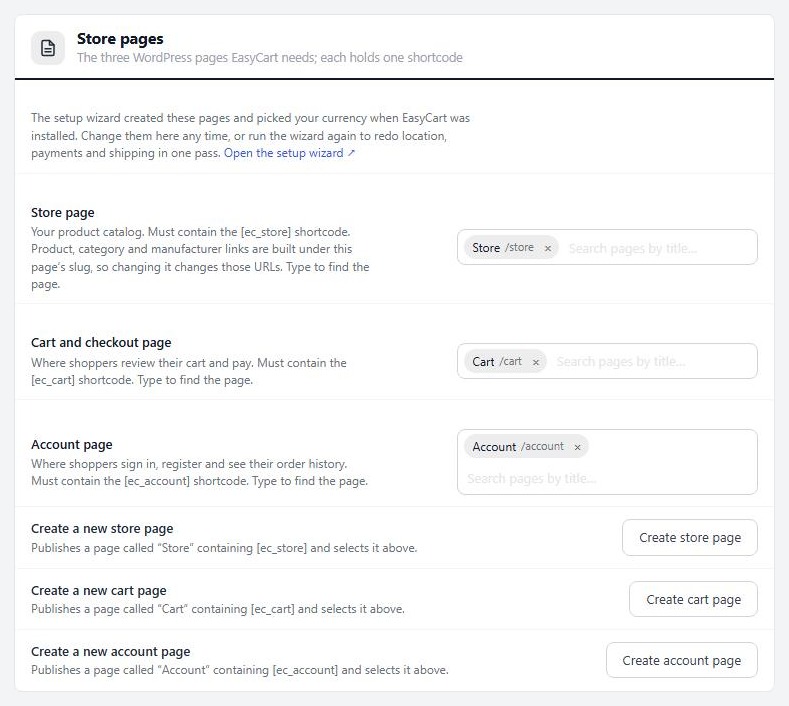
Settings › Store details › Store pages, with the three pages set.

Step 2. Add the WP EasyCart block

From the inserter, or type /easycart

no stored settings

Edit any page. Press the + button, search for easycart and choose WP EasyCart. You can also type a forward slash in an empty paragraph and start typing the block’s name.

The block opens with a list called WP EasyCart Shortcode. Choose what this block shows: Store, Cart, Account, Category Standard Display, Category Grid Display, Store Table Display, Product Display, Add to Cart Button, Cart Display or Membership Content. The fields below the list change with your choice.
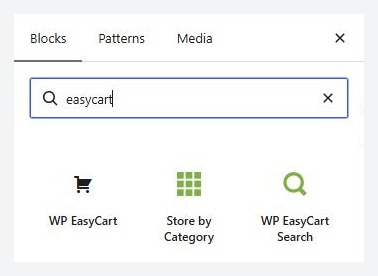
Searching the block inserter for easycart finds the three blocks.

Step 3. Build the store page

Store, with or without filters

no stored settings

Choose Store to show your catalog. Leave the filters alone and you get the whole store.

To show only part of the catalog, tick Add Product Filters and choose an Add Filters option: Show Featured Items Only, or filter by Category, Menu, Sub-Menu, Sub-Sub-Menu, Manufacturer or a single Product. Then pick the category, menu, manufacturer or product from the list that appears. This is how you make a page for each range, such as Winter coats or Sale.

The Store by Category block does the same for categories in one step. Choose the categories with its search box, press Done, and the page shows a full store for just those categories.
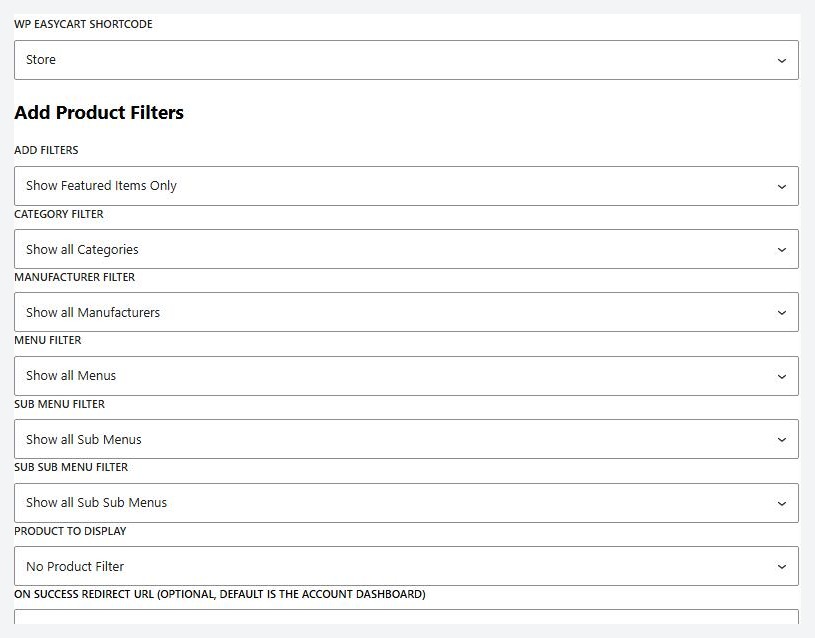
The WP EasyCart block set to Store, with the product filter fields.

Step 4. Show your categories

A front door for browsing

no stored settings

Two more choices in the list show your categories as pictures and names, the kind of front page many stores use.

Category Standard Display lists the categories you pick in a set layout.
Category Grid Display shows them in a grid. Choose the number of Columns, from 1 to 6.

For both, choose Categories to Display: the featured categories, the top level categories, or specific ones. Each category links to its own page in your store.

Step 5. Put products anywhere

A product, a buy button or a table

no stored settings

You can drop a product into any page, such as a blog post or a landing page.

Product Display shows one product the way it appears in your store. Choose the Product to Display and a Display Type: the default product display, the same as the product widget, or Custom Display Type 1.
Add to Cart Button is only a button. Choose the product, then Background Add: No, Redirect to Cart sends the customer to the cart, and Yes, Add in Background adds the item without leaving the page.
Store Table Display lists products in a table. Choose which products, menus or categories, then up to five columns, each with a label and the data it shows, such as Title, Price, Model Number, Stock Quantity or a Details Link.

The single product pages your customers land on are not built with blocks. They come from your theme’s product layout or, if you use Elementor, a product template.

Good to know

If something goes wrong

The usual snags with the blocks.

If it does not work

The usual snags

no stored settings

The block shows settings, not my store. That is normal. The editor does not draw a preview. Update the page and open it to see the result.

The block is missing from the inserter. The blocks load only for administrators and store managers, and only in the admin.

A long list of products becomes a text box. With around 2000 products or more, product pickers turn into a box where you type IDs separated by commas, to keep the editor fast.

My cart page shows nothing. Check that the page selected under Settings › Store details actually contains the cart shortcode. Cart, Store and Account only work on the page the settings name.

Two carts on one page. Use one Cart block on the cart page and no other cart shortcode.

Keep going

Related panels

Store details

Where the store, cart and account pages are chosen.

Design

The store design settings.

Products

Settings that change how store pages behave.

Categories

Create the categories your pages show.

Try the PRO features free for 14 days

Anything marked PRO comes with WP EasyCart PRO or Premium. Take the whole thing for a run on your own store before you decide.

Updated on September 29, 2026
