How-to › Checkout, orders and customers
How to Fulfill Orders
Ship an order, send the customer their tracking and keep the queue moving. You learn the statuses, work the order screen, add tracking and handle bulk, partial and delivered orders. 11 parts.
Quick links
Where to find it:WP Admin › EasyCart › Orders › Orders
Before you start
What shipping an order does
What you need and what happens when an order ships.
How fulfillment works
What you need and what shipping an order does
no stored settingsWhat you need. Fulfilling an order is part of the free plugin. You can ship, add tracking, email the customer and print a packing slip without PRO. PRO adds bulk fulfilling and the PDF documents. Label extensions, which are Shippo, ShipStation and Stamps.com, are Premium extensions.
What shipping an order does. It saves the tracking number, moves the order to Order Shipped, and can email the customer their tracking in the same step. Only a paid order can be shipped. An order that is unpaid, refunded, partly refunded or cancelled is never marked shipped, so nothing leaves the building by mistake.
The steps: know which statuses count as paid, work the order screen, use tracking and packages, then handle bulk, partial and delivered orders.
Do it
Ship an order
Statuses, the order screen, tracking, labels and packages.
Step 1. Know your order statuses
Which ones count as paid
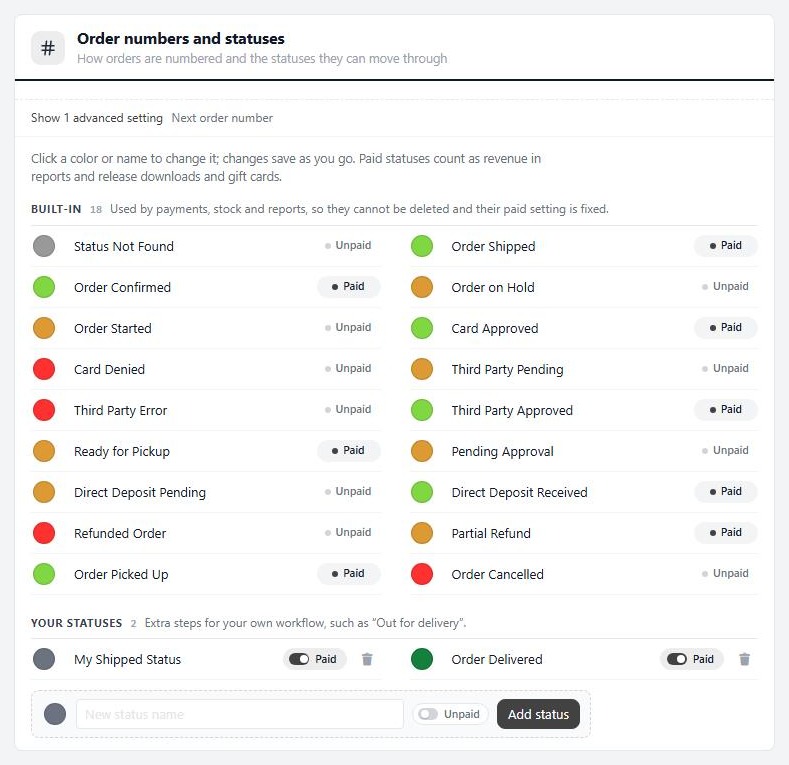
no stored settingsEvery order has a status. Some count as paid, which the plugin calls approved. A paid status takes stock, releases downloads and gift cards, and counts as revenue in reports. Open EasyCart › Settings › Checkout and find Order numbers and statuses to see them. Built-in statuses have a fixed Paid or Unpaid chip.
Paid: Order Confirmed, Card Approved, Third Party Approved, Direct Deposit Received, Ready for Pickup, Order Picked Up, Order Shipped and Partial Refund. Order Delivered is paid too, and is made the first time it is needed.
Unpaid: Order Started, Order on Hold, Card Denied, Third Party Pending, Third Party Error, Pending Approval, Direct Deposit Pending, Refunded Order and Order Cancelled. Draft and Awaiting Payment, made by New order, are unpaid too.
You can add your own statuses under Your statuses, such as Out for delivery. Give each a colour, and choose Paid or Unpaid for it. Built-in statuses cannot be deleted.
⚠️ Careful: A paid status takes stock and releases downloads and gift cards. Moving an order to one by hand before the money has arrived gives away the goods.
Step 2. Work the order screen
Orders › Orders, then open an order
no stored settingsOpen EasyCart › Orders › Orders. Filter by Awaiting Fulfillment to see what is waiting, or press the Awaiting tile. Open an order.
Across the top, a steps bar shows where the order stands: Placed, Paid, Pack & ship, Shipped and Delivered. A pickup order reads Ready for pickup and Picked up. An order with nothing to ship reads Nothing to ship. A refunded or cancelled order ends at that status.
Under it, the Next step panel tells you what to do now. For an order to ship, it reads Ship 2 items to Sam Lee and shows the address and shipping method the customer paid for. A payment held for review reads Review payment and comes first.
On the right, Shipping queue says how many other orders wait, and which has waited longest. Press Next order to ship or the N key to go to it. Work the queue from the oldest order down.
Step 3. Ship the order
Carrier, tracking number, one button
no stored settingsIn the Next step panel, choose the Carrier, which starts on the one your shipping method points to, and paste or scan the Tracking number. In browsers that can read barcodes, a scan button uses the camera. Tick Email followed by the customer’s first name to send the shipped email, then press Ship order. The order is marked shipped and the customer gets the tracking in one step.
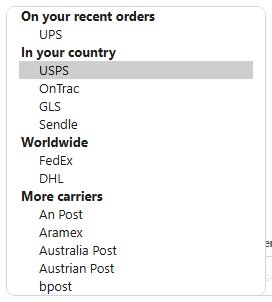
The carrier list has USPS, UPS, FedEx, DHL, Canada Post, AusPost and Other. Under the panel, three links help: Make a label opens the Fulfill order window, Print packing slip prints the slip for the box, and Edit packages changes the boxes.
Pick items as you pack them. Each line has a Packed tick, and the orders list shows how many are packed. When every item is ticked the tracking field is ready for you.
From the order list. The Fulfill button on a row opens a small box with the same Carrier and Tracking number fields, Mark the order as shipped and Email the customer ticks, and a Ship order button. A pickup order shows Mark picked up instead.

Buy a shipping label
The Fulfill order window
no stored settingsPress Make a label to open the Fulfill order window. It works in two steps. Make the label shows the label services you have connected, then Or make it at the carrier, with a tile for each carrier that opens the carrier’s own site. The one that matches your shipping method is marked Suggested. A helper box lists the ship-to address with copy buttons.
Step two, Tracking and email, is where you paste the tracking number, choose Mark the order as shipped and Email the customer the shipped email, and save.
Label extensions. Shippo, ShipStation and Stamps.com are extensions that come with WP EasyCart Premium. Once one is connected, its label service appears in the window and buys the label for you, and the tracking comes back to the order. Without one, the window offers a link to view the extensions. Each has its own guide in the Extension Guides.
💡 Note: Label extensions come with WP EasyCart Premium. Install them from the Extensions page in your admin, and start with the Shippo or ShipStation guide.
Tracking numbers and packages
One order, one box or many
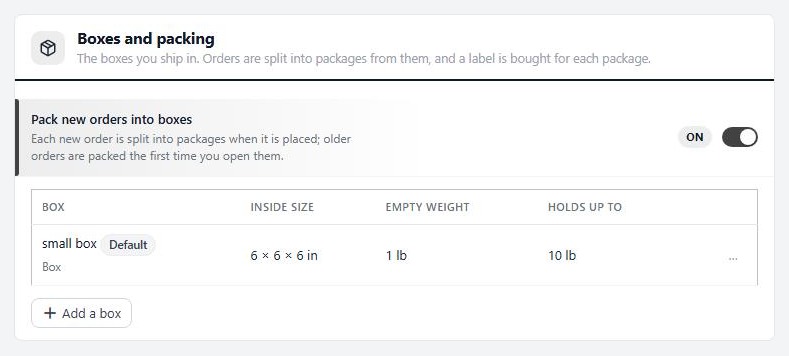
no stored settingsNew orders are split into packages when they are placed, from your box library. Set it up under Settings › Shipping settings in Boxes and packing. Pack new orders into boxes is on by default. Press Add a box to describe the boxes you use, then mark one as the default. Orders placed before the box library existed are packed the first time you open them.
With one package, the Ship panel takes one tracking number. With several, the panel says how many packages are left and offers Add tracking for each package. It opens the Fulfill order window on Tracking for each package. Add a number for each box and the customer gets one shipped email listing every package.
To change what goes in each box, press Edit packages. Each package is a card with a box picker, a weight and item steppers. Use Move to send an item to another package. Every shippable item has to sit in exactly one package before you can save. A package with a label is locked.
The shipped email shows the tracking number, a Track your package button that opens the carrier’s page, and every other package listed under it. It comes from the Shipping confirmation document in Settings › Documents.
Good to know
Bulk, partial and delivered
Many orders at once, shipments in parts, the Delivered status and the usual problems.
Fulfilling many orders at once
Bulk actions on the order list
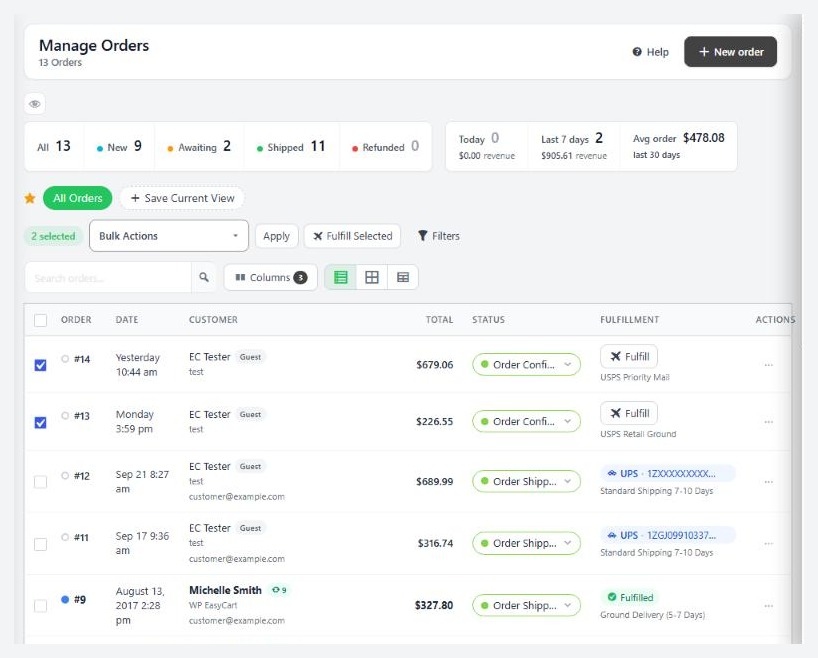
no stored settingsTick orders in the list and use the bulk actions. Change Order Status moves them together, and Send Order Shipped Email sends the email for each. With PRO, a Fulfill Selected button opens Bulk Fulfill. It marks the selected orders as Shipped and keeps the tracking numbers already saved on each. Free local pickup orders are marked Order Picked Up instead and never get a shipped email. Send shipped emails to customers is ticked by default. Press Fulfill Orders.
Bulk fulfill skips any order that is not paid, refunded or cancelled, or that a fulfillment partner is still shipping.
Partial shipments
Some items now, the rest later
no stored settingsWhen an order ships in parts, add tracking for the boxes that leave first. The order stays open until every package has tracking. The steps bar reads, for example, 1 of 3 shipped, the Next step button becomes Fulfill remaining, and the panel reads Ship the remaining items. The orders list has a Partly shipped filter.
The order moves to Shipped only when no package is still waiting. With PRO, the Send Email window lets you tick the items in this box and lists the rest as To follow in a separate shipment on the shipped email and the packing slip. See Sending Order Documents.
The Delivered status
Optional, and often automatic
no stored settingsDelivered is the last step. It is optional, and nothing else in the store depends on it. Under Settings › Shipping settings the Delivery card has Mark orders delivered from tracking, which is on by default. When a label service reports that every package on a paid order arrived, the order moves to your Delivered status. You can rename that status or change its colour under Order statuses.
If nothing reports delivery for an order, the steps bar says Optional, and a shipped order shows Mark delivered on the Delivered step. Press it once the customer has the parcel. If a package comes back or fails, the step reads Delivery problem.
Test it
Ship one order before you ship a hundred
no stored settings1. Place a test order and pay it in test mode. It shows as awaiting fulfillment.
2. Open it. Check the Next step panel reads Ship 1 item, with your address.
3. Pick a carrier, paste a fake tracking number, tick the email box and press Ship order.
4. Check the status is Order Shipped, the steps bar is filled in and the shipped email arrives with a Track your package button.
5. Try an order with two items in two packages and add tracking for each.
Delete your test orders when you are done.
If it does not work
The usual reasons an order will not ship
no stored settingsThe Ship order button is missing. The order is not paid, or it is refunded, partly refunded or cancelled. Check its status. An order waiting for a bank transfer is not paid until you move it to Direct Deposit Received.
You are told the order has packages. A single tracking number is refused when more than one package still waits. Add a number for each package from the Fulfill order window.
The order was not marked shipped. A fulfillment partner still has items to ship, or a package still needs its tracking number. The order moves to Shipped once they ship.
The customer did not get the email. The Email box was not ticked, or the email failed. Open Send Email on the order and send it again, and check the Email log in Settings › Email.
The wrong package contents. Press Edit packages. Every shippable item has to sit in one package, and a package that already has a label cannot change.
A tracking number is wrong. Correct it in Quick edit on the orders list. The correction also fixes the store’s own package, so the email and My Account show the right number.
Keep going
Related panels
The order list and the order screen in full.
Shipped emails, packing slips and split shipments.
Boxes, delivery and carrier accounts.
Buy labels with Shippo.
Ready to run your store on WP EasyCart?
Everything in this guide works with the free plugin. PRO and Premium add subscriptions, memberships, wholesale pricing and more. Try every PRO feature free for 14 days.