
Step 1. Check the status card
Settings › Elementor
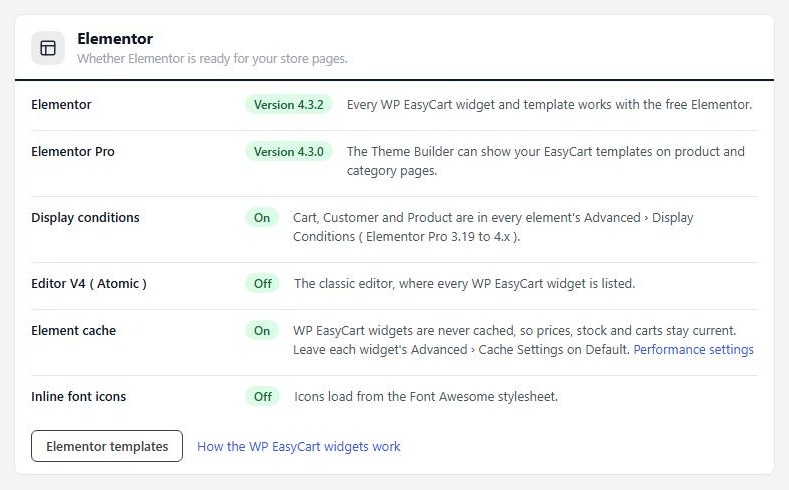
Go to EasyCart › Settings › Elementor. The top card, called Elementor, tells you whether Elementor is ready for your store pages.
If Elementor is not active, the card says so and offers a Get Elementor button. Install and activate it, then come back. Once it is active the card lists:
Elementor: the version you run. It turns to a warning when it is newer than the version WP EasyCart was tested with. The widgets keep working, so treat it as a heads-up.
Elementor Pro: the version, or Not installed. The card says plainly that Pro is not needed, because WP EasyCart assigns its own product and category templates.
Display conditions (only with Elementor Pro): whether WP EasyCart’s own display conditions are on. See the dynamic tags guide for what they do.
Editor V4 (Atomic): shown when your Elementor has it. WP EasyCart widgets are classic widgets. They work next to atomic elements and sit in the panel under WP EasyCart.
Element cache: shown on Elementor 3.22 and newer. WP EasyCart widgets are never cached, so prices, stock and carts stay current. Leave each widget’s Advanced › Cache Settings on Default.
Inline font icons: how Elementor draws icons. The WP EasyCart widgets follow it.
Two links sit under the list: Elementor templates opens your Elementor library, and How the WP EasyCart widgets work opens the Elementor docs.
Step 2. Find the widgets in the panel
Five groups, named WP EasyCart
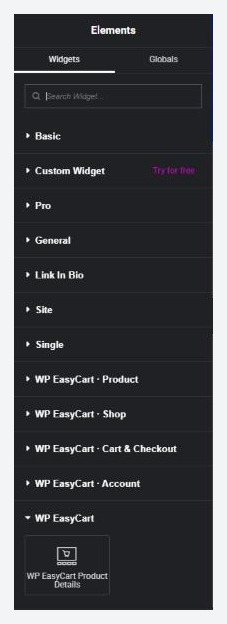
Open any page with Elementor and search the panel for the widget you want, or scroll to the group. WP EasyCart adds these groups:
WP EasyCart · Product: the buying and information widgets for a product page. Add to Cart, Product Price, Product Stock, Product SKU, Product Gallery, Product Badges, Product Title, Product Rating, Product Description, Product Short Description, Product Specifications, Product Tabs, Product Reviews, Breadcrumbs, Product Meta, Share Buttons and Related Products.
WP EasyCart · Shop: Products, Product Carousel, Product Categories, Shop and Product Search, plus the category and manufacturer pieces: Category Title, Category Description, Category Image, Subcategories, Manufacturer Title, Manufacturer Description and Manufacturer Logo. Pricing Table (PRO) shows a subscription plan group’s pricing table.
WP EasyCart · Cart & Checkout: Cart, Checkout, Order Summary, Order Confirmation, Menu Cart and Side Cart (PRO).
WP EasyCart · Account: My Account, Account Navigation, Account Dashboard, Order History, Order Details, Subscriptions, Addresses, Account Details, Payment Methods, Downloads, Customer Login, Registration Form, Lost Password and Logout.
WP EasyCart: the older widgets. They keep every saved page working. Where WP EasyCart has replaced one with a newer widget, the old one no longer shows in the panel, and a page that still uses it offers a Replace button.
Each group has its own guide in this series: product pages, shop and category pages, the category template, the account area and the cart and checkout.
Step 3. Add the starter pages
Five ready layouts in My Templates
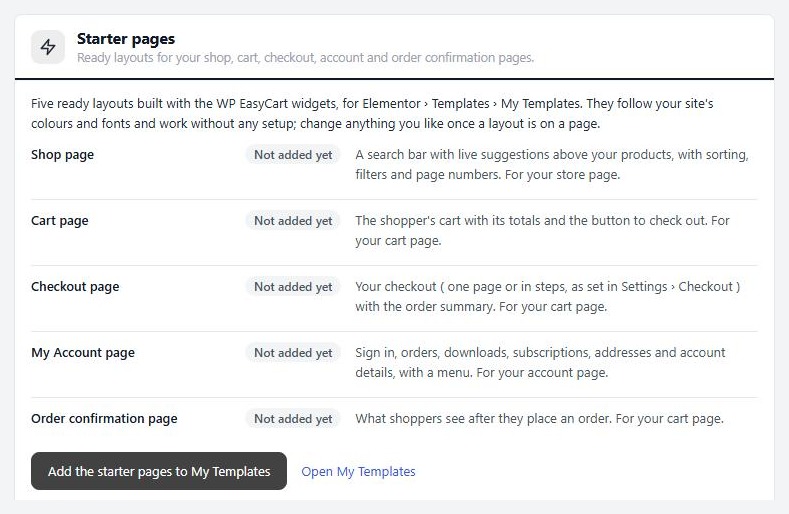
Starter pages give you a finished layout to edit instead of a blank page. On Settings › Elementor, open the Starter pages card. It lists five layouts and shows which are already in your library:
Shop page: a search bar with live suggestions above your products, with sorting, filters and page numbers. For your store page.
Cart page: the shopper’s cart with its totals and the button to check out. For your cart page.
Checkout page: your checkout, one page or in steps as set in Settings › Checkout, with the order summary. For your cart page.
My Account page: sign in, orders, downloads, subscriptions, addresses and account details, with a menu. For your account page.
Order confirmation page: what shoppers see after they place an order. For your cart page.
Press Add the starter pages to My Templates. The layouts land in Elementor › Templates › My Templates, each named WP EasyCart — Shop page and so on. Press it again later and the button reads Add the missing starter pages: it adds only what is not there, and a template you deleted comes back. Each row has an Edit in Elementor link, and Open My Templates takes you to the library.
Use one. Edit the page with Elementor, open Add Template (the folder icon), choose My Templates and insert the layout. Put the Shop page on your store page and My Account on your account page. The cart, the checkout and the order confirmation all live on your cart page: insert the Cart, Checkout and Order confirmation layouts there, one below the other, and each shows at its own step. Your store, cart and account pages are chosen in Settings › Store details, in the Store pages card.
The layouts follow your site’s colours and fonts and need no setup. Adding templates needs an account that can manage the store’s settings and edit posts in WordPress.
Step 4. Set your store colours once
Elementor › Site Settings › WP EasyCart
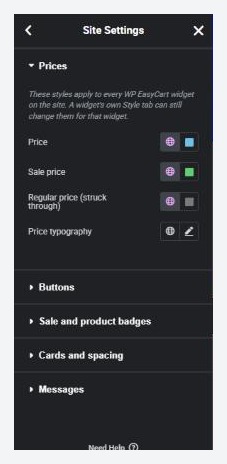
Instead of styling every widget, set the look of the whole store in one place. In the Elementor editor, open the menu at the top left, then Site Settings. Under Theme Style, next to Typography and Buttons, is a tab called WP EasyCart. It styles every WP EasyCart widget on the site at once:
Prices: Price, Sale price, Regular price (struck through) and Price typography.
Buttons: Background and Text, Normal and Hover, Corner radius and Button typography.
Sale and product badges: Background and Text.
Cards and spacing: Card corner radius, Space between items, Borders and Secondary text.
Messages: Success and Error.
Colours start from your Global Colors, so a store that already has a palette looks right straight away. A widget’s own Style tab still wins for that one widget. Behind the scenes each setting writes a shared style variable, such as --wpec-button-bg. Nothing is copied into WP EasyCart’s own settings, so saving Site Settings has no side effects.
Ready to run your store on WP EasyCart?
Everything in this guide works with the free plugin. PRO and Premium add subscriptions, memberships, wholesale pricing and more. Try every PRO feature free for 14 days.
