
Step 1. Use a dynamic tag
The WP EasyCart group of dynamic tags
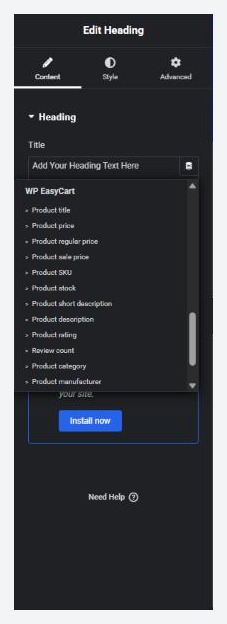
no stored settingsWhere a control shows the dynamic tags icon, open it and pick from the WP EasyCart group. The Product tags are:
Text and numbers: Product title, Product price, Product price (number), Product regular price, Product sale price, Product SKU, Product stock, Product stock (number), Product short description, Product description, Product rating, Product rating (number), Review count, Product category and Product manufacturer.
Links: Product URL, Add to cart URL, Product category URL and Product manufacturer URL.
Images: Product image and Product gallery.
The cart and customer tags are Cart count, Cart count (number), Cart subtotal and Customer first name.
Which product. A product tag shows the product of the page it sits on: a product page, a product template or a Loop Grid card. Choose A product I choose in the tag to show another one, from a list of up to 300 products or by its ID.
Prices. The price tags follow the product page, including sale prices, customer prices, VAT and your language file. Product price can show the Price the shopper pays, the Regular price (before a sale), the Sale price (only when on sale) or the Lowest price (products with options). The Product sale price tag shows nothing for a product that is not on sale. The number tags give a plain number, for a number control.
Elementor › Site Settings › WP EasyCart styles prices, buttons and badges for every WP EasyCart widget at once. See the overview guide.
Step 2. Add to cart from any button
The Add to cart URL tag
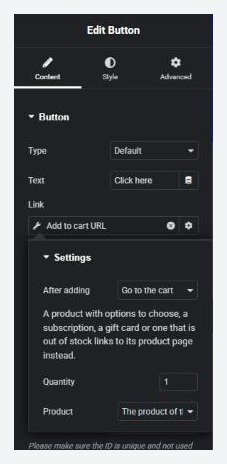
no stored settingsSet the link of a Button, Call to Action or Price Table to the Add to cart URL tag. Clicking it adds the product to the cart. In the tag choose After adding: Go to the cart or Stay on the page and show a note, and a Quantity. Pick the product with the tag’s product choice, or let it use the page’s product.
The link looks like /?wpec_add_to_cart=12&quantity=1, with &wpec_stay=1 for the stay option. It adds only products a link can add in one step: active, the store open to the shopper, in stock or on backorder, with a price the shopper may see. A product with options to choose, a subscription, a gift card, a donation, a catalog or inquiry product, or one that is out of stock sends the shopper to its product page instead, where they can choose.
A link adds up to 20 units, and never more than the stock left. Browsers that prefetch the link and obvious bots do not add anything, and search engines are asked to skip these links in robots.txt. Reloading the page the shopper lands on never adds the product again. The older ?ec_add_to_cart= links with a model number keep working.
Step 3 (Elementor Pro). Product cards with Loop Grid
Query IDs for Loop Grid and Loop Carousel
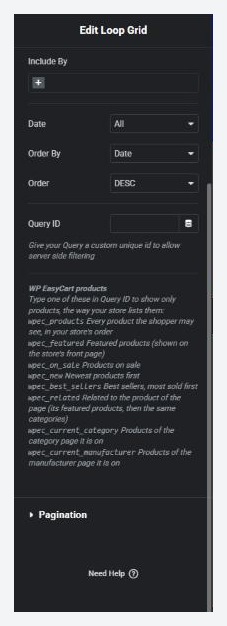
no stored settingsDesign a Loop Item with the WP EasyCart tags or widgets. Add a Loop Grid or Loop Carousel, set Query › Source to Store Items and type one of these in Query ID. The loop panel lists them, too.wpec_products: every product the shopper may see, in your store’s order.wpec_featured: featured products, the ones shown on the store’s front page.wpec_on_sale: products on sale.wpec_new: newest products first.wpec_best_sellers: best sellers, most sold first.wpec_related: related to the product of the page: its featured products, then the same categories.wpec_current_category: the products of the category page it is on (wpec_category works too).wpec_current_manufacturer: the products of the manufacturer page it is on.
Without a Query ID a Store Items loop also lists categories and manufacturers, which are store items too. With one, the loop shows only products. Inactive products, products for another customer role and every product when the store is closed to the shopper (Who can view the store) are always left out. The order follows your store’s default sort in Settings › Products, and best sellers are ranked by paid orders. In the editor, a loop with nothing to match shows sample cards so you can design.
Step 4 (Elementor Pro). Collect newsletter sign-ups
The Add to WP EasyCart newsletter form action
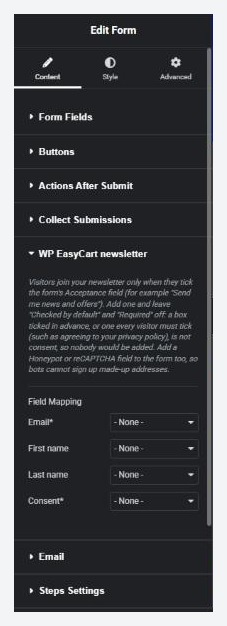
no stored settingsIn an Elementor Pro Form widget, add Add to WP EasyCart newsletter to Actions After Submit. Add an Acceptance field with wording such as Send me news and offers. Leave Checked by default and Required off. Only visitors who tick the box are added to Marketing › Subscribers, with Elementor form as the source.
The action’s own section maps Email, First name, Last name and Consent to your form fields. Left unmapped, it uses the first Email field, the first Acceptance field and fields named first_name and last_name. A box ticked in advance, or one every visitor must tick (such as agreeing to your privacy policy), is not consent, so nobody is added. The form still sends its other actions either way.
Add a Honeypot or reCAPTCHA field to the form too, so bots cannot sign up made-up addresses.
Step 5 (Elementor Pro 3.19 to 5.0). Display conditions
Show or hide an element by cart, customer or product
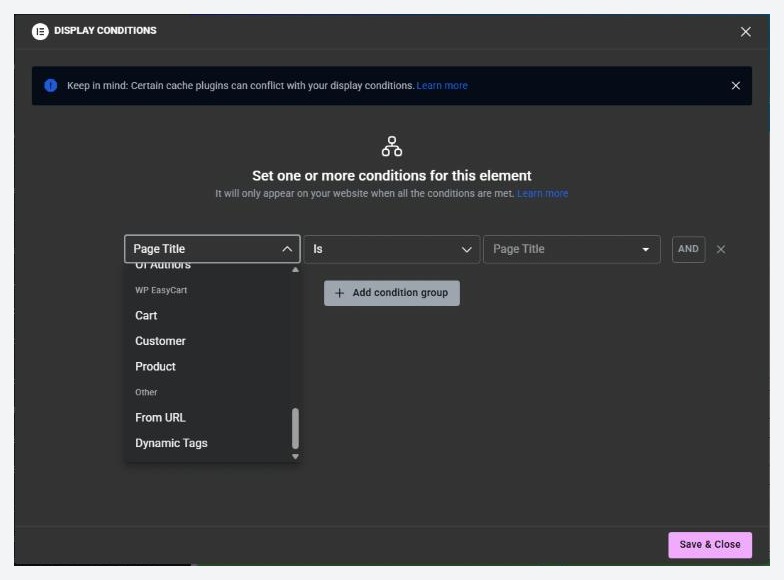
no stored settingsWith Elementor Pro from 3.19 up to, but not including, 5.0, any element’s Advanced › Display Conditions has a WP EasyCart group with three conditions. Each takes Is or Is not:
Cart: Empty, or Has items.
Customer: Signed in, or Signed out.
Product: On sale, or In stock.
Use them for a banner that shows only when the cart has items, a Sign in button for signed-out visitors or a Sale badge on products on sale. Product looks at the product of the page or template. With no product on the page it is neither on sale nor in stock. Pages that use one are never cached, because the answer depends on the visitor.
Check Settings › Elementor. The Display conditions row on the status card says whether they are on. With Elementor Pro older than 3.19 they are not available. With Elementor Pro 5.0 or later WP EasyCart does not register them until an update supports it, and Elementor Pro then ignores a condition you saved, so its element shows to every visitor. The card counts how many pages use one.
Ready to run your store on WP EasyCart?
Everything in this guide works with the free plugin. PRO and Premium add subscriptions, memberships, wholesale pricing and more. Try every PRO feature free for 14 days.
