How-to › Marketing and growth

How to Connect Email Marketing

Keep your newsletter list, customers, orders and abandoned carts in step with MailerLite, Kit, ActiveCampaign, Mailchimp or Klaviyo. You switch on the checkbox, connect your service and test it. 12 parts.

Quick links

Where to find it:WP Admin › EasyCart › Settings › Email marketing

Before you start

What you are building

What you need, what syncs, and which service to use.

How email marketing connects

What you need, and which service to use

no stored settings

What you need. WP EasyCart PRO or Premium for MailerLite, Kit or ActiveCampaign. The free plugin shows the page locked. For Mailchimp or Klaviyo you need a Premium license and the Email Marketing extension. You can try PRO with the free trial.

What it does. It keeps your newsletter list in step with your store, both ways. A shopper who joins your newsletter is added to your service. A shopper who unsubscribes there leaves your store’s list too. You can also send orders and abandoned carts, so the service can run purchase and cart automations.

Which service. MailerLite, Kit (formerly ConvertKit) and ActiveCampaign live in Settings › Email marketing. Mailchimp and Klaviyo connect through the Email Marketing extension, covered near the end. The old Mailchimp extension is retired.

The steps: switch on the newsletter checkbox, connect your service, check the connection, send your existing subscribers, choose the store data you want to share and test.

Set it up

Five steps

Switch on the newsletter checkbox, connect a service, check it, choose the store data to share, then test.

Step 1. Switch on the newsletter checkbox

Settings › Accounts › Registration

no stored settings

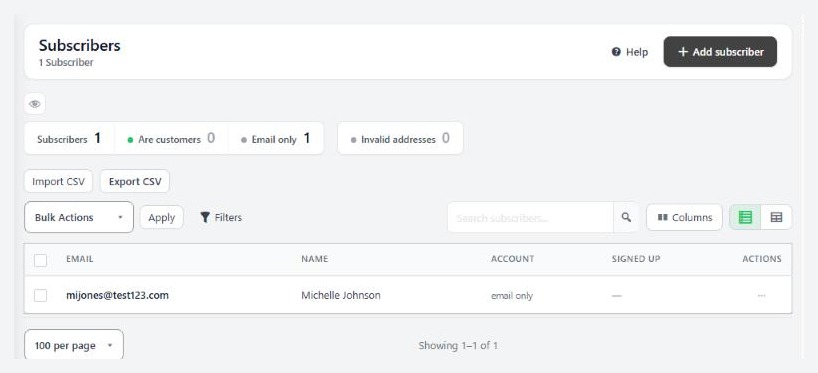
Open EasyCart › Settings › Accounts and find the Registration card. “Subscribe to newsletter” checkbox is on by default. It shows on the registration form and at checkout. Subscribers appear under Users › Subscribers.

The checkbox starts unticked, so a customer must choose to join. That is what makes the consent real. Do not change it to pre-ticked.

You can also collect sign-ups with a popup. In Settings › Design turn on Show the newsletter sign-up popup under Newsletter popup. Its sign-ups land in Subscribers too.
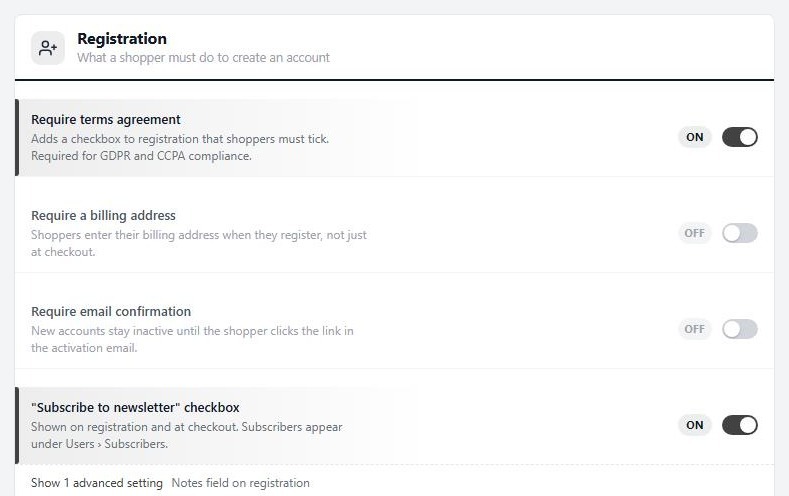
Settings › Accounts › Registration, with the Subscribe to newsletter checkbox setting.

⚠️ Careful: Keep the newsletter checkbox unticked by default. A customer who did not choose to join should not be on your list.

Step 2. Choose and connect your service

Settings › Email marketing

no stored settings

Open EasyCart › Settings › Email marketing. Each service has two sections: the connection and newsletter list, and then its store data. Use the one you already have an account with. The steps below are for each service.
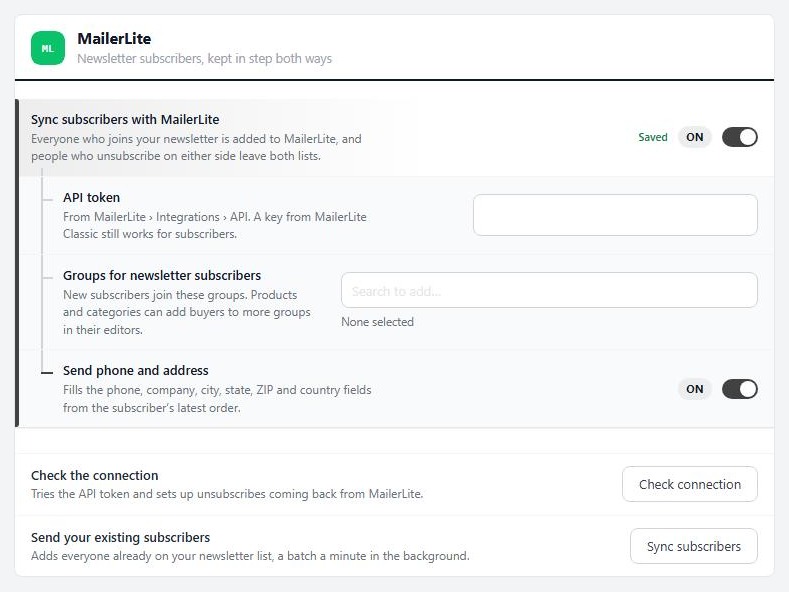
Settings › Email marketing, showing the MailerLite section.

Connect MailerLite

API token and groups

no stored settings

In MailerLite:

Sync subscribers with MailerLite: switch it on.
API token: from MailerLite › Integrations › API. A key from MailerLite Classic still works for subscribers.
Groups for newsletter subscribers: new subscribers join these groups. Products and categories can add buyers to more groups in their editors.
Send phone and address: fills the phone, company, city, state, ZIP and country fields from the subscriber’s latest order.

Save the page, then press Check the connection.

Connect Kit (formerly ConvertKit)

API keys and a form

no stored settings

In Kit:

Sync subscribers with Kit: switch it on.
API key: from Kit › Settings › Developer › API keys, a V4 key. It is needed for tags, the last name field, cart tags and unsubscribes coming back.
V3 API secret: on the same Developer page, under V3. It records purchases, because Kit’s newer API only lets approved apps do that.
V3 API key: only needed if you have no V4 key.
Form to subscribe to: optional with the V4 key. If the form asks people to confirm, Kit sends its confirmation email first.
Tags for newsletter subscribers: new subscribers get these tags.

Save the page, then press Check the connection.

Connect ActiveCampaign

API URL, key and list

no stored settings

In ActiveCampaign:

Sync subscribers with ActiveCampaign: switch it on.
API URL: your account’s API access URL, under Settings › Developer in ActiveCampaign. Only the address is kept.
API key: from the same Developer page. It is only sent from your server.
List to add subscribers to: create a list for store subscribers first.
Ask new subscribers to confirm: pick an ActiveCampaign form that uses double opt-in, and new subscribers join the list once they confirm.
Tags for newsletter subscribers.

Save the page, then press Check the connection.

Step 3. Check it and send your existing subscribers

Check the connection, then Send your existing subscribers

no stored settings

Check the connection tries your key or token and sets up unsubscribes coming back from the service. Under the section a status shows Connected with your account, or The last check failed, and Unsubscribes come back once that is set up.

Send your existing subscribers adds everyone already on your newsletter list, a batch a minute in the background. The status shows how far it has got, such as how many sent and failed.

Below the status is a table of recent activity. It shows when, what and the result, which is Sent, Will retry, Failed or Not sent. What is sent includes subscribes, unsubscribes, address changes, privacy erasures, orders, refunds, abandoned carts, existing subscribers, past orders and connection checks. Look here first when someone is missing in your service.

Step 4. Choose the store data to share

Orders, abandoned carts and customers who did not sign up

no stored settings

Each service has a store data section. It is where you switch on what reaches the service beyond the newsletter list.

MailerLite store data: Send orders to MailerLite starts its purchase automations and shows in its reports. It needs the new MailerLite on a Comfort or Power plan. Send abandoned checkouts sends carts left by subscribers, with a link back to the cart. Include customers who did not sign up records their orders as customers who do not accept marketing, and they join no group. Send past orders sends every paid order in the background.

Kit store data: Record purchases in Kit needs the V3 API secret. Tag subscribers who leave a cart adds a tag when a subscriber leaves a cart and removes it when they buy, so you can start a Kit automation from it. Abandoned cart tag needs the V4 key. Send past orders records earlier orders.

ActiveCampaign store data: Send orders to ActiveCampaign shows orders on the contact and starts “Makes a purchase” automations, and refunds update them. Send abandoned carts sends carts with a link back, and marks them recovered when they buy. Include customers who did not sign up makes them contacts on no list. ActiveCampaign bills by contacts, so this raises your bill. Send past orders sends history and never starts automations.

Who sends the cart reminders. Each service has Let MailerLite send the cart reminders (or Kit, or ActiveCampaign). Turn it on and your store’s own abandoned cart emails skip the carts the service gets, so nobody is reminded twice. If you turn it off, use the abandoned cart sequence in Marketing › Abandoned Cart. See the abandoned carts guide.

⚠️ Careful: Your store keeps sending receipts and shipping emails. If you also turn on order emails in your service, customers get two of each. Send only one set.

Mailchimp and Klaviyo

The Email Marketing extension

no stored settings

Mailchimp and Klaviyo are not in Settings › Email marketing. That page has an Other services section, with a link to Browse extensions. Install the Email Marketing extension from EasyCart › Extensions. It needs a Premium license, with WP EasyCart, WP EasyCart PRO and WP EasyCart Premium all up to date.

You pick Mailchimp or Klaviyo, connect by signing in or with a key, and choose the audience or list. It sends products, customers, orders, carts and discount codes as they change, and keeps sign-ups in step both ways. If you still have the old MailChimp extension, deactivate it first. The full setup is in the Email Marketing extension guide.

💡 Note: One extension, two services. Klaviyo and Mailchimp are picked inside the Email Marketing extension, and only one is connected at a time.

Step 5. Test it

Sign up as a customer and watch it arrive

no stored settings

1. In a private window, sign up with a new email using the checkbox at checkout or the registration form.
2. Open Users › Subscribers. The address should be there.
3. Open your service. The contact should arrive within minutes, in the group, tags or list you chose. If you set a confirmation form, confirm it.
4. Back in Settings › Email marketing, look at the recent activity. The subscribe should read Sent.
5. Unsubscribe in your service. The address should leave Subscribers. Put it back by hand if it was you.

Then place a test order if you turned on orders, and check it arrives.

Keep it running

Consent and fixes

Who is sent and what happens when they leave, and what to check when a contact does not arrive.

If it does not work

The usual reasons contacts do not arrive

no stored settings

Check the connection fails. Recheck the key or token, and for ActiveCampaign the API URL. Kit needs a V4 key for tags, and a V3 secret for purchases.

A list or group picker says it could not list them. The connection is not working. Fix the key, save, and reload.

A customer is missing. They may not have ticked the box. Check Users › Subscribers, then the recent activity for Failed or Not sent.

Existing subscribers are slow to arrive. They go a batch a minute in the background, and only while the site is visited or a server cron job runs. Give a big list time.

Orders do not reach MailerLite. Orders need the new MailerLite on a Comfort or Power plan.

Unsubscribes do not come back. Press Check the connection again. It sets them up.

Nothing sends since your license lapsed. The page says the license is not active. Only unsubscribes and address changes go through. Renew at wpeasycart.com/my-account.

Customers get two cart reminders. Turn on Let the service send the cart reminders, so your store skips those carts.

Keep going

Related panels

Email Marketing

The Email Marketing extension for Mailchimp and Klaviyo.

MailerLite

The MailerLite integration guide.

Subscribers

Your subscribers list.

Abandoned Carts

Your own abandoned cart reminders.

Ready to run your store on WP EasyCart?

Everything in this guide works with the free plugin. PRO and Premium add subscriptions, memberships, wholesale pricing and more. Try every PRO feature free for 14 days.

The WP EasyCart admin: orders and offers
Updated on September 30, 2026