
How-to › Checkout, orders and customers
How to Take a Phone Order and Send a Pay Link
Build an order for a customer who calls or emails, then send an invoice with a Pay button so they pay online. You build the order, save it, send the invoice and mark it paid. 12 parts.
Quick links
Where to find it:WP Admin › EasyCart › Orders › Orders › New order
Before you start
What you are doing
What you need and the path from a call to a payment.
How a phone order works
What you need and the path from call to payment
no stored settingsWhat you need. WP EasyCart PRO or Premium. Building an order in the admin and the invoice email are PRO features, and without PRO the New order button offers an upgrade. The pay link page itself is part of the free plugin, and to take a card online on it you also need Stripe, Square, or PayPal with its Pay Now buttons on.
The path. A customer calls or emails an order. You build it in the admin, save it and email an invoice with a Pay button. The customer opens the link, pays on a page for that one order, and the order marks itself paid. Stock goes down when the order is paid, not when you build it.
The steps: build the order, choose how you save it, check that pay links can take payment, send the invoice, then handle the payment.
💡 Note: Not on PRO yet? Locked features in the free plugin carry a Start free trial link, and a trial unlocks New order and the invoice email while it lasts.
Do it
Six steps
Build the order, save it, check pay links, send the invoice and see what the customer sees.
Step 1. Start a new order and pick the customer
Orders › Orders › New order
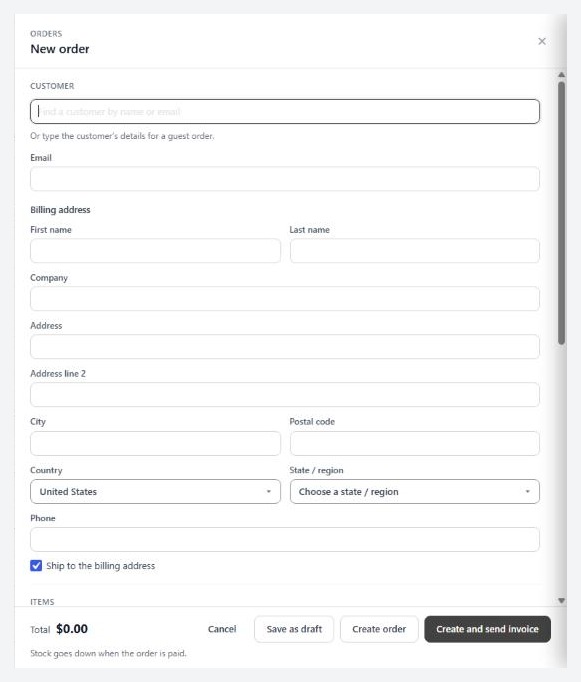
no stored settingsOpen EasyCart › Orders › Orders and press New order. A drawer opens.
Under Customer, search with Find a customer by name or email to pick someone who already has an account. Their details fill in. For a new caller, type the details yourself, and the order is a guest order. You need a valid Email, a First name, a Last name and a Country on the billing address before you can save.
Under Shipping address tick Ship to the billing address to copy it, or untick it and type another. If nothing ships, tick Nothing to ship.
Step 2. Add the items
Products by name or SKU, or a custom line
no stored settingsUnder Items, type in Add a product: search by name or SKU. The search also finds a product by its ID or by a variant’s SKU. Pick a result, choose its Options if it has any, and set the quantity. The line uses the same price the checkout would, including a variant’s own price. You can change the Unit price on a line for a phone discount.
For something not in your catalog, press Add a custom line. Give it a Description, Qty and Unit price, and tick Taxable or Ships as needed.
If a product is short of stock, the line says so, for example that only some are in stock and the rest goes on backorder. The order still saves. Stock is taken when it is paid.
Gift cards, downloads and subscriptions cannot be added here. They are only sold through your store’s checkout, so the search skips them.
Step 3. Shipping, discount and tax
The totals work themselves out, and you can overrule them
no stored settingsShipping rate lists your store’s rates for the shipping address. Choose one, or choose Custom: enter the method and amount to type your own. If your live carrier rates cannot be loaded here, the builder says so and you enter the shipping by hand. A customer whose account has free shipping gets every rate free.
The Summary box shows the Subtotal, Discount, Tax and Total.
Discount is an amount you type to knock off the order.
Tax reads Automatic. It uses your store’s tax rules, or a tax service such as Avalara AvaTax, for the shipping address, or the billing address when nothing ships. Press Recalculate after you change an address or a line. Type an amount to set tax by hand, and press Use automatic to go back. A tax-exempt customer account is shown as exempt. If you use TaxCloud or TaxJar, they only work out tax at checkout, so you enter this order’s tax by hand.
Step 4. Invoice details and notes
PO number, payment terms and a note
no stored settingsUnder Invoice details you can add a PO number for a business customer. If you turned on Payment terms in Settings › Documents, a Payment terms list appears too, with your terms such as Net 30. Note to the customer is saved on the order as the customer note.
Step 5. Save it, three ways
Draft, Awaiting Payment, or send the invoice now
no stored settingsThe buttons at the foot of the drawer do three different things:
Save as draft: the order gets the Draft status. A draft is only visible to you. The customer cannot see it in My Account, and its pay link does not work yet. Use it when you are still working out the price.
Create order: the order gets the Awaiting Payment status and is placed. Nothing is emailed yet.
Create and send invoice: creates the order as Awaiting Payment and opens the Send Email window on the invoice, ready to go.
Both statuses are made the first time you need them, and neither counts as paid. The order is a manual payment order. When you send a draft’s invoice, it moves to Awaiting Payment on its own.
⚠️ Careful: A draft is hidden from the customer, and so is its pay link. If you email the pay link by hand, save the order as Create order first.
Check that pay links can take payment
Settings › Documents › Pay links
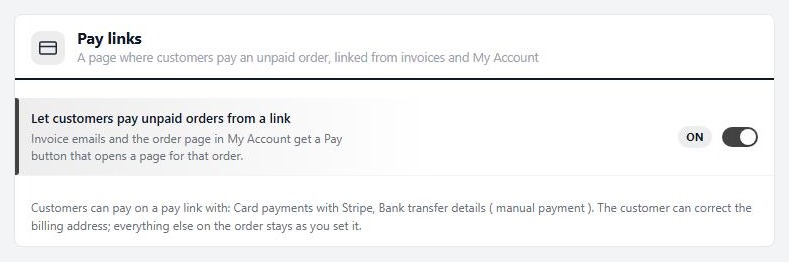
no stored settingsOpen EasyCart › Settings › Documents and find Pay links. The switch Let customers pay unpaid orders from a link is on by default. It gives invoice emails, and the order page in My Account, a Pay button that opens a page for that one order.
Under the switch, a line lists what customers can pay with on a link. It is one or more of Card payments with Stripe, Card payments with Square, PayPal (only when PayPal’s Pay Now buttons are on) and Bank transfer details ( manual payment ). If you use another card gateway, the same screen warns you that it cannot take payments on pay links yet. Invoices then go out without a Pay button for it. If none of your methods can take a payment online, a customer who opens a pay link sees your bank transfer details, or a note to contact you.
Step 6. Send the invoice
Send Email › Invoice, with a Pay button
no stored settingsFrom the order, open its … menu and Send Email, and choose Invoice. The Send Email window is covered in Sending Order Documents. There is an Invoice PDF tick. Leave it ticked to attach the PDF, or untick it to send the details in the email only. You can also press Send invoice in the Next step panel at the top of the order.
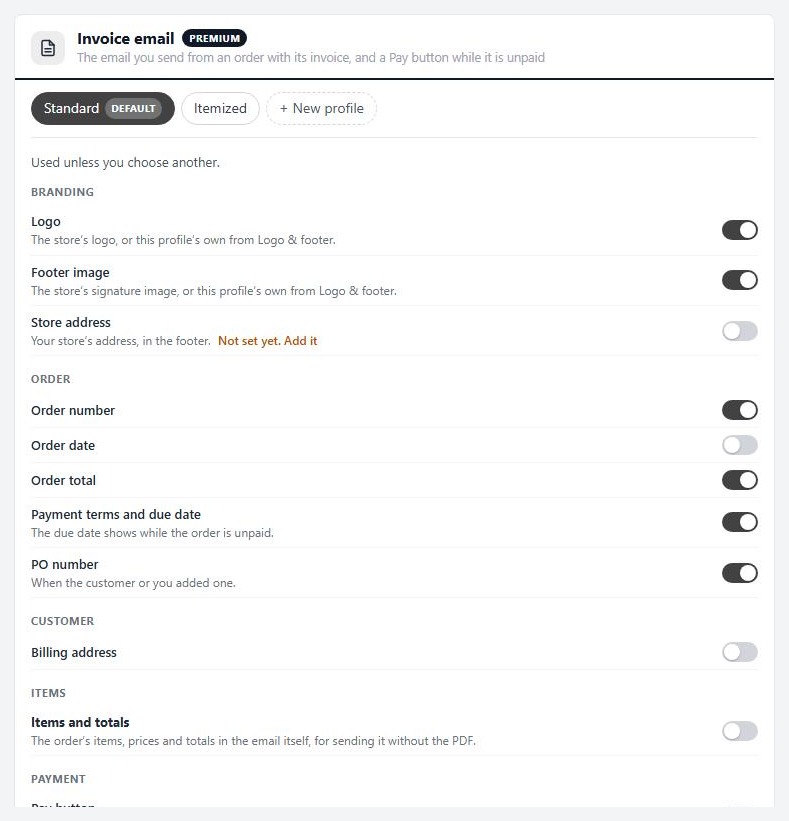
The email carries the order number, what was paid and what is due, any payment terms, due date and PO number, and a Pay invoice button. If pay links cannot take payment online, it shows your bank transfer details instead. Its look is set in Settings › Documents › Invoice email, which has a Standard and an Itemized profile, editable wording and a live preview.
The order screen also has an Invoice & PO card. Its Pay link box shows the link to copy, for texting to a customer or pasting into a chat. Email pay link sends the link, and Resend pay link appears once it has gone out. After the first send the Next step panel reads Invoice sent, waiting for payment, with when and to whom, and a Resend invoice button.
What the customer sees
One page for one order, no account needed
no stored settingsThe customer opens the Pay invoice button and lands on a page headed Pay for your order. It shows the order, the Amount due, where it ships, and a Payment box. The tabs are Card, PayPal and Bank transfer, and only the ones you can take show. They can fix their billing address. Everything else on the order stays as you set it. They press Pay now and see Thank you! Your payment was received. We have emailed you a receipt.
They do not need to log in. The link carries a key for that one order. A customer who has an account also sees a Pay now button on the order in My Account while it waits for payment.
The link stops working at the right moments. A draft says We could not find this order. An order that is already paid says This order is paid. Thank you!. A refunded or cancelled order says it can no longer be paid online.
Keep it running
Payment and problems
Payments, marking an order paid, testing and the usual problems.
When it is paid, and marking it paid yourself
Automatic for pay links, by hand for cash and bank transfer
no stored settingsPaid on the pay link. The order moves to a paid status, the stock for each line is taken once, the payment is written on the order’s timeline, and the customer gets their receipt. The gateway is trusted, not the browser: Stripe is asked whether the payment really went through. A payment that does not match the order, or a second payment on an order that is already paid, leaves a note on the order for you to check.
Paid outside the store. For cash, a cheque or a bank transfer, change the order to a status that counts as paid on the order screen, such as Direct Deposit Received or Order Confirmed. The order takes its stock when it reaches a paid status. Order statuses are covered in How to Fulfill Orders.
Record payment. If you edit an order after it was paid, so that a balance is left, the order shows Balance due and a Record payment button under it. Fill in Amount received, an optional Reference such as a cheque number, and tick Email the customer a receipt if you want one sent. The payment is added to what was paid, and the status and stock stay as they are. The pay link then charges only the balance.
Test it
Take a phone order from yourself
no stored settingsPut your gateway in test mode. Then:
1. Press New order, pick a test customer and add one cheap product.
2. Press Create and send invoice and send it to your own email.
3. Open the email and press Pay invoice. Pay with a test card such as 4242 4242 4242 4242, any future date and any code.
4. Back on the order, check its status is a paid one, the timeline shows the payment and the product’s stock went down.
5. Open the link again. It should say the order is paid.
Then turn test mode off.
If it does not work
The usual reasons an invoice or a payment fails
no stored settingsThe invoice has no Pay button. Pay links are off in Settings › Documents, or your gateway cannot take payments on them. The Pay links card names the gateway. Use Stripe, Square or PayPal with Pay Now buttons for a card on a pay link.
The customer says We could not find this order. The order is still a Draft, or the link was cut short when it was pasted. Send the invoice, which moves a draft to Awaiting Payment, or copy the Pay link again.
You cannot save the order. The builder asks for a valid customer email, a name and a country. If it says a product is a gift card, a download or a subscription, or was deleted, remove that line and add it again another way. If it says TaxCloud and TaxJar work out tax at checkout only, type the tax by hand.
The customer paid but the order looks unpaid. A payment that is still processing shows as pending. Wait for the gateway to confirm it. Check that your Stripe webhook is delivering. If a payment did not match the order, a note on the order tells you what to check in Stripe or PayPal, and Record payment is the way to add it.
A customer paid twice. The second payment leaves a note on the order that it arrived after the order was paid. Refund it in your gateway.
Stock did not go down. It goes down when the order is paid. A draft or an Awaiting Payment order has not taken any.
Keep going
Related panels
Pay links, the invoice email and invoice numbers.
The Send Email window in full.
The order list and the order screen.
Connecting Stripe, Square and PayPal.
Ready to run your store on WP EasyCart?
Everything in this guide works with the free plugin. PRO and Premium add subscriptions, memberships, wholesale pricing and more. Try every PRO feature free for 14 days.



