
How-to › Checkout, orders and customers
How to Set Up Pickup, Delivery Scheduling and Restaurant Ordering
Take orders for pickup, let shoppers choose a date or a time, and run a restaurant or a bakery from your store. You set your hours, turn on pickup at checkout, switch on your products and test. 11 parts.
Quick links
Where to find it:WP Admin › EasyCart › Settings › Schedule & locations
Before you start
Two kinds of pickup
What you need and how preorder and restaurant pickup differ.
How pickup and scheduling work
What you need and the two kinds of pickup order
no stored settingsWhat you need. WP EasyCart PRO or Premium with an active license. The store schedule, the locations and the two product switches are PRO features. They show locked without PRO.
Two kinds of pickup order. Preorder for Pickup is for things you sell ahead, like pies for the holidays. The customer orders now and chooses a pickup date and a time on that day. Restaurant for Pickup is for same-day food, like pizza. The customer chooses ASAP, or a later time today, based on your hours and your preparation time. A product is one or the other.
What about delivery? The schedules are pickup schedules. WP EasyCart has no delivery time-slot picker. To ask for a requested delivery date instead, see the section on delivery dates below.
The steps: set your schedule, turn on pickup scheduling at checkout, add locations if you have more than one, switch on your products, then place a test order.
💡 Note: This guide replaces the old How to Setup a Restaurant article. The menus it named have moved. Store Schedule is now Schedule & locations.
Set it up
Four steps
Your schedule, the checkout options, locations and your products.
Step 1. Set your store schedule
Settings › Schedule & locations › Store schedule
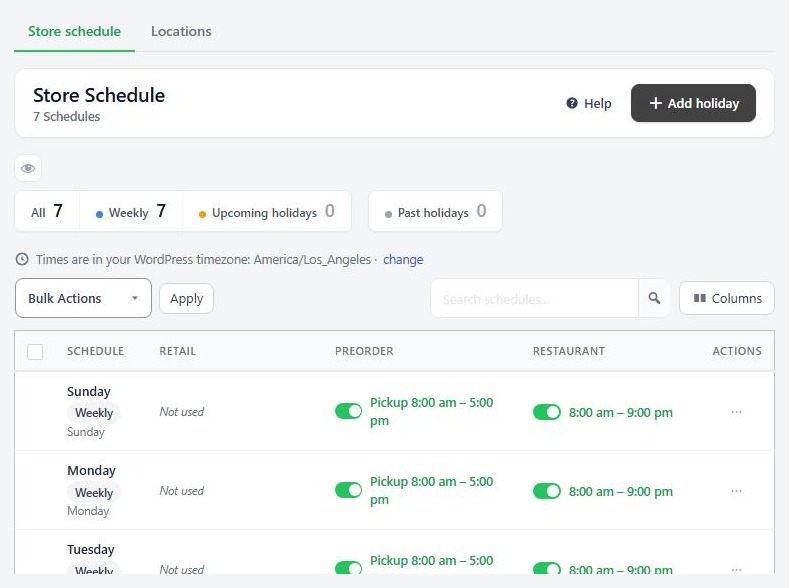
no stored settingsOpen EasyCart › Settings › Schedule & locations. The Store schedule tab shows seven weekly rows, Monday to Sunday. The seven are permanent. You can edit them but never delete them. The times use your WordPress timezone, which the page prints, so check that first.
Press a day to edit it. Under Details give it a label. Then three cards, Retail, Preorder and Restaurant, each with its own Use this schedule switch and an Open or Closed choice:
Retail covers standard products. When the day is closed, checkout is blocked for those orders on that day.
Preorder has a Preorder window with Opens and Closes, in months, days, hours and minutes. It sets how far ahead people can order. Then Pickup opens and Pickup closes are the hours for collection that day.
Restaurant has Opens at and Closes at. Leave both blank to accept orders all day.
Holidays. Press Add holiday and choose the date. A holiday is added closed for every channel your weekly schedule uses, and you can open it to change that. A holiday replaces the weekly schedule on its date only. Duplicate as holiday copies a day, which saves retyping hours for a day that is nearly normal. Holidays do not repeat, so add them again next year. Only holidays can be deleted, and you can undo for fifteen minutes.
⚠️ Careful: A Retail schedule that is closed blocks checkout for standard products on that day. Turn Retail off for a day, or leave it open, if you only want to close pickup.
Step 2. Turn on pickup scheduling at checkout
Settings › Checkout › Pickup scheduling
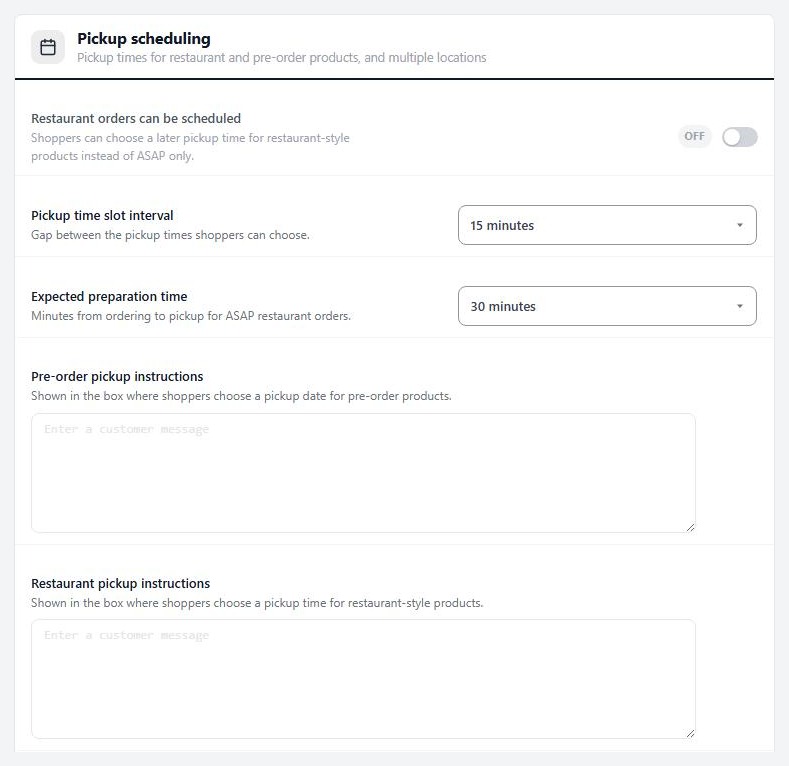
no stored settingsOpen EasyCart › Settings › Checkout and find Pickup scheduling. It covers pickup times for restaurant and pre-order products, and multiple locations.
Restaurant orders can be scheduled: off means shoppers can only choose ASAP. On lets them choose a later time today.
Pickup time slot interval: the gap between the times they can choose. It is 5, 10, 15, 20, 30 or 60 minutes, and starts on 15.
Expected preparation time: the minutes from ordering to pickup for an ASAP order. It runs from 5 to 90 in steps of 5, and starts on 30. A shopper who picks ASAP is given a time this far ahead.
Pre-order pickup instructions and Restaurant pickup instructions (advanced): text shown to the shopper next to the pickup choice, such as where to park or which door.
The switches for several locations are also here, under Show advanced settings. Step 4 covers them.
Step 3 (optional). Add pickup locations
Settings › Schedule & locations › Locations
no stored settingsIf you collect from more than one place, open the Locations tab and press Add location. Give it a label shoppers recognise, a full address, contact details and a pickup note, such as which door or where to park. Locations need PRO with an active license.
Shoppers only see locations once you turn on Multiple pickup locations in Settings › Checkout, under Pickup scheduling. The Locations tab warns you when it is off and links to the switch. Three more advanced settings appear beneath it:
Separate schedule per location: each location follows the schedules you tick on it. Add the locations to your schedules first.
Ask shoppers to choose a location when the store loads: shows a picker on arrival, with Distance units (Miles or Kilometres) and a Google Maps API key. With the key, a location’s coordinates are found from its address. Without it you type the latitude and longitude yourself, and a location with none does not show up in a distance search.
Products not stocked at the chosen location: Show as normal, Hide, or Show but disable purchase.
Step 4. Switch on your products
Product type, or Type & Behavior
no stored settingsThe quickest way is a new product. Go to EasyCart › Products › Products, press Add New and choose Restaurant item or Preorder for pickup as the Product type.
For a product you already have, open its editor, go to Type & Behavior and find Product Behaviors. Tick Enable Preorder for Pickup (order now, pick up on a chosen date) or Enable Restaurant for Pickup (ASAP-style pickup, with a ready time based on your schedule and hours). Save.
Good to know
What shoppers see and how to manage it
The pickup step, pickup orders, an example, delivery dates and the usual problems.
What the shopper sees
The pickup step at checkout
no stored settingsThe pickup step sits on the payment step of the checkout, on both the classic and the one-page checkout.
A preorder shows the heading This is a Preorder for Pick Up, the items, a Pickup Location if you use locations, and a date box and a time list. The date picker greys out days your schedule closes, and holidays. The time list shows only your pickup hours for the chosen day. Your instructions show under Pick Up Instructions. If the shopper skips it they get This order requires you to choose your pickup date and time.
A restaurant order shows This is a Pickup Order, the items, and a Time choice of ASAP or Schedule for later when you allowed scheduling. When the restaurant is closed the shopper sees The restaurant is currently closed!. In the last hour before closing a Closes in countdown shows.
After the order, the shopper is told Please be sure to pick up your order on [pickup_date] or Your order has been received and you may pick it up at [pickup_time]. You can edit those phrases and the step’s headings in the Language settings.
Managing pickup orders
The order list, the Pickup card and Mark picked up
no stored settingsTo see when orders are due, turn on Pre-order pickup date column and Restaurant pickup time column in the Orders card of Settings › Admin. The Pickup filter on the order list shows pickup orders together.
On the order screen a Pickup card holds the pickup date and time, and the location when you use several. You can change them if the customer rings to move it. The steps bar reads Ready for pickup with Restaurant order or Local pickup, then Picked up. The statuses are Ready for Pickup and Order Picked Up.
Mark picked up. For an order that uses the Free Local Pickup shipping method, the Next step panel reads Waiting for the customer to collect it with a Mark picked up button, and so does the order list. It sets the order to Order Picked Up. No carrier, tracking number or shipped email is involved. For a preorder or a restaurant order, change the status yourself once the customer has it.
An example: a coffee shop
Every value here is an example, not a default
no stored settingsSchedule. Monday to Friday, Restaurant is open with Opens at 07:00 and Closes at 15:00. Saturday is 08:00 to 13:00. Sunday is set to Closed. A holiday row closes the shop on the day you close.
Checkout. Restaurant orders can be scheduled is on. Pickup time slot interval is 15 minutes. Expected preparation time is 20 minutes. The Restaurant pickup instructions say Pick up at the counter and give your name.
Products. Every drink and pastry is a Restaurant item.
Result. At 09:10 a shopper who chooses ASAP is told to collect around 09:30. A shopper who chooses Schedule for later picks a time from 09:30 in fifteen minute steps, up to the closing time of 15:00. At 15:10 the shopper sees that the restaurant is closed.
For a bakery selling holiday pies, use Preorder for Pickup, a Preorder window that opens weeks ahead, and Pickup opens and Pickup closes for the collection hours.
Asking for a delivery date
Settings › Checkout fields (PRO)
no stored settingsIf your orders are shipped or delivered by you and you want the customer to request a date, add a question at checkout. Open EasyCart › Settings › Checkout fields and add a field of type Date. Place it at Delivery, which shows under the shipping methods. Then set Earliest date and Latest date, as a number of days from today or as a date, Days that cannot be chosen and Dates that cannot be chosen, one per line. You can show the answer as a column on the orders list.
This asks for a date and checks it is allowed. It does not limit how many orders a day can take. The date is a request that you keep.
Test it
One preorder and one restaurant order
no stored settingsIn a private window that is not logged in as an admin:
1. Add a Preorder for Pickup product to the cart and go to the payment step. Check that closed days are greyed out and that the times are your pickup hours.
2. Try to pay without choosing a date. You should get the missing date message.
3. Finish the order with a test card. Open it in the admin and check the Pickup card.
4. Repeat with a Restaurant item. Check ASAP and, if enabled, Schedule for later.
5. Check the closed message by testing outside your restaurant hours, or by setting today to Closed for a minute.
6. Mark the order picked up.
Then turn test mode off.
If it does not work
The usual reasons the pickup step is missing or wrong
no stored settingsNo pickup step at checkout. The product is not set as a Restaurant item or Preorder for pickup, or your PRO license is not active.
Every date is greyed out. The schedule for that channel is closed, the preorder window is not open yet, or the schedule has Use this schedule off for Preorder. A schedule no channel uses reads Not used in the list.
The restaurant says it is closed when it should be open. Check the Restaurant card for today and for any holiday. Times use the WordPress timezone, so a wrong timezone puts them out by hours.
No Schedule for later option. Restaurant orders can be scheduled is off, or there is no time left before closing.
Shoppers see no location choice. Multiple pickup locations is off in Settings › Checkout. The Locations tab says so.
A location is missing from a distance search. It has no coordinates. Add a Google Maps API key, or enter its latitude and longitude by hand.
A closing time will not save. It has to be later than the opening time, and the hours must be valid clock times.
Keep going
Related panels
Schedules and locations in full.
Every pickup scheduling setting.
Where the pickup switches sit on a product.
Pickup columns and the order screen.
Ready to run your store on WP EasyCart?
Everything in this guide works with the free plugin. PRO and Premium add subscriptions, memberships, wholesale pricing and more. Try every PRO feature free for 14 days.



