How-to › Design your store › Elementor

Elementor: Design the Account Area

Design the customer account in Elementor, with one My Account widget or your own layout of sign in, orders, addresses, downloads and more. 9 parts.

Quick links

Where to find it:WP Admin › EasyCart › Settings › Elementor

Before you start

What you are building

What the account widgets do and the two ways to use them.

How the account widgets work

One widget for everything, or fourteen parts

no stored settings

What you need. WP EasyCart and Elementor. The free version of Elementor is enough, and so is the free WP EasyCart. The account widgets are always on. There is nothing to switch on.

What they do. They draw the customer account with the store’s own account engine, so order history, pay links, downloads and subscriptions keep working. You only change the layout and the look.

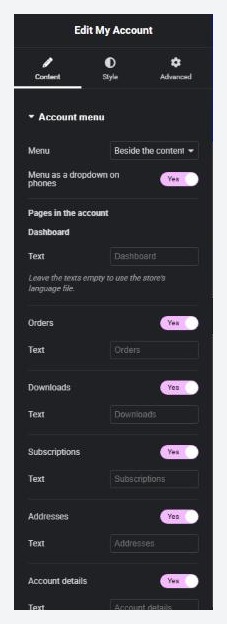
You have two ways to build it. Drop My Account on your account page for the whole area with a menu. Or build your own layout from the separate parts: Customer Login, Registration Form, Lost Password, Account Navigation, Account Dashboard, Order History, Order Details, Subscriptions, Addresses, Account Details, Payment Methods, Downloads and Logout.

The steps: pick your route, choose who sees what, style it with sample data and test it as a customer.

Build it

Five steps

My Account or your own parts, who sees what, sample data and a test as a customer.

Step 2. Or build your own layout from parts

The WP EasyCart · Account group

no stored settings

Drag only the parts you want, in any layout, on the same page. Each part shows its own views:

Customer Login: the sign-in form. Options: Show “Forgot your password?” and Show the new customer box.
Registration Form and Lost Password: the sign-up form and the lost password and emailed reset link. Each can Show a sign-in form beside it.
Account Navigation: the menu on its own, with a Layout choice, the phone dropdown and the same Pages in the account switches. Use it with My Account set to Hidden, or with the parts.
Account Dashboard: the dashboard view, with a switch for the store’s account menu beside it.
Order History: the list of orders. View order opens the order here with a link back to the list.
Order Details: one order. When no order was opened it shows the customer’s latest order or nothing, and it can hide the Back to orders link. Add it to the page to show orders somewhere else on it.
Subscriptions: subscriptions and their details. It needs Stripe subscriptions and the account’s subscriptions link, or customers see nothing.
Addresses: Show Billing and shipping address, Billing address or Shipping address. The shipping address shows only when your store ships.
Account Details: Show Name and email and the password change, Name and email, or Password change.
Payment Methods: the card on file. Your store keeps one only for Stripe subscriptions that customers manage in their account.
Downloads: the customer’s downloads.
Logout: a sign out button with its Text, Icon, Icon position and After signing out, go to.

Every part has the same Style tab, so headings, text, fields, buttons, links and messages match. Set the store-wide colours once in Site Settings, as in the overview guide.
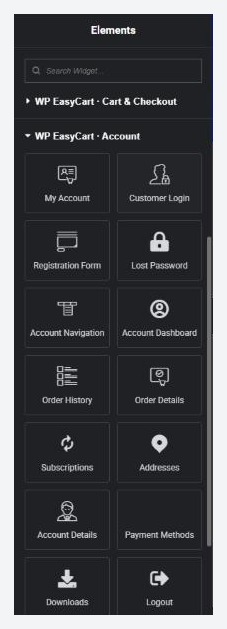
The Elementor panel, WP EasyCart · Account group.

Step 3. Choose who sees what

Show to, and where sign in leads

no stored settings

Most parts have a Show to choice: Everyone, Signed-in customers, or Visitors who are not signed in. The defaults suit the part, so the sign-in form starts as visitors only and the order list as signed-in customers only. The editor always shows a part, with a note saying who sees it, so you can style it.

Customer views never draw for a visitor, whatever Show to says. A visitor cannot see orders, addresses, downloads or subscriptions.

After signing in, go to (My Account and Customer Login) has three choices: Their account (this page when it shows the account, otherwise your store’s account page), This page, or A page I choose with a Page address. The page has to be on your own site. Addresses on other sites are ignored.

Step 4. Style every page with sample data

The editor shows a sample customer

no stored settings

You are rarely signed in as a store customer while you edit, and a customer may have no orders yet. So when you have no account or no data, the editor fills the widgets with a sample customer: sample orders using your first active products, a sample subscription, downloads and addresses. They look and behave like the real thing, so what you style is what customers see. They exist only inside the editor. A sample can never be found by a real order or subscription.

My Account has an Editor preview section. Show in the editor lets you switch between Dashboard, Orders, Order details, Downloads, Subscriptions, Subscription details, Addresses, Account details, Payment methods, and the visitor views Visitor: sign in, Visitor: create an account and Visitor: lost password. It changes only what you see while editing. Customers see the page they open.
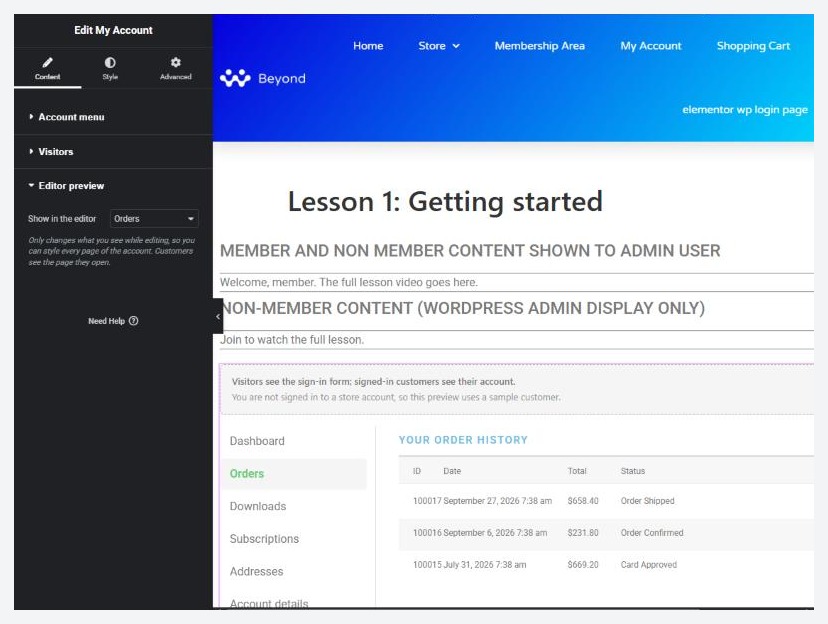
My Account › Editor preview, with the Show in the editor choices.

Step 5. Test it as a customer

Use a private window

no stored settings

Open a private window, so you are not signed in as an admin.

1. Open your account page. You should see the sign-in form and, unless you turned it off, the new customer box.
2. Sign in with a customer that has an order. You should land where After signing in, go to says.
3. Open Orders, then View order. The order should open on this page with a link back.
4. Change an address or the password, and use the menu on a phone-sized window.
5. Sign out. You should land where After signing out, go to says.

Order emails can also point at this page. Orders open here from View order links on the page and from order emails that point to it, when an Order Details widget is on the page.

The account page as a visitor sees it, with the sign-in form.

Good to know

Routing, caching and fixes

How links stay on your page, what a cache may store and the usual problems.

How links stay on your page

Why the address ends in ec_page

no stored settings

The store’s account has views such as sign in, orders, order details and addresses. Widgets link between them with an address that ends in ?ec_page=orders or similar, on the page where the widgets sit. A view that no widget on the page can show stays on your store’s account page instead, so put My Account there, or every part you need.

The forms carry a hidden list of the views of the widget that drew them. It holds no address, so a form can never send a customer to another site.

Extension links. Links that other plugins add to the account menu join the menu at the same places they use in the standard account.

Older widgets. The older Account Forms and Account Dashboard widgets are replaced by these ones. A page that still uses one keeps working and offers a Replace button that swaps in the matching new widget with its styling.

Caching and site-wide headers

What a page cache may store

no stored settings

Page caches never store what a signed-in customer sees, nor pages with account widgets, nor pages with a sign-in, sign-up or lost-password form. A menu or a sign out button in a site-wide header leaves your other pages cached for visitors.

But a sign-in, sign-up or lost-password form, or the My Account widget, in a site-wide header, footer or popup turns page caching off on every page. Keep those forms on your account page and link to it instead.

⚠️ Careful: Test a header form with your cache plugin on, in a private window, before you go live.

If it does not work

The usual account problems

no stored settings

A part shows nothing on the live page. Check Show to, and remember the customer views show only to signed-in customers. Subscriptions and Payment methods also need Stripe subscriptions managed in the account, and Downloads needs a download product.

A menu link opens the store’s account page instead of this page. No widget on this page shows that view. Add My Account, or the part for it.

Order History does not show order details. It opens them itself unless the page also has an Order Details widget, which then shows the order.

A form shows twice or a message repeats. Two widgets that show the same view. Each message prints once per page, in the first widget that shows its view.

My site is slow after a header form. See the caching section: move the sign-in form to the account page.

Still stuck? Contact support from https://wpeasycart.com/my-account.

Keep going

Related panels

Accounts

The store-wide account settings.

Store details

Where you choose your account page.

User Accounts

Look up and manage customer accounts.

Subscriptions

The subscriptions customers manage in their account.

Ready to run your store on WP EasyCart?

Everything in this guide works with the free plugin. PRO and Premium add subscriptions, memberships, wholesale pricing and more. Try every PRO feature free for 14 days.

The WP EasyCart admin: orders and offers
Updated on September 30, 2026