
How-to › Design your store › Elementor
Elementor: Build a Category and Manufacturer Template
Design every category page in Elementor with title, description, image, subcategories and products, and design manufacturer pages with the Theme Builder. 9 parts.
Quick links
Where to find it:WP Admin › EasyCart › Settings › Elementor
Before you start
What you are building
What a category template is and what you need.
How category templates work
One layout for every category, or one for a single category
no stored settingsWhat you need. WP EasyCart and Elementor. The free version of Elementor is enough, and so is the free WP EasyCart, for one layout shared by every category. You do not need Elementor Pro, because WP EasyCart assigns its own category template.
What a category template is. An Elementor page that every category page uses in place of the standard category layout. You arrange a title, a description, an image, subcategories and a product list, and every category follows the same design with its own content.
Manufacturers are different. The store-wide template draws categories only. Manufacturer pages get their own design through the Elementor Pro Theme Builder, using the manufacturer widgets. That is covered near the end.
Different layouts for some categories. With PRO, one category can use its own template. That is step 5.
The steps: create the template, choose a category to preview, add the widgets, publish and assign it, then optionally give one category a layout of its own.
Build it
Five steps
Create the template, choose a preview category, add widgets, publish it and assign layouts.
Step 1. Create the template
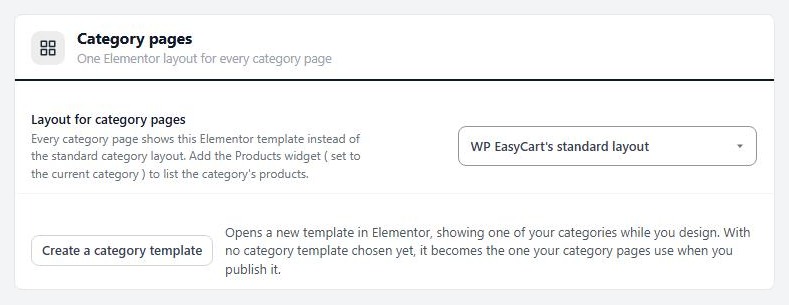
Settings › Elementor › Category pages
no stored settingsGo to EasyCart › Settings › Elementor and find Category pages, which says One Elementor layout for every category page. Press Create a category template.
Elementor opens with a new draft called Category page, already holding four widgets: Category Title, Category Description, Subcategories and Products, the last one set to the category of the page it is on. It shows one of your categories while you design. If you have not chosen a category layout yet, the new template is chosen for you, but category pages ignore it while it is a draft.
Step 2. Choose a category to preview
So you design against real data
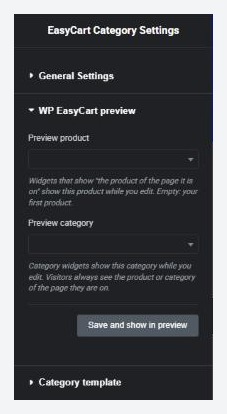
no stored settingsWhile you design, Elementor shows one category so the widgets have something to display. By default it is your first active category. To pick another, press the gear at the bottom of the Elementor panel to open the page settings, open WP EasyCart preview, choose a Preview category and press Save and show in preview. Pick a category with a long description, an image, subcategories and many products, because that is the layout most likely to break.
Visitors always see the category they opened. The preview category is only for you.
Step 3. Add and arrange widgets
The category pieces in the Shop group
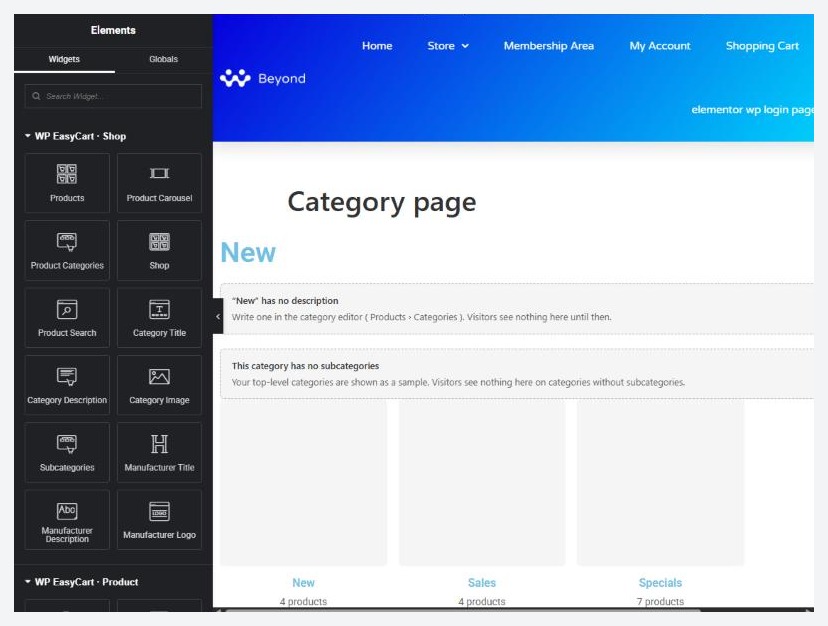
no stored settingsThe category widgets sit in the WP EasyCart · Shop group of the panel. Each one has a Show choice: The category of the page it is on, which is what a template needs, or A category I choose.
Category Title: the category name. Choose the HTML tag and whether it links to the category page.
Category Description: the description you wrote for the category.
Category Image: the category image, with an Image size and an optional link to the category page.
Subcategories: tiles for the categories inside this one. Show can also be Top-level categories, Featured categories or Categories I choose. Set Most categories, Columns, Image, Image shape, Image size, Number of products and Description. Visitors see nothing when a category has no subcategories.
Add the products the same way as on any page. Either use Products with Show set to Products in the category of the page it is on, or use Shop, which adds search, sorting and filters and follows the page on its own. Use the Elementor containers to lay it out, for example the image beside the title and description, and the subcategories above the products.
The template itself reports the category page’s product list to your analytics, so a Shop widget inside a template sends no list events of its own.
💡 Note: The widgets read the category of the page they sit on, so you never pick a category in them. Choose A category I choose only for a fixed strip, such as a featured category on the home page.
Step 4. Publish and assign it
A draft is ignored
no stored settingsPress Publish in Elementor. Then go back to EasyCart › Settings › Elementor and check Layout for category pages. The list holds WP EasyCart’s standard layout and every category template you have made. Choose yours. A template that is still a draft is labelled so, and under it the page says Draft: category pages keep the standard layout until you publish this template in Elementor with an Edit in Elementor button to go back and publish it.
When it is live the page says In use on every category page and offers View a category page. To go back, choose the standard layout again.
Step 5 (PRO). A different layout for one category
The Page layout card in the category editor
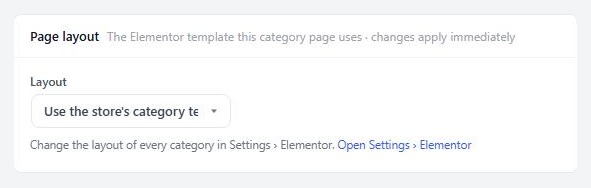
no stored settingsOpen a category in EasyCart › Products › Categories. The Page layout card lists templates in a Layout select. Your choices are Use the store’s category template (with its name), WP EasyCart’s standard layout to keep the plain layout for this category whatever the store uses, or any category template you have made. A category with its own layout shows an Edit this template in Elementor link. Changes apply immediately, with no Save button.
Per-category layouts need PRO with an active license. The free plugin shows the card locked, with a Give this category its own layout button. If the license lapses, every category falls back to the store-wide template. Each layout is a template like any other, so create extra ones with Create a category template and assign them here.
Good to know
Manufacturers, the Theme Builder and fixes
Manufacturer pages, Theme Builder conditions and the usual problems.
Manufacturer pages (Elementor Pro)
Manufacturer Title, Description and Logo
no stored settingsThree widgets in the WP EasyCart · Shop group are made for manufacturer pages. Each has a Show choice: The manufacturer of the page it is on or A manufacturer I choose.
Manufacturer Title: the name, with an HTML tag and an optional link to the manufacturer page.
Manufacturer Description: the description you wrote for the manufacturer.
Manufacturer Logo: the logo, with an Image size and the optional link.
On a product page, or a product template, the same widgets show the product’s manufacturer, so a brand name and logo can sit on every product. In the Elementor editor a sample manufacturer is shown so you can style them.
To design the manufacturer page itself, build a template in the Theme Builder with the manufacturer widgets and a Products widget set to Products by the manufacturer of the page it is on, and give it the display condition Manufacturer page (next section).
If you already use the Elementor Theme Builder
Display conditions with Elementor Pro
no stored settingsWith Elementor Pro, the Theme Builder has a template type called Single Product (WP EasyCart). Its display conditions include a WP EasyCart group, in which the ones for this guide are:
Category page: All category pages, or one category you choose.
Products in category: product pages whose product is in the category you choose.
Manufacturer page: All manufacturer pages, or one manufacturer you choose.
The group also holds Entire store, Product, Store page, Cart page and Account page. Set the condition on the template, publish it, and Elementor Pro draws matching pages with it. This is the route for a manufacturer page, or for a category layout that the store-wide setting cannot express, such as one design for every category in a department.
If a Theme Builder template and the store-wide category template both cover a page, the Theme Builder one wins. The store-wide template then shows only if the Theme Builder template contains a Post Content widget. Settings › Elementor warns you when this happens and names the template. To use the store-wide template, remove category pages from the Theme Builder template’s display conditions.
⚠️ Careful: Two templates for the same pages is the usual reason a design does not appear. Pick one route per page type: the store-wide setting, or the Theme Builder.
If it does not work
The usual reasons a template does not show
no stored settingsCategories still use the old layout. The template is still a draft, or is not chosen in Layout for category pages. Publish it and choose it.
The editor shows the wrong category. Change Preview category in the page settings and press Save and show in preview.
A category page has no products. Check the Products widget is set to Products in the category of the page it is on. Inactive products, and products limited to another customer role, never show.
Subcategories shows nothing. It lists the categories inside the page’s category, and visitors see nothing when there are none. Choose Top-level categories or Categories I choose if you want tiles on a category with no children.
A category placed on another page keeps the standard look. The template draws a category on its own page only. A category you place with a shortcode on a different page keeps the standard layout and its shortcode settings.
Keep going
Related panels
Create categories and give each a description and image.
Create manufacturers and give each a description and logo.
The store design settings.
Where a product picks its categories and manufacturer.
Ready to run your store on WP EasyCart?
Everything in this guide works with the free plugin. PRO and Premium add subscriptions, memberships, wholesale pricing and more. Try every PRO feature free for 14 days.



