
How-to › Design your store › Look and feel
How to Customize Your Store’s Look
Change colors, fonts, product cards, columns, page sizes and wording without a page builder. 10 parts.
Quick links
Where to find it:WP Admin › EasyCart › Settings › Design
Before you start
Where the look lives
What you need and which settings pages to use.
Where the look lives
Design, Products, Per page options, Price points and Language
no stored settingsWhat you need. WP EasyCart, free. Nothing here needs a page builder. One item is marked PRO.
Most of your store’s look is settings. Under EasyCart › Settings the Appearance group holds Design, Language, Per page options and Price points. Products holds how lists, product pages, the add-to-cart flow and the filter sidebar behave.
The steps: colors and fonts, product cards, product page and cart layout, list behavior, page sizes and price ranges, wording, then per-page tweaks and custom CSS.
Change it
Seven steps
Colors, cards, layout, lists, sizes, wording and per-page tweaks.
Step 1. Colors and fonts
Design › Store colors and Typography
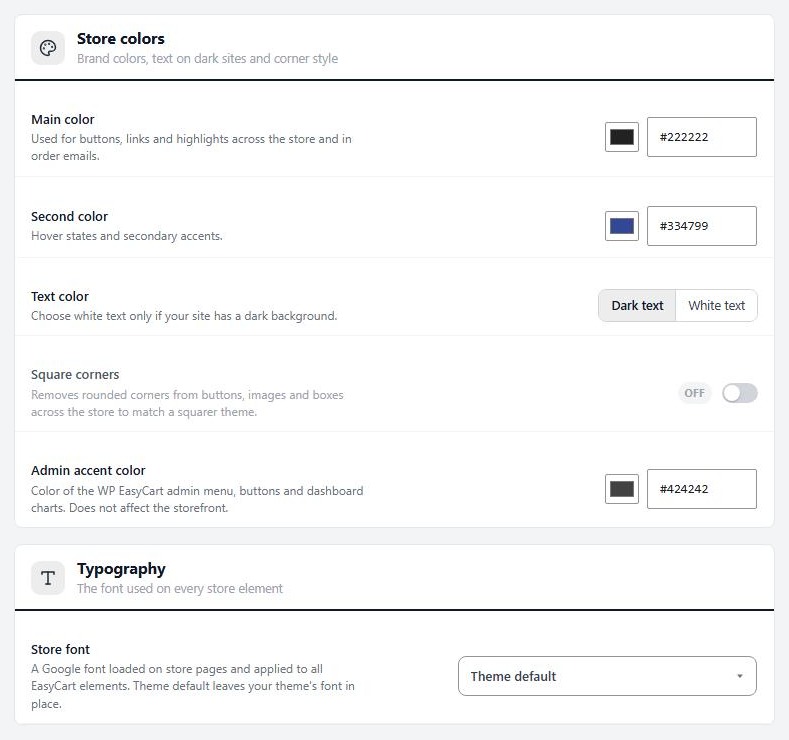
no stored settingsOpen Settings › Design. Under Store colors:
Main color: buttons, links and highlights across the store and in order emails.
Second color: hover states and secondary accents.
Text color: Dark text or White text. Choose white only for a dark site.
Square corners: removes rounded corners from buttons, images and boxes.
Admin accent color: colors the WP EasyCart admin, not your storefront.
Under Typography, Store font loads a Google font on store pages and applies it to all EasyCart elements. Theme default keeps your theme’s font. Choose Custom font and enter a name in Custom font family to use a font your theme already loads. WP EasyCart does not load that font for you.
Step 2. Product cards and columns
Design › Product listings
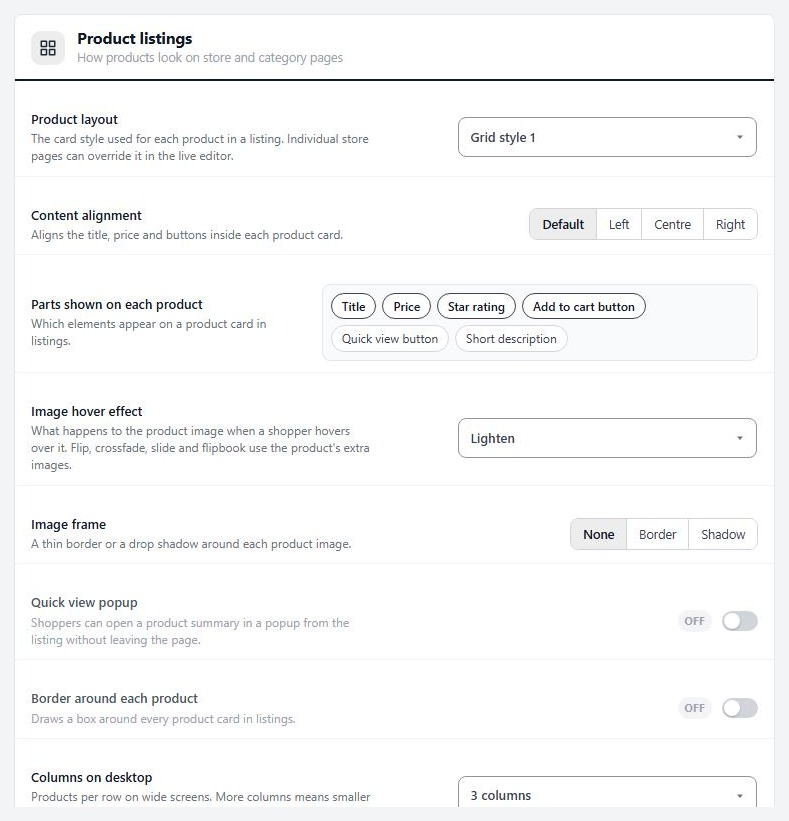
no stored settingsUnder Product listings choose how each product looks in a list:
Product layout: Grid style 1 to 5, or List.
Content alignment: Default, Left, Centre or Right.
Parts shown on each product: title, price, star rating, add to cart button, quick view button and short description.
Image hover effect: flip or crossfade to the second image, lighten, grow, shrink, grey to color, brighten, slide, flipbook or no effect.
Image frame: None, Border or Shadow.
Quick view popup, Border around each product and Round the border corners, with a switch for each corner.
Then set columns for desktop, both tablet sizes and both phone sizes. More columns means smaller images. Automatic image height keeps natural proportions. Turn it off to crop images to a fixed height per screen size.
💡 Note: A shortcode can override any of these per page, such as columns or the card style. Settings are the defaults.
Step 3. Product page and cart layout
Design columns, and Products › Product pages
no stored settingsIn Design, Product page sets columns per screen size. Two columns puts the gallery beside the details, one stacks them. Cart & checkout look does the same for the order summary beside or below the checkout form.
In Settings › Products under Product pages choose what a product page shows: Breadcrumb links, Show the model number, Show the product’s categories, Show the manufacturer, Zoom on image hover, Open images in a lightbox, Image and details column split (advanced) and Short description below the Add to cart button. Set a Placeholder image for products without a photo too.
These shape WP EasyCart’s standard product layout. If you assign an Elementor product template, the template takes over the layout. See Elementor: Build a Product Page Template.
Step 4. How lists and adding to cart behave
Products › Product lists, Add to cart flow, Store sidebar
no stored settingsProduct lists. Sort menu, Default sort order, Short description on grid tiles, Featured categories first on the store page, Split products into pages and Let shoppers pick a page size.
Add to cart flow. Stay on the product page after adding to cart (off sends the shopper to the cart), Go straight to checkout when adding from a list, Keep the Add to cart button after adding (advanced), One subscription per purchase and, with PRO, Quantity box beside list Add to cart buttons.
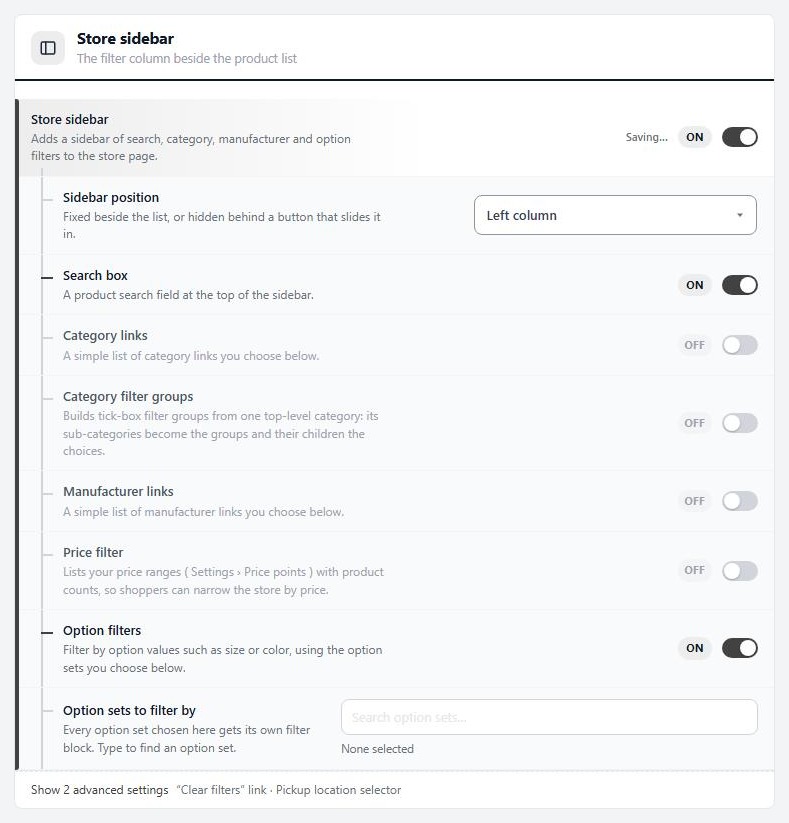
Store sidebar. This is EasyCart’s own filter column beside the product list, not your theme’s sidebar. Turn on Store sidebar and choose the Sidebar position: Left column, Right column, Slide in from the left or Slide in from the right. Then switch on the filters you want: Search box, Category links, Manufacturer links, Price filter and Option filters. The Pickup location selector is PRO.
Step 5. Page sizes and price ranges
Settings › Per page options and Price points
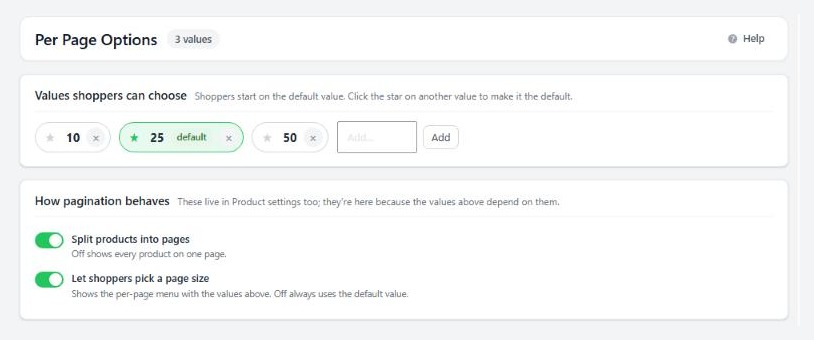
no stored settingsPer page options lists the page sizes shoppers can choose. Add a number, click a chip to remove it, and click the star on one to make it the size shoppers start on. With no star, the middle value is used. Sizes above 500 are refused. These matter only when Split products into pages is on.
Price points defines the ranges in the price filter: Under, Between and Over rows, in the order you drag them. Each row shows how many products it holds, and the page warns about gaps and overlaps. The filter appears only after you switch on Price filter in the Store sidebar.
Step 6. Change the wording
Settings › Language
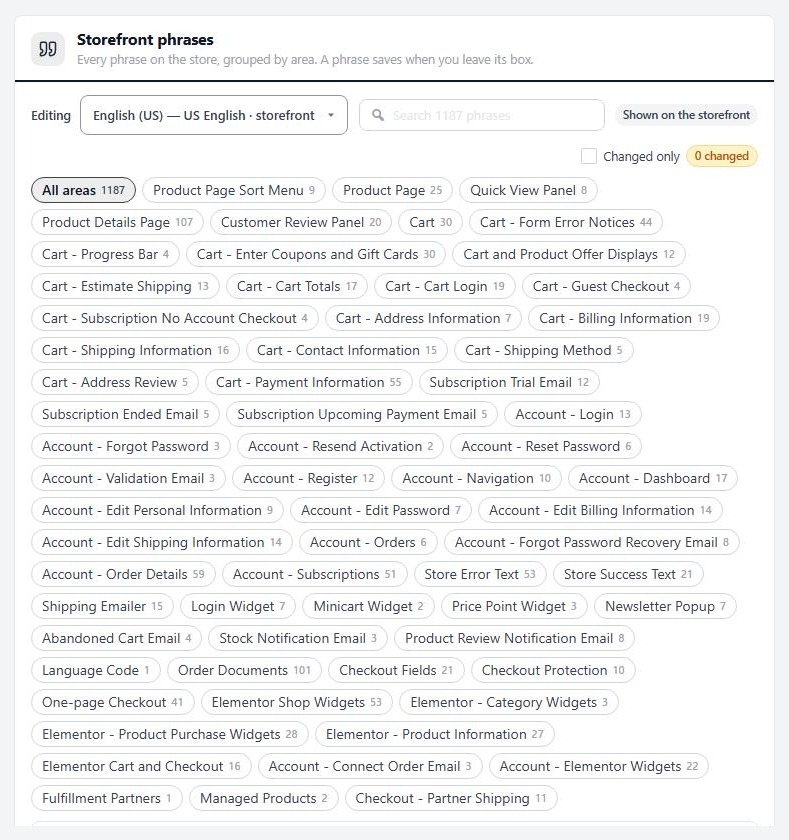
no stored settingsSet the Storefront language shoppers read, and add or remove installed translations. Under Storefront phrases, every phrase the store says is listed by area. Search them, tick Changed only to see your edits, edit a phrase and it saves when you leave the box. Reset one phrase, or press Reset area to return an area to the shipped wording.
The order receipt wording is edited under Settings › Email, and the phrase editor links there.
Step 7. Tweak one page from the page itself
The on-page design editor
no stored settingsWhile you are signed in as an administrator, a store page shows a small gear. It opens a panel of Page Product Options: Product Type, Quick View, Colorize EasyCart, Dynamic Image Height, and columns and image height for each screen size. Show Device Preview opens a preview at iPad and iPhone sizes.
SAVE keeps the choices for that page. SET AS DEFAULT saves them as the store defaults, the same settings you found in Design. To remove the gear, turn on Hide the live design editor in Design › Theme integration (advanced).
⚠️ Careful: SET AS DEFAULT changes the whole store, not just the page you are on.
Good to know
Code and fixes
Custom CSS, theme templates and the usual reasons a change does not show.
Custom CSS and theme templates
For what settings cannot reach
no stored settingsCustom CSS. Settings › Design › Custom CSS takes plain CSS, with no style tags. It prints on every store page and survives plugin updates.
Template system (developers). Custom theme folder and Custom layout folder name folders you create under wp-easycart-data/design/theme and wp-easycart-data/design/layout. A file in the layout folder replaces the built-in template of the same name, and a theme folder replaces CSS, images and scripts. The data folder sits beside the plugin folder, so updates do not overwrite it.
If it does not work
The usual reasons a change does not show
no stored settingsA change does nothing on my product page. An Elementor product template is in use. Change the layout there.
Colors did not change. Clear your page cache, and check that a theme rule is not overriding them.
My font does not show. A custom font family must already be loaded by your theme.
The price filter is empty. Add ranges under Price points, then switch on Price filter.
The page-size menu is missing. Turn on Split products into pages and Let shoppers pick a page size in Settings › Products.
Keep going
Related panels
Every Design setting.
Every Products setting.
Page size options.
Price ranges for the filter.
The language and phrase editor.
Ready to run your store on WP EasyCart?
Everything in this guide works with the free plugin. PRO and Premium add subscriptions, memberships, wholesale pricing and more. Try every PRO feature free for 14 days.



