
How-to › Product setup
How to Organize Your Catalog
Help shoppers find things. You build categories, menus and manufacturers, place each product, then set how the store sorts, filters and pages. 9 parts.
Quick links
Where to find it:WP Admin › EasyCart › Products › Categories
Before you start
What you are building
What each tool is for and what you need.
How the catalog is organized
Categories, menus, manufacturers, and what each is for
no stored settingsWhat you need. WP EasyCart. Categories, menus, manufacturers, featured products, badges and price points are in the free plugin. Smart categories, which fill themselves from rules, and Limit Visibility to User Role are PRO. There is a free trial if you want to try them.
Categories are how your catalog is grouped: Shoes, Bags, Sale. A category can sit inside another, and a product can be in as many as you like.
Menus are how shoppers are invited to browse. They have three levels and they are separate from categories, so you can promote a seasonal route without moving anything.
Manufacturers are brands. Each one gets a page of its own products.
On top of these sit smaller tools: featured products on a product page, badges on listings, the sort order, price ranges, and how many products show per page.
The steps: set up categories, choose how they fill, add menus and manufacturers, place each product, then set how shoppers filter and page through the results.
Set it up
Six steps
Create categories, choose how they fill, build menus and manufacturers, place each product and set sorting and filters.
Step 1. Create your categories
Products › Categories › Add category
no stored settingsGo to EasyCart › Products › Categories and press Add category. Fill in:
Name and Parent category. Choose Top level, or an existing category to nest it. Subcategories appear under their parent in menus and the store sidebar. A product can belong to a parent and a child at the same time.
URL slug. Press Generate from name, or write your own. Renaming a category later does not change its slug on its own.
Description. Tell shoppers what they will find. It also helps search.
Category image (square, at least 600 by 600) and Featured banner (about 1600 by 500), which themes use as the category header.
Featured. Shows the category in featured-category widgets and on the store landing page.
Visibility: Active or Hidden. A hidden category keeps its products, but the page is private and not listed.
Store order. A higher number shows first.
To put your featured categories above the product grid, open Settings › Products, Product lists, and turn on Featured categories first on the store page.
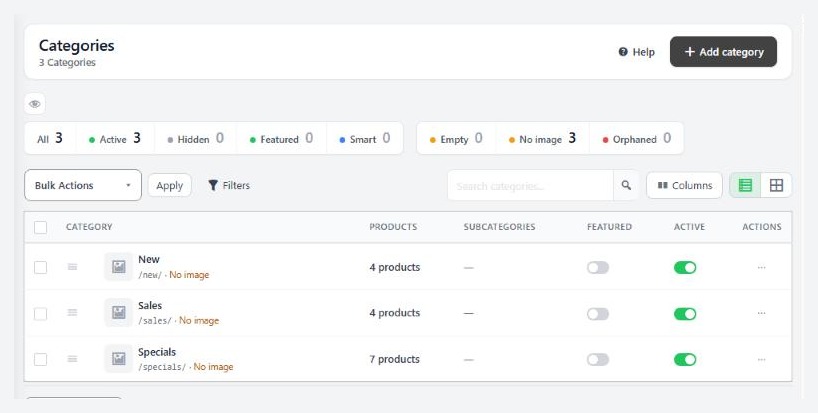
💡 Note: Hide a category rather than delete it. Hiding keeps its products, its URL and its structure. Deleting is possible from the editor, with a choice of what happens to subcategories and products, and Undo for 30 days.
Step 2. Choose how each category fills
Hand-picked, smart rules, or both
no stored settingsIn the category editor, the Products card decides how products get in.
Hand-picked. Type a product name or SKU and add it, or press Browse products…. You have full control, and every new product needs adding by hand. You can also add categories to a product from its own Organization tab.
Smart rules (PRO). You describe the products and they join on their own. Add rules such as price less than 25, manufacturer is Acme or on sale is yes, then choose whether products must match all or any of the rules. You can rule on title, SKU, price, list price, stock quantity, weight, manufacturer, category, option set, date added, on sale, active, downloadable and subscription. A live preview shows how many products match now. Products join and leave whenever a product is saved, and once an hour.
Both. Rules do the bulk, and you add exceptions by hand.
Use rules for anything that should stay current: New arrivals, Under 25, a brand. Use hand-picking for a curated shelf.
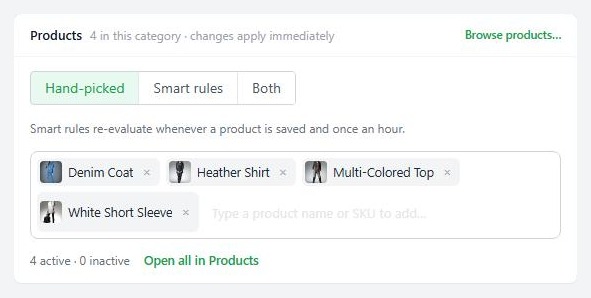
⚠️ Careful: On a category that uses smart rules only, hand-picked products that do not match the rules are removed when you save. Choose Both if you want exceptions.
Step 3. Build your menus
Products › Menus, three levels deep
no stored settingsGo to EasyCart › Products › Menus and press Add menu. Open it and press Add sub-menu to nest one below it. A menu holds sub-menus, and those hold sub-sub-menus. That is three levels.
Menus hold products directly. In the menu editor, type a product name or SKU to add it. Each product can sit in up to three menu locations, and adding fills the product’s first empty one. A menu also takes a description and keywords.
A menu will not fill itself as your catalog changes. For groupings that should stay current, use a smart category.
Show a menu on a page. In the WP EasyCart block, choose Store and pick a menu, sub-menu or sub-sub-menu. In a shortcode these are menuid, submenuid and subsubmenuid. The Gutenberg blocks guide shows the block.
Step 4. Add manufacturers
Products › Manufacturers
no stored settingsIf shoppers think in brands, go to EasyCart › Products › Manufacturers and press Add manufacturer. Create it with a name, then open it to set a featured image and its URL slug. Press Assign products to add many products in one go, which is quicker than doing it product by product when a new brand arrives.
On a product, the Manufacturer field is on the General tab. Show the manufacturer in Settings › Products, Product pages, names the brand on the product page, linked to every product they make. Turn on Manufacturer links in the Store sidebar to filter by brand.
If you sell only your own products, skip manufacturers. An empty structure is one more list to maintain.
Step 5. Place each product
The Organization tab
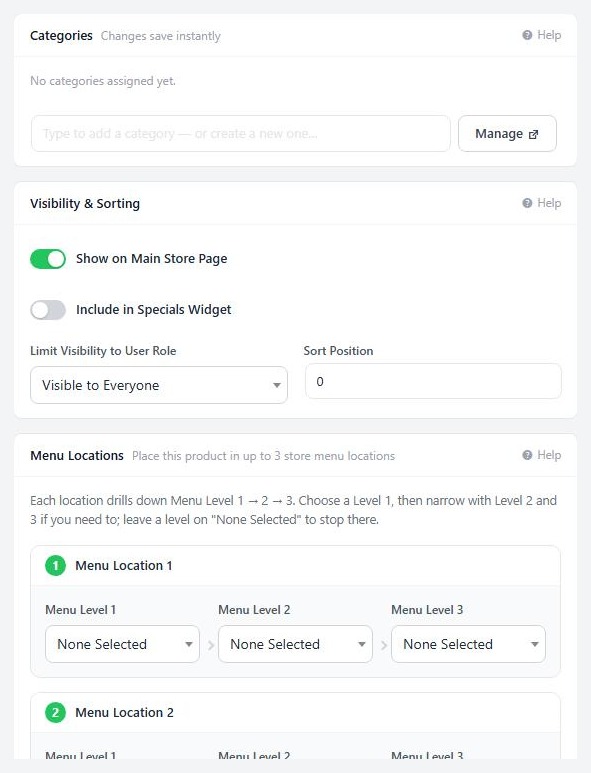
no stored settingsOpen a product and go to the Organization tab.
Categories. Add the product to its categories. Changes here save instantly. Press Manage to open the categories list.
Visibility & Sorting. Show on Main Store Page lists it on the main store page. Include in Specials Widget adds it to the specials widget. Limit Visibility to User Role (PRO) hides it from everyone outside one role. Sort Position sets its place in the default order: a lower number shows first, and products with the same number are ordered by price, lowest first.
Menu Locations. Place it in up to three store menu locations, each a menu, sub-menu and sub-sub-menu.
Featured Products. Pick up to four related products to cross-sell on this product’s page, as Featured Product 1 to 4.
Badges. On the Media tab, Badges & Image Effects puts a promo tag on the listing. Choose a Tag Type (Round, Square, Diagonal or Classy, or No Tag), type the Tag Promo Text, such as New or Sale, and pick the Tag BG Color and Tag Text Color. A preview shows the badge before you save.
Step 6. Set how shoppers sort, filter and page
Sort menu, price points and products per page
no stored settingsThe sort menu. In Settings › Products, Product lists, Sort menu lets shoppers reorder the list. Default sort order is what they see first: Default order (the order you set in admin, from Sort Position), price, title, newest, oldest, best rated or most viewed. Each option in the menu can be switched on or off.
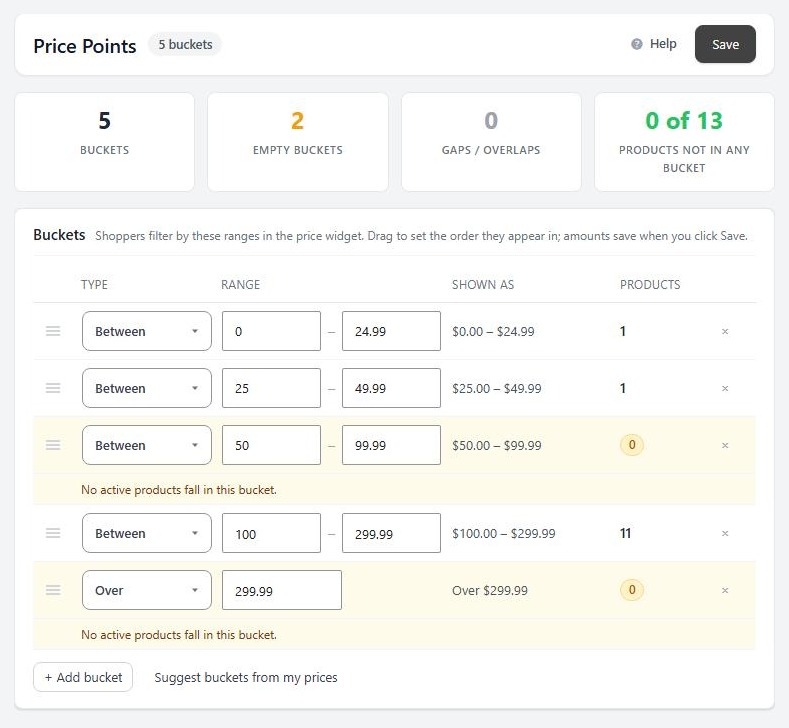
Price ranges. Go to Settings › Price points and add buckets. There are three kinds: Under a price, Between two prices and Over a price. A normal ladder is one Under, several Between and one Over. Drag to reorder. The page shows how many active products fall in each bucket and warns about gaps and overlaps. Then turn on Price filter in the Store sidebar card of Settings › Products. Defining ranges alone shows nothing.
Products per page. Split products into pages and Let shoppers pick a page size are in Product lists. The sizes on offer are in Settings › Per page options. Keep the list short. Three or four sizes is plenty.
The sidebar. Store sidebar adds search, category, manufacturer, option and price filters to the store page. Turn on what shoppers use.
Check it and keep it running
Good to know
Testing it as a shopper, and what to check when a product is missing.
Test it as a shopper
Walk your own store
no stored settingsOpen your store page in a private window.
1. Open a category. Its products should be the ones you expect, in the order you set.
2. Open a subcategory from the sidebar or menu.
3. Open a manufacturer page. It should list only that brand.
4. Pick a price range. The count beside it should match the results.
5. Find a product with a badge, and one with featured products on its page.
6. Change the page size and the sort order.
Then look for dead ends: an empty category, or a product in no category, is a page nobody reaches.
If it does not work
Why a product is missing from a page
no stored settingsA product is missing from a category. Check the product is Active in the store, and that the category is set to Active, not Hidden. For a smart category, save the product again or wait up to an hour. Hand-picked products that do not match the rules are removed when you save a smart-rules-only category.
A price range shows zero. Products in the gap between two buckets belong to neither. The Price Points page reports gaps and overlaps. Fix them and save.
The price filter does not appear. Turn on Price filter in the Store sidebar. It needs at least one bucket.
The default order looks like it is sorted by price. Sort Position is 0 on every product, so price decides. Give products different numbers, or pick another default sort order.
A menu is stale. Menus do not update on their own. Use a smart category for lists that should.
Still stuck? Open a ticket at wpeasycart.com/my-account.
Keep going
Related panels
Every panel in the category editor.
Menus, sub-menus and sub-sub-menus.
Manufacturers and their pages.
The product Organization tab.
Price points in full.
Per page options in full.
Ready to run your store on WP EasyCart?
Everything in this guide works with the free plugin. PRO and Premium add subscriptions, memberships, wholesale pricing and more. Try every PRO feature free for 14 days.



