
How-to › Start here
Set Up Shipping That Does Not Lose Money
Charge for shipping in a way that covers what it costs you. You pick a method, build its rates, set free shipping and handling, and test. 9 parts.
Quick links
Where to find it:WP Admin › EasyCart › Settings › Shipping rates
Before you start
What you need
Weights on your products, and what each kind of rate is for.
What you need
Weights on your products, and a rule for what shipping costs you
no stored settingsWhat you need. A WP EasyCart store with products. Flat rates, and rates by cart total, weight, quantity or percentage, are in the free plugin. Live rates from a carrier are a PRO or Premium feature, and there is a 14-day free trial if you want to try them.
Know your costs first. Shipping loses money when what you charge is not linked to what a parcel costs you. Before you start, look at what you pay to send your usual orders: a small one, a typical one and your heaviest.
Put weights on your products. Weight-based rates and live carrier rates read each product’s weight. Without it, the store cannot price the parcel. The weight, length, width and height fields are in the product editor, and the Add New panel says they are used for live carrier rates and rate tables. Leave them blank only if you charge flat rates.
There are six steps: turn shipping on and pick a method, build its rates, decide when shipping is free, add handling and zones, add live rates if you have PRO, then test what a customer is charged.
Set it up
Six steps to shipping that pays
Turn shipping on, build the rates, decide when it is free, add handling, add live rates and test.
Step 1. Turn shipping on and pick a method
One method at a time is in use
no stored settingsOpen EasyCart › Settings › Shipping settings. In Shipping method, Charge shipping at checkout must be on. Off means no shipping address or rate is collected and every order is treated as not shipped.
Then choose How rates are calculated:
Static methods (flat rates you name): fixed prices, such as Standard and Express. The right start for most stores.
By order total: one rate, chosen by how much the shopper spends.
By order weight: one rate, chosen by the order’s total weight.
By item quantity: one rate, chosen by how many items are in the cart.
Percentage of the order total: shipping charged as a share of the cart.
Live carrier rates: real prices from a carrier, PRO and Premium.
Only the chosen method’s table is used at checkout. Rates you enter under another method are ignored, not added. Switching method deletes nothing, so you can try each.
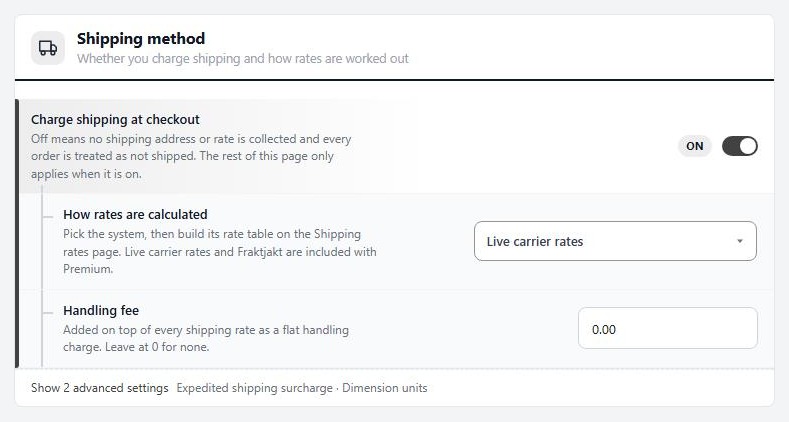
⚠️ Careful: Only the active method’s table is used. If checkout quotes nothing, or something you do not recognise, check the method before you edit any rate.
Step 2. Build your rates
Flat rates, or a table by total, weight, quantity or percentage
no stored settingsOpen EasyCart › Settings › Shipping rates. The page shows which method is on, with a switcher, and one table for each system. Only the active method’s table is used.
Flat rates. Press Add method, give it a Method name such as Standard delivery, and a Rate. Every method listed is offered to the shopper, in the order set by Order (drag to reorder). Zone limits a method to one destination, or leave it on Any destination.
By cart total. Press Add rate and fill in Cart total from and the Rate. The row whose “from” amount is the highest one at or below the cart total applies. Start a row at 0 so every order gets a rate.
By weight. The same rule, using Order weight from, in the unit your products are weighed in. This is the closest of the manual systems to what a parcel really costs you.
By quantity. The same rule again, using Items in the cart from.
Percentage of total. The row you reach sets the Percent of the cart total charged. Simple, and increasingly wrong as order values spread, because a parcel’s cost does not scale with its price.
Every row needs a number of 0 or more. Delete removes a rate for good, so shoppers are no longer offered it.
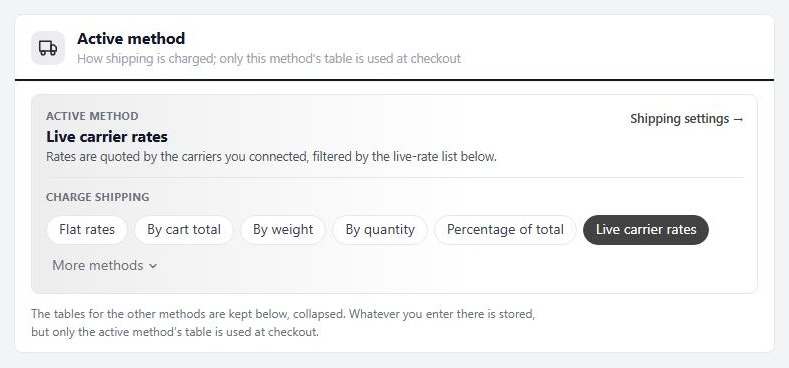
💡 Note: Every field on the rate tables is explained in Settings › Shipping rates.
Step 3. Decide when shipping is free
A threshold that raises the order value
no stored settingsFree shipping over a set amount is the most reliable lever for raising order value. How you build it depends on your method.
Flat rates. Fill in Free shipping at on a method. It becomes free once the cart total reaches that amount. Leave it empty to always charge the rate.
By cart total. Add a row that starts at your threshold with a rate of 0. Orders at or above it match that row, and ship free.
Set the threshold above your average order, not at it. Then work out what a free order costs you and check the margin still covers it.
You can also offer a free local pickup option. In Settings › Shipping settings, Options at checkout has Offer free local pickup, which adds a no-cost pickup choice next to your rates.
Step 4. Add handling and zones
Cover packing costs, and charge by destination
no stored settingsBack in Shipping settings, the Shipping method card has two amounts that stop shipping quietly losing money:
Handling fee: added on top of every shipping rate as a flat charge. Use it for packing materials and time. Leave at 0 for none.
Expedited shipping surcharge: offers an expedited choice at the standard rate plus this amount. It works with the total, weight, quantity and percentage systems, and 0 hides the choice. It is an advanced setting.
Zones. The Shipping zones card groups countries and regions, so one table can charge one price at home and another abroad, with no row for every country. A rate row then picks its zone. Where you are willing to ship at all is set under Ship-to countries & regions, which is managed in Countries & Regions. A country that is off is refused as a shipping address at checkout.
Two switches change how flat rates behave. Static methods charge per item multiplies a flat rate by the number of items, instead of charging once per order. Hide rates until an address is entered removes the estimate from the cart page.
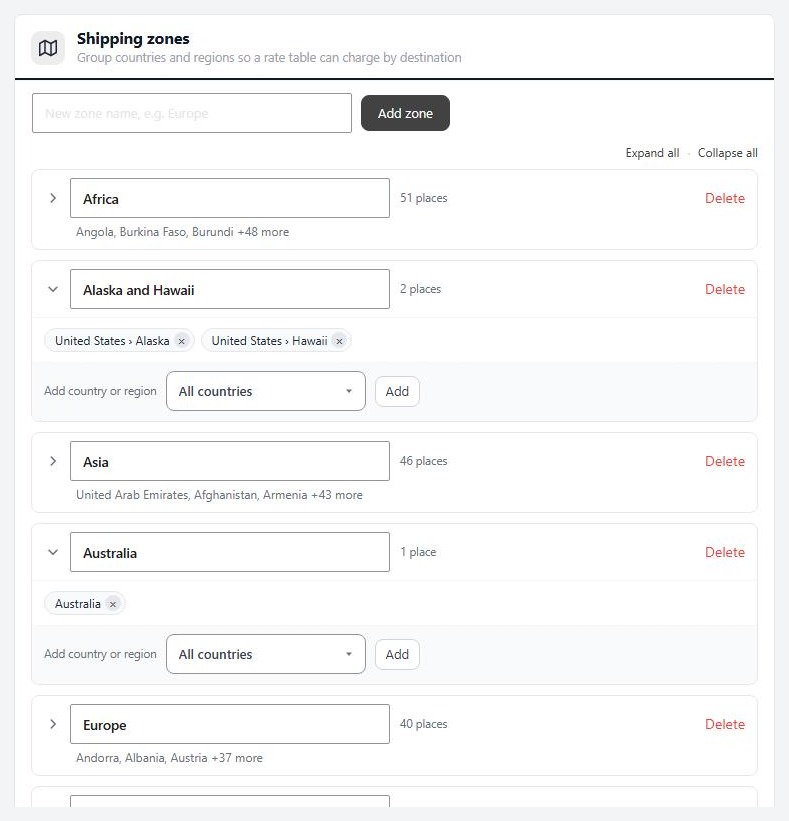
💡 Note: Every option on this page is explained in Settings › Shipping settings. Countries you will and will not ship to are set in Settings › Countries & Regions.
Step 5. Add live carrier rates (PRO)
USPS, UPS, FedEx, DHL, Canada Post and Australia Post
no stored settingsLive rates ask the carrier what a parcel will cost, using the box weight and the destination. They are included with PRO and Premium.
In Shipping settings, choose Live carrier rates as the method. Then open Carrier accounts, which covers USPS, UPS, FedEx, DHL, Canada Post and Australia Post. Turn on a carrier with its enable switch, such as Enable UPS, and fill in its credentials and origin details, such as its Origin postal code. A carrier quotes once its details are complete, and the screen names what is missing.
Now open Shipping rates. Live carrier rates there is a list of the services shoppers are offered, in the order they see them. Offering every service a carrier returns is a mistake. Three or four that differ clearly in speed and price convert better than eleven that look alike. A service can be replaced with a fixed amount, which is how you absorb part of the cost or round a rate.
The Live carrier rates card in Shipping settings controls the rest: Show estimated delivery days, Quote each item as its own parcel and Always show overridden rates. The last one shows a replaced rate even when the carrier returns nothing for the address.
💡 Note: Live rates read product weight and dimensions, set in Inventory & Shipping.
Where you ship from, and what you ship in
Origin details and your boxes
no stored settingsShip-from. Each carrier takes its own origin details in its account settings, such as the origin postal code, city and country. Get these right, because a quote from the wrong origin is a quote for the wrong parcel. The separate Ship-from address card is only for Fraktjakt.
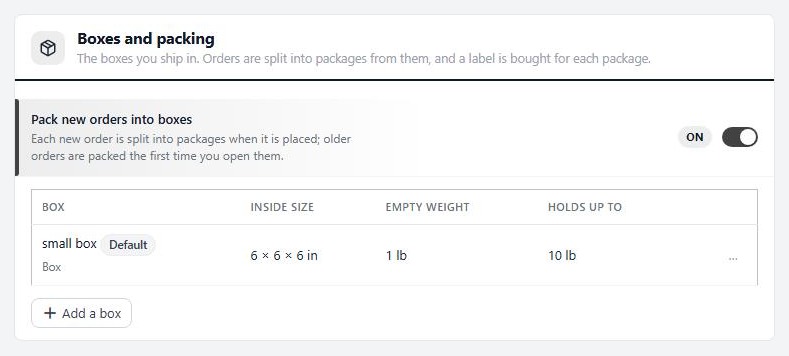
Boxes and packing. Save the boxes you ship in under Boxes and packing. For each box you enter its inside size, empty weight and how much it holds, and you can mark one as the default. With Pack new orders into boxes on, each new order is split into packages when it is placed, and a label is bought for each package. Orders that cannot be packed by size use the default box.
Step 6. Test what a customer is charged
Buy from your store and read the total
no stored settingsDo not trust the table. Test it, as a customer, on the cases you priced:
1. Add a small order to the cart, and open the cart page. If Hide rates until an address is entered is on there is no estimate, so go to checkout.
2. Enter a domestic address and read the shipping you are offered. It should match what you expect for that total or weight.
3. Repeat for a typical order, your heaviest order and one just above and just below your free shipping threshold.
4. Repeat for an address in each zone.
To place the order, use Bill later or a gateway in test mode, as in the payment guide. Then open Orders and check the shipping amount on the order.
When it goes wrong
Troubleshooting
The usual reasons a rate is missing or wrong.
If it does not work
The usual reasons a rate is missing or wrong
no stored settingsCheckout offers no shipping. Check which method is active. The table you built is only used when its method is chosen. Also check the destination country is switched on in Countries & Regions.
A weight rate is wrong. A product with no weight cannot be priced. Add weights, and check the units.
By total or weight prices nothing under a certain amount. No row starts at 0. Add one so every order gets a rate.
A live carrier gives no rates. A carrier only quotes once its details are complete. Check the carrier’s status in Carrier accounts, and that every product has a weight.
A rate shows for one country but not another. A rate row is tied to a zone. Check the row’s Zone, and the zone itself.
Still stuck? Open a ticket at wpeasycart.com/my-account.
Keep going
Related panels
The rate tables behind your shipping method.
The method, zones, carrier accounts and boxes.
Product weight and dimensions.
Countries and regions you ship to.
Free shipping offers.
Ready to run your store on WP EasyCart?
Everything in this guide works with the free plugin. PRO and Premium add subscriptions, memberships, wholesale pricing and more. Try every PRO feature free for 14 days.



