
How-to › Tracking and data

How to Share Your Products with Google and AI Search

Get your products into Google Shopping and AI shopping answers. You check what your store shares, add barcodes, policies and shipping times, then build a feed for Merchant Center. 10 parts.

Quick links

Where to find it:WP Admin › EasyCart › Settings › Search & AI

Before you start

What you are sharing

What Google and AI assistants read, and which parts need Pro.

What you are sharing, and what needs Pro

What Google and AI assistants read, and which parts are free

no stored settings

What Google and AI assistants read. Search engines and AI assistants such as ChatGPT, Gemini, Perplexity and Copilot answer shopping questions from data on your product pages: price, stock, variants, barcode, reviews, and your return and shipping policy. WP EasyCart adds that data for you. This guide checks it is right, and connects it to Google Shopping.

Free. Everything on Settings › Search & AI except the feed: product details, returns, shipping, the crawler check and the SEO plugin switches, plus the Search & AI card on each product.
PRO or Premium. The Google product feed, its Feed options, Google attributes in bulk, and connecting Google Merchant Center. The free plugin shows these locked with a preview. The free trial unlocks them.

The steps: check your status, share product details, add your return policy and shipping times, make sure crawlers can read your store, add barcodes, then build the feed and give it to Google Merchant Center.

Set it up

Eight steps

Check your status, share product details, add policies and barcodes, then build the feed and give it to Google.

Step 1. Check your status

Settings › Search & AI

no stored settings

Go to EasyCart › Settings › Search & AI. It sits in the Marketing group of the Settings menu. The Status section shows what search engines and AI assistants can read right now: how many products are shared with price and stock, how many hide their price, and how many are missing a barcode or part number.

Below the counts it lists what to fix, such as product details being switched off, no return policy yet, or a crawler being blocked. Each line links to the section that fixes it. The same checks show in Store Status.

Press Test a product in Google to open Google’s Rich Results Test on one of your product pages.
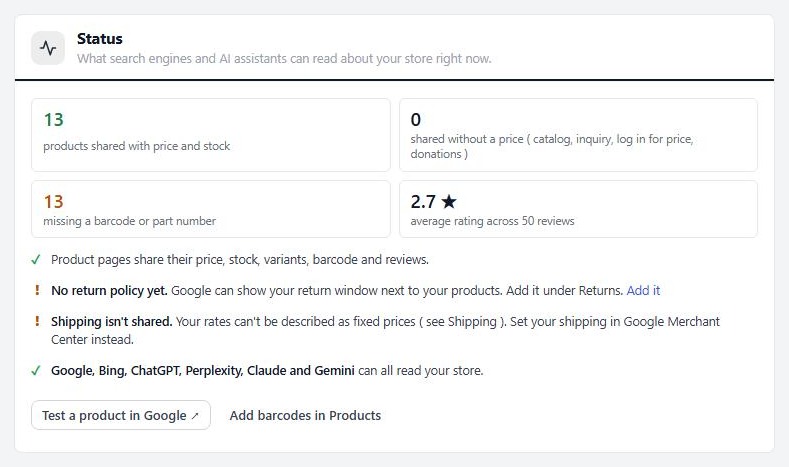
Settings › Search & AI, the Status section.

Step 2. Share your product details

The Product data section

no stored settings

Share product details with search engines and AI assistants is on by default. It adds each product’s price, stock, variants, barcode and reviews to its page in the format Google, Bing and assistants read. Turn it off only if another plugin already does this, or the data prints twice.

Condition of your products is New, Used or Refurbished, used for every product unless its own card says otherwise. Reviews to share is either Rating and reviews, which shares the average and the five newest reviews, or Rating only. Reviews carry the reviewer’s name only when your product pages show names.

Products that hide their price, such as catalog, inquiry or login-for-price products and donations, are shared as information and not as something for sale.

If you use Yoast SEO, Rank Math, All in One SEO or SEOPress, the SEO plugin section decides who prints descriptions and social previews, so nothing prints twice. The defaults work for most stores.

Step 3. Add your return policy

Google can show your return window next to your products

no stored settings

In the Returns section answer Do you accept returns? with Within a set time, Any time, No returns or Not shared. For the first two, set:

Return window: days after delivery, for Within a set time.
How customers return items: By mail, In store or both.
Return shipping: Free, Customer pays or Flat fee, and the Return fee if flat.
Refund: Full refund, Exchange or Store credit.
Countries you sell to: the countries the policy applies to. Google needs these, and the Status section warns until you choose them.
Returns page: your full policy page, linked for shoppers and assistants who want the details.

The policy is shared once for the whole store, not per product.

Step 4. Add your shipping times

Rates come from Shipping rates. You add how long it takes.

no stored settings

The Shipping section is built from Settings › Shipping rates. Change a rate there and this follows. You add the timing:

Handling time: business days from order to hand-over to the carrier, such as 0-1.
Order cut-off time: orders after this time start the next business day. It uses your WordPress time zone.
Delivery time: days in transit, such as 2-5. Under Show advanced settings you can set a different delivery time for each shipping zone.

The list under the fields shows each zone as Shared or Not shared. Some rates cannot be described as fixed prices: live carrier rates, a percentage of the order plus handling, rates that apply everywhere until you choose your countries, and regions inside countries other than the US, Australia and Japan. For those zones set your shipping in Google Merchant Center instead.

Step 5. Check who can read your store

Your robots.txt decides whether search engines and assistants see your products

no stored settings

The Who can read your store section checks your robots.txt for Google, Bing and Copilot, ChatGPT search, Perplexity, Claude and the Gemini app. Each shows Can read or Blocked, with the line of robots.txt that blocks it.

WP EasyCart does not change robots.txt. If something is blocked, the rule comes from a file on your server, another plugin or your host, and it has to be fixed there. Remove the rule, or add a line such as User-agent: OAI-SearchBot followed by Allow: / for the assistant you want. Press Check again after you change it.

Two things to know. Settings › Reading in WordPress has a Discourage search engines box. Ticked, it hides your whole store, and the Status section says so. Blocking AI training crawlers is fine, because they are separate from the search crawlers that decide whether your products appear. If your site is behind Cloudflare, check its AI crawler setting too, because WordPress cannot see it.
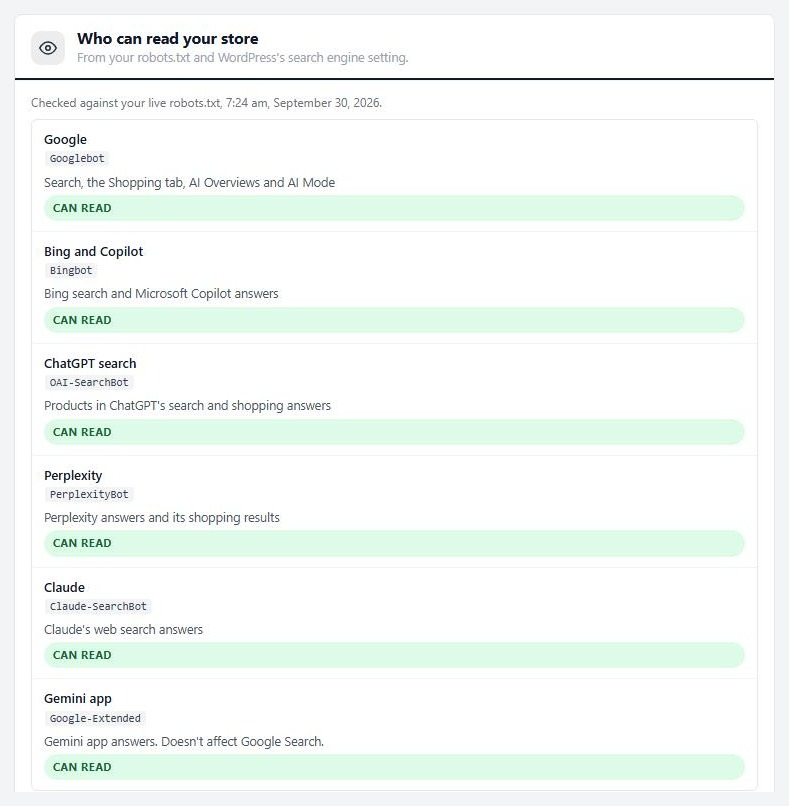
Settings › Search & AI, the Who can read your store section.

Step 6. Add barcodes to your products

The Search & AI card on each product

no stored settings

Open a product and go to the SEO & Marketing tab. The Search & AI card is there for any product you have saved. Fill in:

Barcode (GTIN, UPC, EAN or ISBN): the number under the barcode on the packaging. Google uses it to match your product to searches. It must have 8, 12, 13 or 14 digits and a correct last digit, and the card tells you when it does not. For a 10-digit ISBN use the 13-digit one that starts with 978. Variants keep their own barcodes on the Options tab.
Manufacturer part number: only if there is no barcode.
Condition: Store default, or New, Used or Refurbished for this product.
This product has no barcode: tick it for handmade, custom or one-of-a-kind products so Google stops asking for one.

The card’s Checklist tells you what else the product needs, such as a description, an image, a brand or a barcode. Press Preview what Google reads to see the data for this product, or Test in Google to run Google’s Rich Results Test on its page. Save the product.

PRO stores also have a Google Merchant card on the same tab for the rest of the Google Shopping attributes, such as product category, gender, age group and size. Barcode, part number and condition live in the Search & AI card only.

To fill in many products at once, use Google attributes in bulk on the Search & AI page (PRO). Download the spreadsheet of every product and variant, fill in the Google attributes, and upload it back.
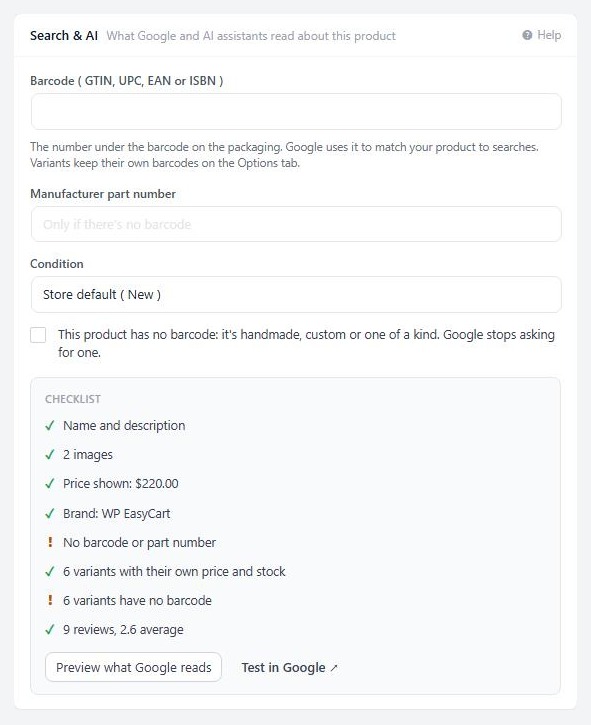
A product’s SEO & Marketing tab, showing the Search & AI card.

Step 7. Build your Google product feed (PRO)

A private address that Google, Bing and Pinterest fetch every day

no stored settings

The Google product feed section keeps one private feed address up to date for Google Merchant Center, Microsoft Merchant Center and Pinterest. Nothing to upload, and products never expire. Your feed needs an active license. If it lapses, the last feed stays online but stops updating.

The section shows how many items are in the feed, how many were left out, and when it was last built. Press Update now to build it the first time, because the nightly build has not run yet.

Under Your feed address there are two addresses: the .xml address for Google and Microsoft, and the .tsv address for Pinterest. Anyone with an address can read your public product list and nothing more. You can also download either file.

Under Feed options set Build the feed every night at (it starts at 2 in the morning), and choose whether to include out-of-stock products, use your store name as the brand for handmade products, and a Default Google product category. Product and stock changes are picked up within the hour as well.

Left out and warnings lists what the last build skipped and why: products that hide their price, show a price range, have no price or image, are out of stock when you excluded them, or were turned off for Google. Warnings cover a missing or invalid barcode and a main image under 500 by 500 pixels. Open a line to see the products.

If you shared the address by mistake, press New address under New feed address. The old address stops working at once.
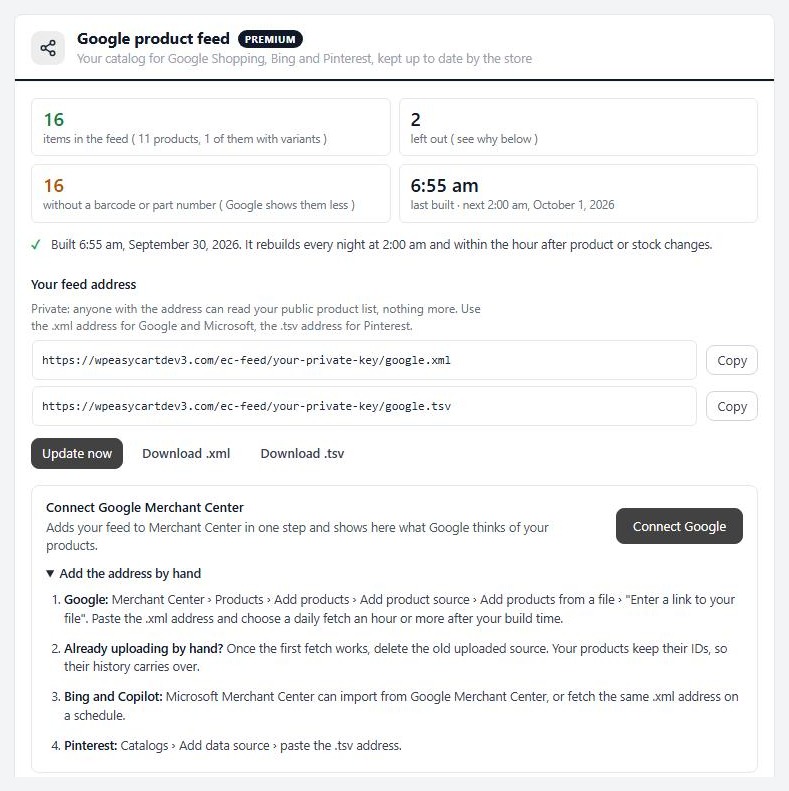
Settings › Search & AI, the Google product feed section, with a built feed and its private address.

💡 Note: The feed shares the same data as your product pages, so fixing a barcode on the product fixes it in the feed too, after the next rebuild.

Step 8. Give the feed to Google Merchant Center

Connect Google in one step, or add the address by hand

no stored settings

Connect Google. In the feed section press Connect Google, sign in to Google and give WP EasyCart access. Then choose your Merchant Center Account and the Country you sell to, and press Add my feed. Google fetches the feed now and every day after your nightly build, and the card shows how many products are active, waiting for review or disapproved, with the top problems. Prices must be in that country’s currency: in the US and Canada without tax, elsewhere with VAT, as your product pages show them. If the button says Coming soon, use the manual steps below.

Use Check with Google to refresh the verdict and Fetch now to ask Google to fetch again. Google allows this once an hour. Disconnecting keeps your feed working, and Merchant Center keeps fetching it.

By hand. Open Add the address by hand on the card. In Merchant Center choose Products, Add products, Add product source, Add products from a file, then “Enter a link to your file”. Paste the .xml address and pick a daily fetch an hour or more after your build time. If you already upload by hand, delete the old source once the first fetch works. Your products keep their IDs, so their history carries over. Microsoft Merchant Center can import from Google, or fetch the same .xml address. Pinterest takes the .tsv address under Catalogs, then Add data source.

💡 Note: Your feed address is a secret link. Do not post it in public. If it leaks, make a new address and paste it into Google, Microsoft and Pinterest.

Keep it running

When something goes wrong

The usual reasons products are left out or rejected.

If it does not work

The usual reasons products are missing or rejected

no stored settings

A product is not in the feed. Open Left out and warnings. The reason is listed with the products it affects. The common ones are a hidden or missing price, no image, or an out-of-stock product with out-of-stock products excluded.

Google cannot fetch the feed. The feed section warns when your robots.txt blocks Googlebot or AdsBot-Google. Fix the rule as in step 5. Check also that you pasted the complete address, and that you did not press New address since you gave it to Google.

Google says a barcode is wrong. Open the product’s Search & AI card. The card shows what is wrong with the digits. A product with no barcode should be ticked as having none.

Google reads old product data. The Status section warns when your theme keeps its own copy of the product page template that still prints the old data, and shows the fix. Update that copy.

The feed has not updated. Press Update now. A build that has not moved for 10 minutes can be restarted the same way. Check that your license is active.

Google is not showing my products in results. Approval takes time, and the feed is only the start. Check the status counts on the card, fix disapproved products in Merchant Center and give Google time to crawl.

Still stuck? Open a ticket from your account at wpeasycart.com/my-account.

Keep going

Related panels

Google Merchant

The Google Merchant setup guide.

SEO & Marketing

Every option on a product’s SEO & Marketing tab.

Shipping rates

The rates your shipping section is built from.

Store Status

Store Status repeats the Search & AI checks.

Ready to run your store on WP EasyCart?

Everything in this guide works with the free plugin. PRO and Premium add subscriptions, memberships, wholesale pricing and more. Try every PRO feature free for 14 days.

The WP EasyCart admin: orders and offers
Updated on September 30, 2026