
How-to › Selling special products
How to Sell Membership Content on WordPress
Sell access to members-only pages, videos or downloads. You create a membership product, connect Stripe, protect a page and test it. 12 parts.
Quick links
Where to find it:WP Admin › EasyCart › Products › Add New
Before you start
What you are building
What membership means in WP EasyCart and what you need before you begin.
How membership works
What you need and what actually unlocks a page
no stored settingsWhat you need. WP EasyCart PRO or Premium, and Stripe connected in Settings › Payment. A membership is a subscription product, and subscriptions bill through Stripe. Every member needs an account on your store, which checkout creates.
The idea. You sell a product. You wrap the content you want to protect in a membership shortcode that names that product. When a logged-in customer holds the product, they see the content. Everyone else sees whatever you put in the non-member message.
Holding the product means an Active subscription to it, or, for an ordinary product, an order containing it whose status counts as approved, such as Order Shipped or Card Approved.
Two ways to protect content. Lock a whole page, so visitors who are not members are sent somewhere else, or wrap part of a page in a membership block so it shows to members and a message shows to everyone else. You can use both.
There are five steps: create the product, connect Stripe, protect your content, give members a way back to it, then test the whole thing with a real purchase.
Set it up
Five steps
Create the product, connect Stripe, protect a page, give members a way back and test.
Step 1. Create the membership product
A subscription product with a Membership URL
no stored settingsGo to EasyCart › Products › Products and press Add New. Enter a title and a price, choose Membership from Product type, and press Create & open editor. The price is what the member pays each billing period.
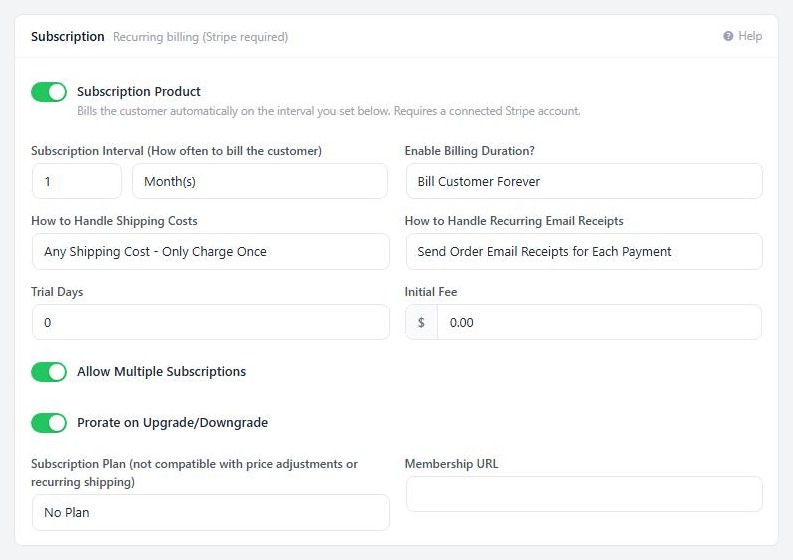
The Membership type turns on the subscription settings for you. Open the Type & Behavior tab and find the Subscription section, then set it up:
Subscription Interval: how often you bill, such as 1 Month(s) or 1 Year(s).
Enable Billing Duration?: leave on Bill Customer Forever for an open ended membership, or choose Set Max Number of Payments for a fixed term.
Trial Days and Initial Fee: a free trial before the first charge, and a one-time sign-up fee. Both are optional.
Allow Multiple Subscriptions: turn it off if a customer should only ever hold one of this membership.
Membership URL: the page your members should land on, such as your Members Area page. Paste the full address. Shoppers are sent there from the order confirmation page and their account.
Press Save. Then note the product’s ID, which you need in step 3. It is the number at the end of the editor’s address, product_id=12. The product list also shows it in an ID column on a wide screen, and you can pick the product by name in the editor block.
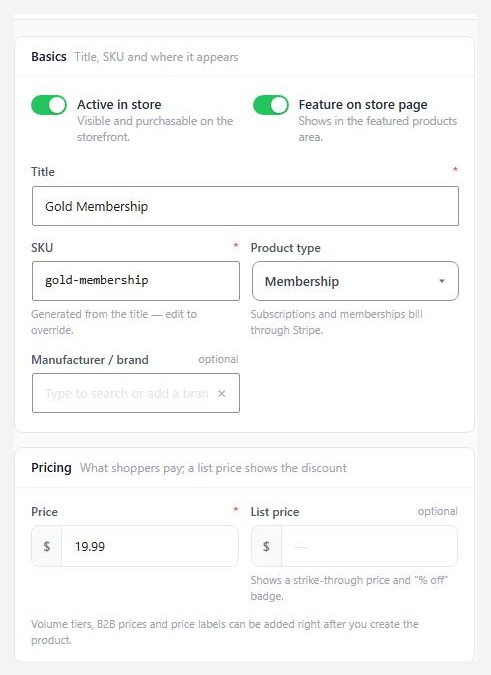
💡 Note: A membership is billed by Stripe, so the price you enter is charged every period. To sell lifetime access, use a one-time product instead, as described under Other ways to sell access.
The Subscription section
Billing, trial and the Membership URL on the product
no stored settingsThis is the section you just set up, shown as it looks on a new Membership product. Leave Subscription Plan on No Plan unless you sell several tiers that customers can move between. Plans are made under Products › Subscription Plans and are optional for membership. See the subscription plans doc for tiers.
Step 2. Connect Stripe
Subscriptions bill through Stripe, and Stripe reports back to your store
no stored settingsOpen EasyCart › Settings › Payment and connect Stripe if you have not already. Until Stripe can bill, the Subscription section shows a notice and the product cannot be bought.
Then add your store’s webhook in the Stripe dashboard. Stripe uses it to tell your store when a payment succeeds, fails or a subscription ends, and membership access follows those messages. The address is https://yourdomain.com/?wpeasycarthook=stripe-webhook, and the Stripe card in Settings › Payment has a button to copy it. Enable at least invoice.payment_succeeded, invoice.payment_failed, customer.subscription.updated and customer.subscription.deleted.
The Stripe Payment Settings doc walks through every Stripe option.
Step 3, method A. Lock a whole page
The Limit Access box on any page or post
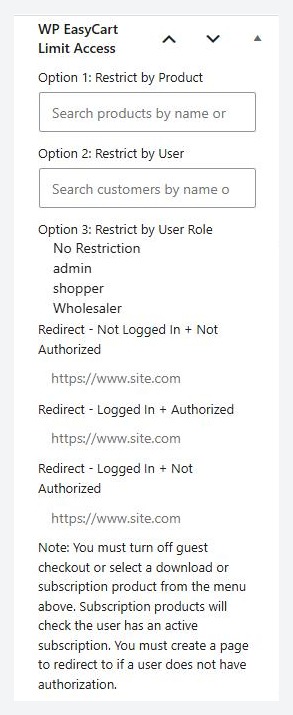
no stored settingsEvery page, post and store page has a WP EasyCart Limit Access box in the editor. In the block editor it sits at the bottom of the Page tab of the sidebar. Open your members page, such as Members Area, and fill it in:
Option 1: Restrict by Product: search for your membership product by name. There is no need to look up its ID. Pick more than one and a customer needs to hold only one of them.
Option 2: Restrict by User: lock the page to named customers.
Option 3: Restrict by User Role: lock it to customers with a role you created. When you fill in more than one option, a visitor must pass all of them.
Then set where visitors go. The redirects decide what happens, and a page with none is not locked at all.
Redirect – Not Logged In + Not Authorized: where visitors who are not logged in are sent, usually your login page. Leave it empty and logged-out visitors can open the page.
Redirect – Logged In + Not Authorized: where customers who are logged in but do not hold the product are sent, usually the page that sells the membership.
Redirect – Logged In + Authorized: optional. Sends members straight on to another page, which is handy for a join page that should skip members.
Enter full addresses, such as https://yourdomain.com/join/. Update the page. Administrators are never locked out, so preview it as a customer to see the redirect.
Which people count. The lock checks the customer’s store account, not their WordPress login. For a subscription product only an Active subscription passes, so a member who cancels or stops paying loses access.
⚠️ Careful: Nothing stops a visitor who has the direct address of a media file, a download or a different page. A lock protects the page you put it on, and a membership block protects only what you put inside it. Keep private files off public pages, and put a lock on each page that should be private.
Step 3, method B. Show content to members inside a page
The membership block or shortcode
no stored settingsUse this when part of a page is for members and the rest is public, such as a page that shows a preview to everyone and the full video to members. It also puts a login form in front of visitors who are not logged in.
In the block editor, add the WP EasyCart block and choose Membership Content as the shortcode type. Under Purchase Required for Access pick your membership product. Pick more than one and a customer needs only one of them.
The block gives you two areas. Type what members see in the MEMBER CONTENT HERE area and what everyone else sees in the NON-MEMBER NOTICE HERE area. A visitor who is not logged in also gets your store’s login and register form above the non-member message, and lands back on the same page after they log in.
Another way in. The block writes two shortcodes, and you can type them yourself in a Shortcode block, or in Elementor’s Shortcode widget, or in any builder that accepts shortcodes:[ec_membership productid="12"]Members only content here[/ec_membership][ec_membership_alt productid="12"]Please join to see this page.[/ec_membership_alt]
The number is the product’s ID. It is the number at the end of the product editor’s address, product_id=12. On a wide screen the product list also has an ID column. Several IDs go in one attribute with commas and no spaces: productid="12,15". The classic editor has the same thing in the EasyCart shortcode menu as Membership Content.
What you see as the store owner
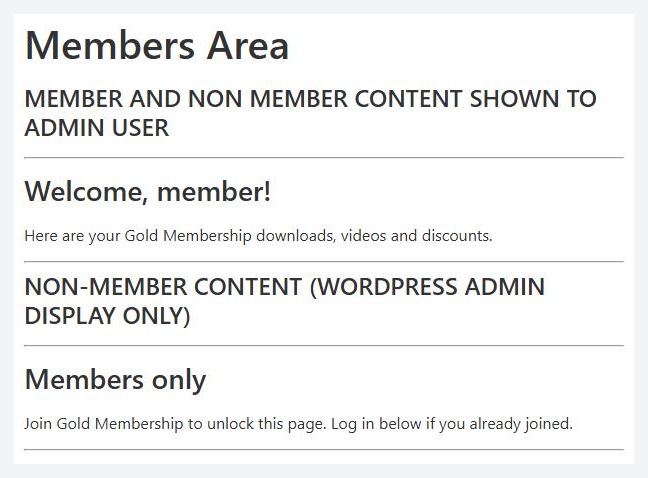
Administrators see both versions, labelled
no stored settingsPreview a page with membership shortcodes while you are logged in as an administrator and you will see both the member content and the non-member content at once, each under a heading that says which is which. That is only for admins. Members see only the member content, and everyone else sees only the non-member notice. To see the real thing, test with a customer account, as in step 5.
Step 4. Give members a way back
Confirmation page, account and menu
no stored settingsBecause you filled in the Membership URL, members get a Click Here to View Your Membership Content link on the order confirmation page, and the same link on their subscription in My Account. The account link is hidden once the subscription has ended, so it never sends a former member to a page they cannot open. The link’s wording is editable in Settings › Email, under Receipt wording.
Add the members page to your site menu too, so members find it without an email. Visitors who click it and are not members see your non-member message, which is your best place to sell the membership.
Step 5. Test it with a real purchase
Use Stripe test mode and a second browser
no stored settingsSwitch Stripe to sandbox in Settings › Payment and register the same webhook in your Stripe test dashboard. Then, in a private window that is not logged in as an admin:
1. Open the members page. You should see only your non-member message and the login form.
2. Open the membership product, press its button and sign up with Stripe’s test card 4242 4242 4242 4242, any future date and any code.
3. On the confirmation page press the membership link. You should see the member content.
4. Back in the admin, open Orders › Subscriptions. The new subscription should read Active.
When it all works, turn test mode off. Subscription buttons say Sign Up Now and take the customer to a subscription checkout page, not the cart.
Keep it running
Beyond the basics
When access ends, other ways to sell access, and what to check when it does not work.
When a member cancels or stops paying
What ends access, and what does not
no stored settingsAccess is checked every time the page loads, and the two methods check slightly differently.
Locking a whole page (method A). For a subscription product only an Active subscription passes. A cancelled or failed subscription loses access straight away.
Membership blocks and shortcodes (method B) first look for an Active subscription. If they find none, they look for any order containing the product whose status counts as approved. A member’s first order is still approved, so a member who cancels can keep seeing this content. To end their access, set that order to a status that is not approved, such as Order Cancelled or Refunded Order, in Orders › Orders. Or use method A for anything that must stop when they cancel.
A failed payment marks the subscription as failed. If a later payment succeeds, the subscription returns to Active and access comes back. Stripe retries failed payments for you, as you set in your Stripe billing settings.
A full refund moves an order to Refunded Order, which is not approved. A partial refund keeps the order approved and keeps access.
Stripe tells your store about all of this through the webhook from step 2. If the webhook is not set up, statuses in your store fall behind and members keep or lose access late.
⚠️ Careful: Test the cancel case on your own store before you promise members that access ends when they cancel. It depends on which method you used.
Other ways to sell access
One-time purchases, roles and members-only stores
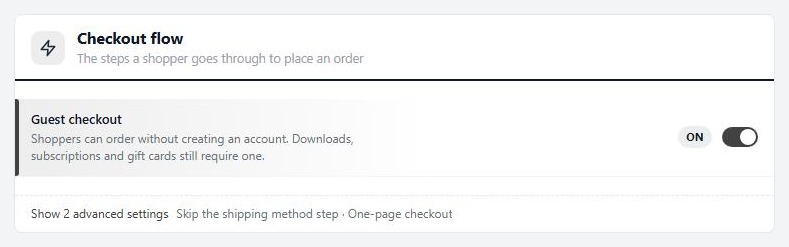
no stored settingsA one-time purchase instead of a subscription. Create a normal product, not a membership. The shortcode works exactly the same, because a paid, approved order counts. Turn Guest checkout off in Settings › Checkout, because access follows the customer’s account and a guest order has none. Refunds end access the same way.
By user role. Add userroles="Gold" to the shortcode, and any customer with that role sees the content, whether or not they bought anything. Create the role under Users › User Roles and assign it to a customer under Users › User Accounts, in Account Access. Roles are set by you, by hand. Buying a product never changes a role, and cancelling never removes it. The name must match the role exactly, capitals included.
A members-only shop. To hide your whole store from anyone who is not logged in with a chosen role, use Settings › Products › Who can view the store. To hide a single product, set Limit Visibility to User Role on the product’s Organization tab. To show a price only after login, use Login for Pricing. None of these protect ordinary WordPress pages. Use the shortcode for those.
If it does not work
The usual reasons a member still sees the notice
no stored settingsA locked page opens for everyone. A page lock does nothing until at least one redirect is filled in, and a logged-out visitor is only sent away if Redirect – Not Logged In + Not Authorized is set. Enter full addresses, and remember administrators are never locked out.
A member sees the non-member message. Check the product ID in the shortcode. Then open Orders › Subscriptions and confirm the subscription is Active. For a one-time purchase, confirm the order status is one of the approved ones.
The message says productid is wrong or nothing changes. If your block saved productid="undefined", the ID did not save. Type the shortcode by hand in a Shortcode block, or choose the product again.
Logged-out visitors see the wrong version or a stale page. Page caching can serve one visitor’s version to everyone. Exclude your members pages from caching. The caching guide explains how for the common cache plugins and hosts.
Access follows the webhook. If members are slow to lose or regain access, check that Stripe is sending events to your store address and that the webhook shows a recent delivery.
Keep going
Related panels
Every option on the Type & Behavior tab.
Manage your members’ subscriptions.
Sell several membership levels and let members switch.
Create the roles the userroles option checks.
Try the PRO features free for 14 days
Anything marked PRO comes with WP EasyCart PRO or Premium. Take the whole thing for a run on your own store before you decide.


