
How-to › Selling special products
How to Accept Donations and Invoice Payments
Take donations, or get paid for an invoice. You make a product where the customer types the amount, or you build an order and send a pay link. 10 parts.
Quick links
Where to find it:WP Admin › EasyCart › Products › Add New
Before you start
Two ways to do it
A product where the customer picks the amount, or an invoice you send.
Two ways to take a payment you did not list
A product where the customer types the amount, or an invoice you send
no stored settingsDonation or Invoice product. You make one product. The customer types the amount they want to pay and checks out. Use it for donations, a tip jar, or a page where clients pay an invoice you have already sent them.
Pay link. You build an order for a customer, for an amount you know, and send an invoice. The invoice has a Pay button that opens a page for that one order. Use it for phone orders, quotes and work you bill after the fact.
What you need. The Donation and Invoice product types are PRO features. The pay link needs an up to date WP EasyCart, and a way to take payment online: Stripe, Square, or PayPal with Pay Now buttons. If you accept bank transfers, the pay page shows those details instead. The New order screen and the invoice email are PRO.
Part A covers the product. Part B covers pay links and invoices. Use either one, or both.
Set it up
Part A and Part B
Create the donation or invoice product, or build an order and send a pay link, then test.
Part A, step 1. Create the donation or invoice product
Product type Donation or Invoice
no stored settingsGo to EasyCart › Products › Products and press Add New. Enter a title such as Make a Donation or Pay an Invoice, choose Donation or Invoice as the Product type and press Create & open editor. The two types do the same thing. Both switch on Donation/Invoice Product, which you can also find in the Product Behaviors section of the Type & Behavior tab.
The switch is described in the editor as: The customer types in the amount to pay. One detail matters. The product page uses your price as the minimum the customer may type. Set the price to the smallest amount you are happy to take, such as 5 for a donation. A customer who types less sees an error asking for at least that amount.
Leave Shippable off. Add a photo and a short description on the General and Media tabs, and say what the money is for. Then save.
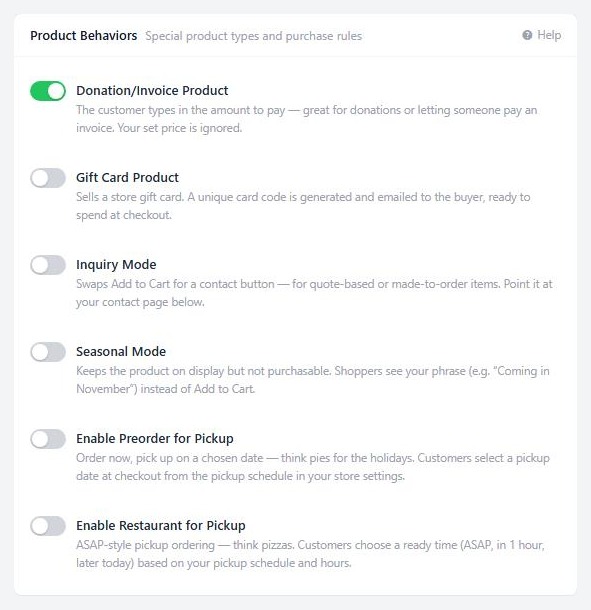
💡 Note: The help text on the switch says your set price is ignored. On the product page it is the smallest amount a customer may type, so set it to your minimum.
What the customer sees
An amount box instead of a fixed price
no stored settingsOn the product page the customer sees a Donation Amount box in place of a fixed price. They type what they want to pay and press the button. The amount changes the price of the cart line, and the rest of checkout works as it does for any product. In lists and grids the product shows a select options link, so the customer always lands on the page with the box.
Guest checkout still works for a donation or invoice payment. It does not for downloads, subscriptions and gift cards. You can edit the labels and the error message in Settings › Language.
Part A, step 2. Turn it into an invoice payment page
Ask for the invoice number with the order notes box
no stored settingsA payment page for invoices needs two things: the amount, and which invoice it is for. The amount is the box above. For the reference, open EasyCart › Settings › Checkout and switch on Order notes box in the Checkout form card. Shoppers can then leave a note with their order. It shows on the order, on the receipt and in the admin.
Put a line in the product description such as Type the amount from your invoice. Put the invoice number in the order notes at checkout. The order notes box is store-wide, so it shows for every order.
If you already know the amount, send a pay link instead. Part B is the tidier way to bill a specific customer, because the link carries the order with it.
Part B, step 1. Check pay links are on
Settings › Documents › Pay links
no stored settingsOpen EasyCart › Settings › Documents and find Pay links. Let customers pay unpaid orders from a link is on by default. With it on, invoice emails and the order page in My Account get a Pay button that opens a page for that order.
Under the switch the store lists what customers can pay with: card payments with Stripe, card payments with Square, PayPal, and bank transfer details when manual payment is on. If another card gateway is your main one, such as Authorize.net, a warning names it and says invoices go out without a Pay button for it. If nothing can take a payment online, customers who open a pay link see your bank transfer details or a note to contact you.
The link itself is your cart page address with the order number and a 30-letter secret key. Anyone with the link can pay that order, so send it only to the customer.
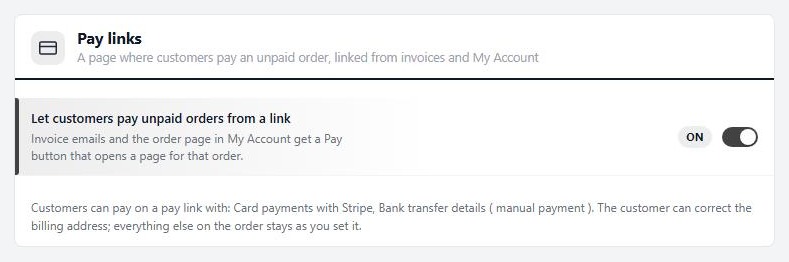
⚠️ Careful: A pay link works for anyone who holds it. Send it to the customer only, and never post it in a public place.
Part B, step 2. Build the order (PRO)
Orders › New order
no stored settingsGo to EasyCart › Orders and press New order. The builder asks for:
Customer: find an account by name or email, or type the details for a guest order.
Billing address and Shipping address, with Ship to the billing address or Nothing to ship.
Items: search a product by name or SKU, or Add a custom line with your own description, Unit price, Taxable and Ships.
Shipping: a rate from your own shipping rates, or your own method and amount.
Summary: a discount, and tax worked out with your tax rules or entered by hand. Press Recalculate after you change an address.
Invoice details: a PO number, payment terms and a note to the customer.
Then choose how to save it. Save as draft keeps it visible only to you. Create order saves it as Awaiting payment. Create and send invoice saves it and opens the order screen with the Send Email window on the invoice.
Stock goes down when the order is paid, not when you create it. Gift cards, downloads and subscriptions can only be sold through your store’s checkout, so they cannot go on a built order.
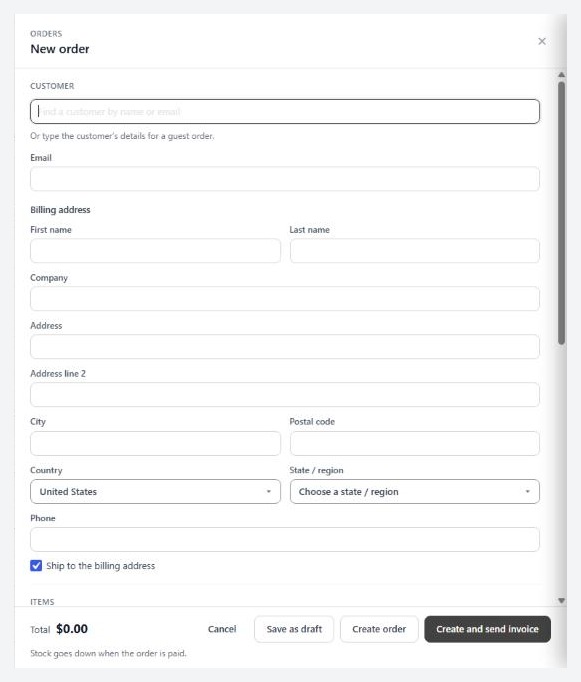
💡 Note: A draft is visible only to you. It becomes visible to the customer when you send the invoice or change its status.
Part B, step 3. Send the invoice
Send Email › Invoice on the order
no stored settingsOn the order screen press Send Email and choose Invoice. The email carries the invoice, usually with an Invoice PDF attached (untick the box to leave it off), and a Pay button while the order is unpaid. Its look and wording are set under Settings › Documents › Invoice email, where you can choose the Standard or the Itemized profile.
Under Invoice numbers in the same settings page you can give invoices their own numbers, choose the format and the next number, and have refunds issue a credit note.
The customer can also find the order in My Account, where an unpaid order carries a Pay now button and a note that it is waiting for payment.
What the customer does on the pay page
Correct the billing address and pay
no stored settingsThe link opens a page for that order. They can correct the billing address and nothing else. Everything on the order stays as you set it. They pay exactly what is due, which is the order total, or the balance if the order was changed after part of it was paid.
They pay by card with Stripe or Square, with PayPal, or they read your bank transfer details. Once a payment goes through, the order gets its payment details, its stock is taken, its status becomes an approved one, and the customer gets a receipt. The order log records order-paid-online.
The page protects itself. An order that is already paid says so. An order whose payment is still processing cannot be paid a second time. Refunded and cancelled orders are closed. A payment that goes wrong, or does not match the order, leaves a note for staff on the order.
Test it
A donation and a pay link, in test mode
no stored settingsSwitch your gateway to its test mode. In a private window that is not logged in as an admin:
Donation. Open the product. Type less than your minimum and check for the error. Type a real amount, check out with the test card and confirm the order total in Orders is what you typed.
Pay link. In your admin, press New order, pick yourself as the customer, add a custom line and choose Create and send invoice. Send it to an address you can read. Open the email and press Pay. Pay with the test card. Then check the order: it should be paid, with the log entry order-paid-online, and stock down for any product on it.
Turn test mode off when you are done.
Good to know
When something goes wrong
The usual reasons a payment does not go through.
If it does not work
The usual reasons a payment does not go through
no stored settingsThe customer typed an amount and got an error. The amount is below the product price, which is the minimum. Lower the price on the product.
The invoice email has no Pay button. Pay links are switched off, or none of your payment methods can take an online payment on a pay link. Check Settings › Documents › Pay links. If your card gateway is one the store names as unable to take pay links, the invoice goes out without a Pay button. Use Stripe, Square or PayPal, or send the customer your bank details.
The pay page says it has expired. The customer left it open. Ask them to reload the page or use the link from the email again.
The order stays Awaiting payment after the customer paid. Stripe and your store finish a payment whose page never came back through the Stripe webhook. Check in Stripe that your store’s webhook shows recent deliveries, and look at the order for a staff note.
A customer cannot open the link. A draft order is not visible to the customer until you send it. Send the invoice from the order.
Paying on a schedule instead? See How to Sell Subscriptions on WordPress.
Keep going
Related panels
Every option on the Type & Behavior tab.
Settings › Documents, including Pay links and Invoice numbers.
Sending invoices, receipts and packing slips.
The order screen and its statuses.
Ready to run your store on WP EasyCart?
Everything in this guide works with the free plugin. PRO and Premium add subscriptions, memberships, wholesale pricing and more. Try every PRO feature free for 14 days.



