
How-to › Tracking and data
How to Track Google Ads and Meta Conversions
Know which ads make sales. You connect Google Ads and the Meta Pixel, add server events, set up cookie consent and test that everything fires. 9 parts.
Quick links
Where to find it:WP Admin › EasyCart › Settings › Integrations
Before you start
What you are setting up
What you need and what Google and Meta learn from your store.
What you are setting up
What you need, and what Google and Meta learn from your store
no stored settingsWhat you need. WP EasyCart PRO or Premium for the Google Ads and Meta Pixel cards. They are PRO features and show locked in the free plugin. The free trial unlocks them. The Cookie consent setting is free. You also need a Google Ads account, a Meta Pixel from Meta Events Manager, and, if your shoppers include visitors from the EU or the UK, a cookie banner plugin.
What it does for you. Google Ads learns which clicks became orders and can build remarketing audiences. Meta learns which shoppers viewed, added and bought, so it can find more like them and credit sales to your ads. Consent decides when either of them is allowed to run.
The steps: connect Google Ads, connect the Meta Pixel, optionally add Meta server events, tell the store about your cookie banner, then test.
Set it up
Five steps
Connect Google Ads, connect the Meta Pixel, add server events, set consent and test.
Step 1. Connect Google Ads
Settings › Integrations › Google Ads
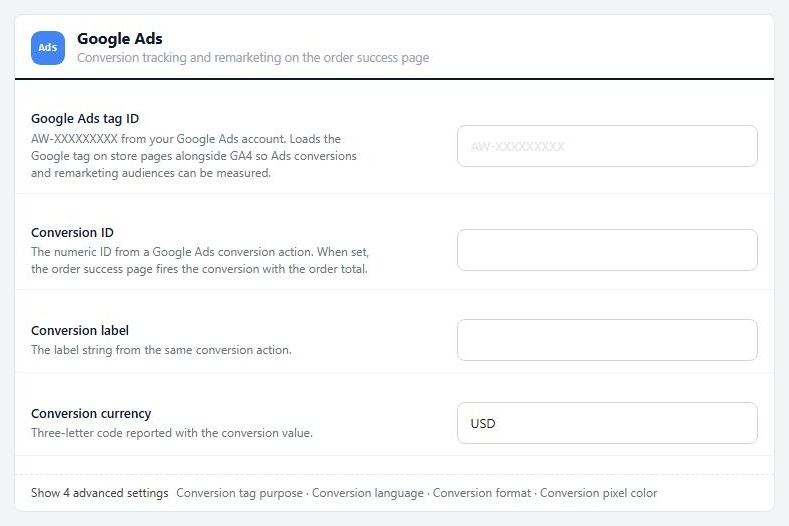
no stored settingsGo to EasyCart › Settings › Integrations and open the Google Ads card. It gives you two jobs, and you can do either or both:
Remarketing and measurement. Paste your Google Ads tag ID (AW-XXXXXXXXX). The Google tag loads on your store pages so Ads can build audiences from your visitors.
Purchase conversions. Fill in Conversion ID (the number) and Conversion label from your Google Ads conversion action. The order confirmation page then reports the order total as a conversion.
Set Conversion currency to your store’s currency. It starts on USD, and the value sent is your order total, so a store in another currency reports the wrong figure until you change it.
Under Show advanced settings, Conversion tag purpose can be set to Remarketing only, which records the visit for audiences without counting a conversion. Leave the other advanced rows (language, format and pixel color) at their defaults unless Google gave you different values. Press Save.
Step 2. Connect the Meta Pixel
Settings › Integrations › Meta Pixel
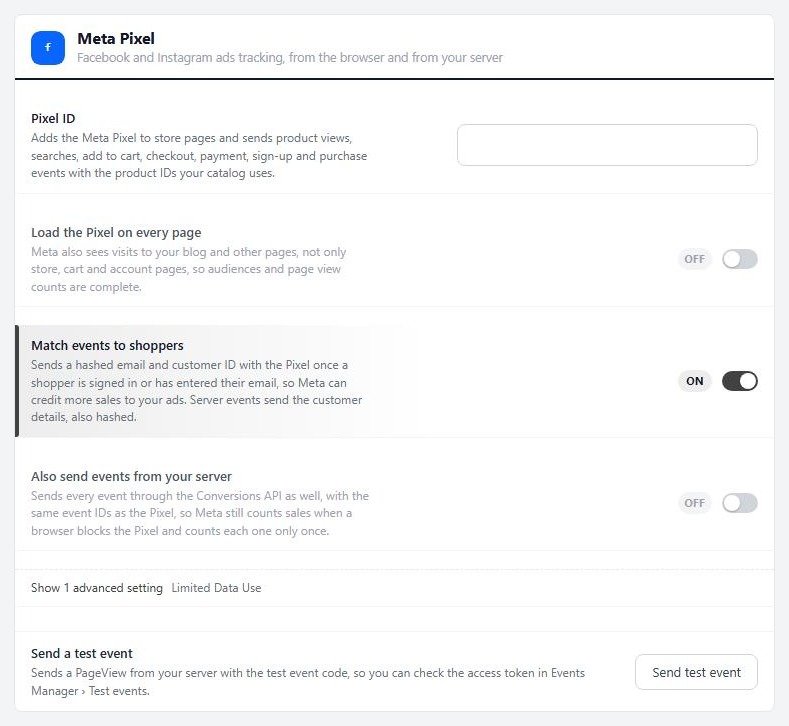
no stored settingsOpen the Meta Pixel card. Paste your Pixel ID from Meta Events Manager into Pixel ID and press Save. The Pixel now loads on your store pages and sends PageView, ViewContent, Search, AddToCart, InitiateCheckout, AddPaymentInfo, CompleteRegistration and Purchase as shoppers do those things. Each event uses the same product IDs as your catalog, so Meta can match them to your products.
Load the Pixel on every page is off by default. Turn it on if you want Meta to see visits to your blog and other pages too, which gives you complete audiences.
Match events to shoppers is on by default. Once a shopper is signed in or has typed their email, the Pixel sends a hashed email and customer ID so Meta can credit more sales to your ads. Both values are hashed before they leave your store.
Limited Data Use sits under Show advanced settings. It asks Meta to process events from US states with consumer privacy laws under Limited Data Use. Turn it on if your privacy policy promises that.
Step 3 (optional). Send Meta events from your server
The Conversions API keeps sales counted when a browser blocks the Pixel
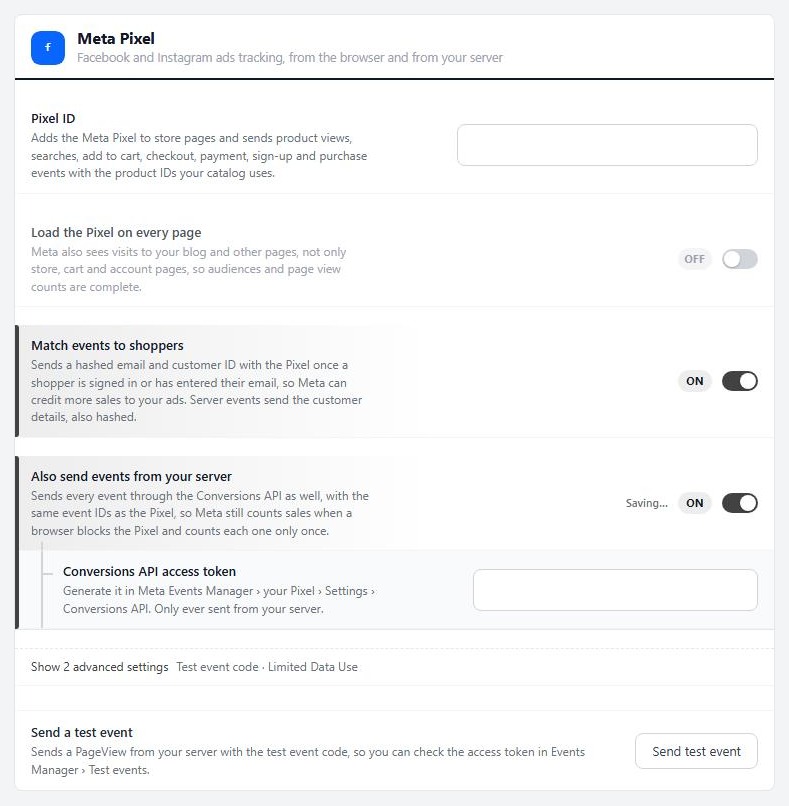
no stored settingsTurn on Also send events from your server in the Meta Pixel card. The store sends every event to Meta through the Conversions API as well, with the same event IDs as the Pixel, so Meta counts each one once and still counts sales the browser blocked.
In Meta Events Manager open your Pixel, then Settings, then the Conversions API section, and generate an access token. Paste it into Conversions API access token. It is only ever sent from your server. Server events need an active PRO or Premium license. If your store also uses the Facebook & Instagram extension, its own connection supplies the token and the card says so.
To check the token, get a code from Events Manager under Test events and paste it into Test event code under Show advanced settings. Then press Send test event. The store sends a PageView from your server with that code, and it should appear in Test events. The card also lists Recent server events as Sent, Will retry, Failed or Not sent. Clear the test code when you finish, because every server event goes to Test events while it is set.
A purchase is sent once per order, with the event ID order_ followed by the order number. The Pixel on your confirmation page uses the same ID, so Meta does not count it twice.
Step 4. Tell the store about your cookie banner
Settings › Integrations › Cookie consent
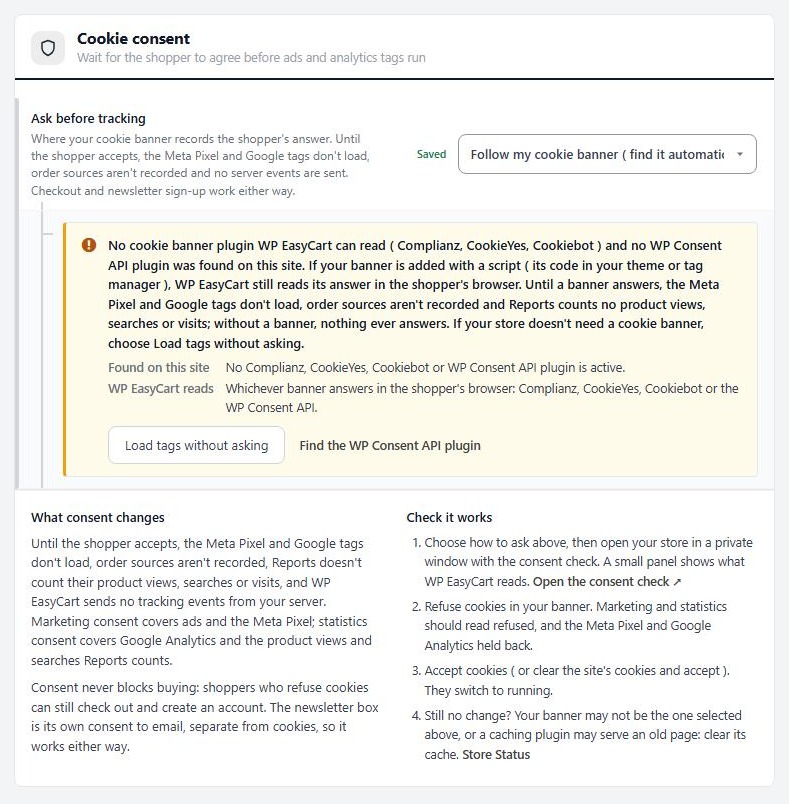
no stored settingsOpen the Cookie consent card. Ask before tracking picks where your store reads the shopper’s answer:
Load tags without asking: the default. Tags load for everyone. Right for stores that need no banner.
Follow my cookie banner (find it automatically): the best choice for most stores. The store finds Complianz, CookieYes or Cookiebot on your site, else the WP Consent API, and follows it. It also reads a banner you add with a script.
WP Consent API (banners that support it): for banners that report to the WP Consent API plugin.
Google Consent Mode v2 (set by my cookie banner): Google tags load at once and follow the consent signals your banner sets. The Meta Pixel waits for the same signals. Turn on Google Consent Mode inside your banner, or nothing is ever granted.
Cookiebot, CookieYes and Complianz: read that banner’s own answer.
Under the choice, a status note names what was found on your site and what WP EasyCart reads. If it spots a banner you are not following, it shows a button such as Follow Complianz that switches the setting in one click. The same message shows in Store Status.
⚠️ Careful: This setting is a tool, not legal advice. Whether your store needs consent depends on where your shoppers live. Ask your own advisor if you are unsure.
What waits for consent
Tracking waits. Buying never does.
no stored settingsWhile your setting asks for consent, these wait until the shopper agrees:
Marketing consent covers the Meta Pixel, the Google Ads conversion on the order confirmation page, and Meta server events.
Statistics consent covers Google Analytics, GA4 server events, and the product views and searches that Reports counts.
Google tag. It loads once the shopper accepts marketing or statistics cookies. Its Google consent signals follow the answer.
Order sources are not recorded until the consent you chose in Settings › Integrations › Order sources, under With a cookie banner, wait for.
Checkout, account sign-up and the newsletter box work whether or not a shopper accepts cookies. The newsletter box is its own consent to email.
The store also stops loading the retired Universal Analytics tag while it is asking.
Step 5. Test it
The consent check, then each service’s own test tool
no stored settingsThe consent check. Under the Cookie consent card press Open the consent check, or add ?wpec_consent_check=1 to your store address in a private window. A small panel shows which banner WP EasyCart reads, whether marketing and statistics read accepted, refused or no answer yet, and whether the Meta Pixel and Google Ads and Google Analytics are running or held back. Refuse cookies in your banner and both should read refused and held back. Accept and they switch to running.
Meta. In Meta Events Manager open Test events and browse your store. Meta’s Pixel Helper browser extension also shows each event as it fires. Look for ViewContent, AddToCart and, after a test order, Purchase.
Google Ads. Use Google Tag Assistant on your store and place a test order. Your conversion action in Google Ads shows a status. It can take a while to move from unverified to recording.
Place the test order with your gateway’s test card, in a private window that is not logged in as an admin.
💡 Note: Google Analytics 4 has its own guide, covering the measurement ID, server events and DebugView. See How to Set Up Google Analytics 4 Purchase Tracking.
Good to know
More and troubleshooting
Affiliate tracking, and what to check when a tag does not fire.
Tracking affiliate sales with ShareASale
A short card for stores on the ShareASale network
no stored settingsThe ShareASale card is a PRO feature. Turn on Report sales to ShareASale and enter your numeric Merchant ID. Nothing is tracked until the ID is set. The store then records each paid order against the referring affiliate. Include line items in the sale report sends each item’s SKU, price and quantity so you can set per-product commissions.
If it does not work
The usual reasons a pixel or conversion never fires
no stored settingsNothing loads, and you are sure the ID is right. Open the consent check. If it says refused or no answer yet, the tags are held back by design. If it says your banner is not found, the choice in Ask before tracking does not match the banner on your site. Choose Follow my cookie banner, or use the one-click button in the status note.
Two banners. If two banner plugins are active the status note warns you and WP EasyCart follows the first it finds. Keep one.
Google Consent Mode never grants. The banner must turn Consent Mode on. Until it does, Google reads every answer as denied.
Google Ads conversions are wrong. Check Conversion currency. It starts on USD.
Meta server events say Failed. Open Recent server events to read the reason. The usual fixes are a new access token, or the token belongs to a different Pixel. A lapsed license also stops server events.
Everything works for you but not for shoppers. Test in a private window, not while logged in as an admin. A caching plugin that serves an old page can hide your changes, so clear its cache after saving.
Still stuck? Open a ticket from your account at wpeasycart.com/my-account.
Keep going
Related panels
The Google Analytics integration guide.
The Facebook & Instagram extension, which can supply the Meta token.
Store Status shows what Cookie consent found.
Reports shows sales by source once order sources are recorded.
Ready to run your store on WP EasyCart?
Everything in this guide works with the free plugin. PRO and Premium add subscriptions, memberships, wholesale pricing and more. Try every PRO feature free for 14 days.



