
How-to › Start here
How to Take Your First Payment
Connect Stripe, Square, PayPal or Bill later, test with test money and switch to live. 9 parts.
Quick links
Where to find it:WP Admin › EasyCart › Settings › Payment
Before you start
What you need
Which gateways are free, which need a license, and what each one requires.
What you need
An account with the gateway, and which options cost what
no stored settingsWhat you need. A WP EasyCart store with at least one product, and an account with the payment provider you choose. Stripe is the recommended path: it takes cards on your own checkout page, and adds Apple Pay, Google Pay and Link.
Free or PRO. On the free edition, Bill later is free. Stripe, Square and PayPal connect through EasyCart Connect and carry a 2% EasyCart fee on each sale, on top of the provider’s own fees. A PRO or Premium license removes that fee and unlocks 30+ more gateways, including Authorize.net, Braintree, Moneris and Intuit Payments. Amazon Pay is a PRO wallet. There is a 14-day free trial if you want to try PRO first.
Secure checkout. Stripe and Square need your site on https. PayPal does not.
The steps are: pick a gateway, connect it, test it with test money, then switch to live.
Set it up
Four steps to a first payment
Choose, connect, test with test money and go live.
Step 1. Choose how you will be paid
One live card gateway, one third-party checkout, and Bill later
no stored settingsOpen EasyCart › Settings › Payment. Payment is organised in slots, and each slot holds one thing at a time:
Live gateway: cards entered on your checkout page. Stripe or Square.
Third-party checkout: shoppers finish paying on the provider’s site. PayPal.
Bill later: the order is placed now and you collect payment yourself.
Wallet: Amazon Pay, PRO only.
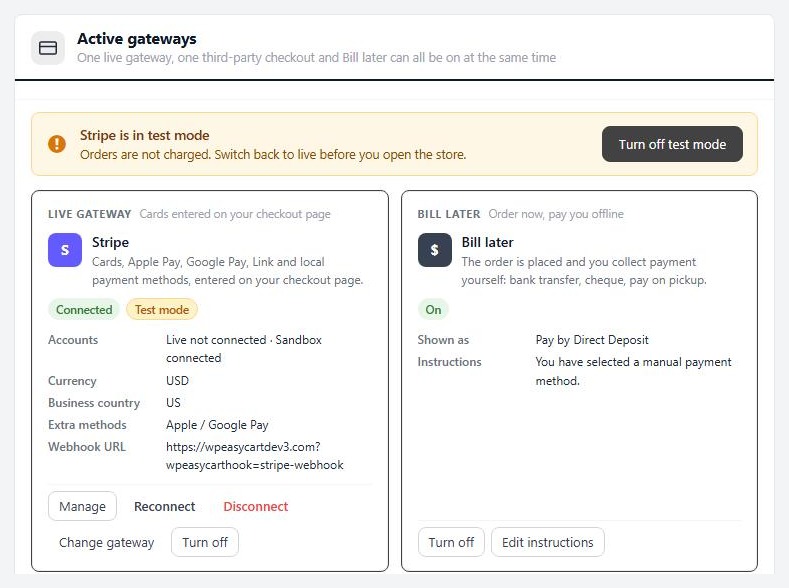
One live gateway, one third-party checkout and Bill later can all be on at the same time. Until a live gateway is connected, the screen tells you shoppers cannot pay by card on your site.
An empty live slot shows Choose how you take cards, with Stripe and Square side by side. Under More gateways is everything else, each labelled with the license it needs.
Step 2. Connect Stripe
The recommended path, sandbox first, then live
no stored settingsOn the Choose how you take cards card press Connect under Stripe. The first time, you are asked to accept the EasyCart Connect terms, which are required for PayPal, Stripe and Square. Then Stripe’s own page opens, you sign in or create an account, authorise, and you come back connected.
Press Try sandbox instead to connect a Stripe test account. Stripe keeps test and live accounts separate, and the card shows which of them are connected: Live connected, Live not connected, Sandbox connected or Sandbox not connected. Connect the sandbox first so you can test with no real money. When you are ready, Connect live account adds the real one, and Switch to live and Switch to sandbox move between them.
Once Stripe is connected, Manage opens its settings. There you can pick your Currency and turn on extra payment methods such as Apple / Google Pay, Link, Klarna, Affirm and Afterpay. The card lists the ones you have on next to Extra methods, and shows the Webhook URL Stripe should send events to.
PRO adds Stripe (API keys, v1), for stores that want to paste their own keys instead of using Connect.
💡 Note: Stripe is also the only gateway that can bill subscriptions. Every option on the payment screen is explained in Settings › Payment.
Or connect Square
Cards on your site, kept in step with your Square account
no stored settingsPress Connect under Square, or Try sandbox to use a Square sandbox account, and finish the authorisation on Square’s side. Make sure you complete it, or the card reports that Square did not finish connecting.
Once connected, Square is set as your live gateway. The card shows your Merchant name, the Location in use, whether Digital wallets (Apple / Google Pay) are on, and when access renews.
Square is also the choice if you sell in person with Square. Products and inventory can be kept in step with your Square account, and Settings › Integrations has a Cart importer that reads your Square catalogue.
Add PayPal
PayPal, Venmo and Pay Later buttons that shoppers already know
no stored settingsPayPal goes in the third-party slot, so it works alongside Stripe or Square. Press Connect under PayPal, or Try sandbox for a PayPal sandbox account. No SSL certificate is required.
The card shows which kind of checkout you have: PayPal Checkout buttons on your site or PayPal Standard (redirect). With Checkout buttons you can also offer Venmo, Card and Pay Later buttons, listed on the card as Extra buttons.
Choosing a new third-party checkout replaces the current one, and you are asked to confirm first.
Or take orders and bill later
Bank transfer, cheque, pay on pickup, no fees
no stored settingsBill later needs no gateway. The customer completes the order and pays you offline, and you follow up yourself. It costs nothing, so it is also the fastest way to run a test order.
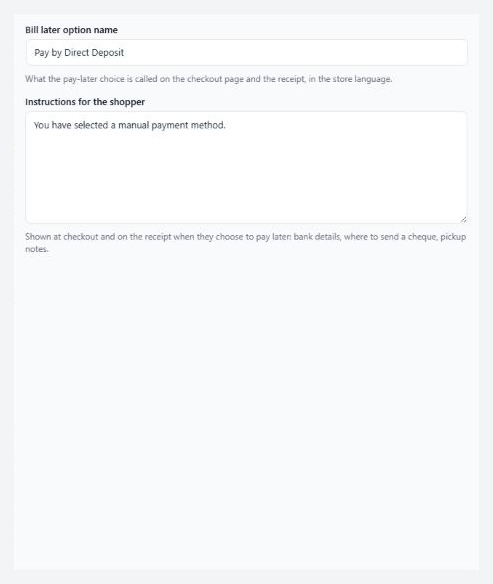
Turn it on from its card, then press Edit instructions. Two fields matter:
Bill later option name: what the choice is called at checkout and on the receipt. Shoppers pick it by this name, so make it clear, such as Bank transfer.
Instructions for the shopper: shown at checkout and on the receipt. Put your bank details, where to send a cheque or your pickup notes here.
Save. The card shows the name under Shown as and a preview of your Instructions.
Step 3. Test it
Place an order with test money
no stored settingsWhile a gateway is in sandbox or test mode, orders are not charged. The Payment page has a banner naming every gateway still in test mode, and says Orders are not charged. Switch back to live before you open the store.
In a private window, so you are not logged in as an admin, buy a product from your store.
Stripe. Use the card Stripe publishes for tests, 4242 4242 4242 4242, with any future expiry date and any security code. To see a refusal, use 4000 0000 0000 0002, which Stripe declines.
Square. Use the sandbox test card numbers listed in Square’s developer documentation.
PayPal. Sign in at checkout with a sandbox buyer account from your PayPal developer dashboard.
Then open Orders › Orders. The order should be there with the right total. If it is not, see the last section.
⚠️ Careful: A gateway in test mode takes no money. Before you announce your store, check the Payment page shows nothing in test mode.
Step 4. Go live
Turn off test mode and place one real order
no stored settingsOn Settings › Payment press Turn off test mode. It switches every active gateway that is in sandbox or test mode back to live, and asks you to confirm: real cards will be charged from now on.
A gateway without a connected live account stays in test mode until you connect one. Press Connect live account on its card first. A card that says Sandbox only has no live account yet.
Then place one real order for a small amount, confirm it appears in Orders, and refund it from your gateway dashboard. A gateway that authorises in sandbox can still fail live, for reasons a connection check cannot see, such as an account not yet approved for live processing.
⚠️ Careful: Turning off test mode charges real cards from that moment on. Place one real order to confirm it works before you promote the store.
When it goes wrong
Troubleshooting
What to check when a payment fails or nothing is charged.
If it does not work
What to check when a payment fails
no stored settingsShoppers cannot pay by card. The Payment page says No live gateway. Connect Stripe or Square, or make sure the card you connected is live and not only sandbox.
Payments succeed but nothing is charged. A gateway is still in test mode. Look for the banner on Settings › Payment and press Turn off test mode.
A card says a license is needed. A gateway that is still selected but needs an active license to process payments is not taking orders. Renew or choose a free gateway.
Stripe or Square will not load on the checkout. Both need your site on https. Check that your certificate works.
Refunds or subscription events do not reach your store. Check the webhook. Stripe must send events to the Webhook URL shown on the Stripe card.
A card was refused and you cannot see why. Open Settings › Log entries. It records the reply your gateway sent back, marked OK or Error, with the order it belongs to.
Store Status. EasyCart › Store Status fails its Payment check when no payment method is set up at all.
Still stuck? Open a ticket at wpeasycart.com/my-account.
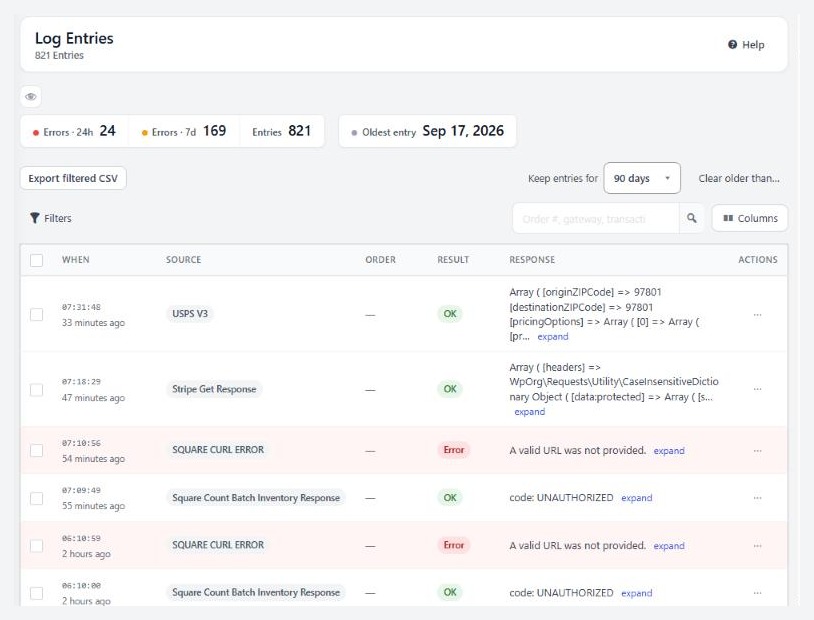
💡 Note: What each log entry means is covered in Settings › Log entries, and the readiness checks in Store Status.
Keep going
Related panels
Every gateway, slot and test mode switch on the Payment page.
Guest checkout and the rest of the checkout settings.
The gateway replies your store recorded.
Licence state and the four readiness checks.
Ready to run your store on WP EasyCart?
Everything in this guide works with the free plugin. PRO and Premium add subscriptions, memberships, wholesale pricing and more. Try every PRO feature free for 14 days.



