How-to › Tracking and data

How to Set Up Google Analytics 4 Purchase Tracking

See which pages, products and campaigns make you money. You save your GA4 measurement ID, choose how events travel, retire the old tag and test a purchase. 9 parts.

Quick links

Where to find it:WP Admin › EasyCart › Settings › Integrations

Before you start

What gets tracked

What you need and which events your store sends to Google.

What gets tracked

What you need, and the events your store sends to Google

no stored settings

What you need. WP EasyCart PRO or Premium, and a Google Analytics 4 property with a web data stream. Every GA4 setting in WP EasyCart is a PRO setting, so the free plugin shows them locked. The free trial unlocks them if you want to try it first.

What your store sends. Once your measurement ID is saved, the store loads the Google tag and reports the shopping journey as GA4 ecommerce events:

view_item_list when a shopper opens a product list, view_item on a product page, add_to_cart and remove_from_cart as they fill the cart, view_cart, begin_checkout, add_shipping_info and add_payment_info as they move through the cart and checkout pages, and purchase on the order confirmation page.

The purchase event carries the order number as the transaction ID, the order total, tax, shipping, the coupon code and every item with its model number, name, price, brand and quantity. Amounts are always in your store’s base currency, whatever currency the shopper browsed in.

The steps: create the data stream, save the ID, choose how events travel, retire the old Universal Analytics tag, set consent, then test.

Set it up

Six steps

Create the data stream, save the ID, choose how events travel, retire the old tag, set consent and test.

Step 1. Create a web data stream in Google

You need a G- measurement ID

no stored settings

In Google Analytics open Admin, pick your GA4 property and add a Web data stream for your store’s address. Google shows the stream’s measurement ID, which looks like G-XXXXXXXXXX. Copy it.

If you already have a GA4 property, reuse its stream. Do not make a second one for the same store, or your numbers split in two.

Step 2. Save the measurement ID

Settings › Integrations › Google Analytics

no stored settings

Go to EasyCart › Settings › Integrations and open the Google Analytics card. It sits in the Advanced group of the Settings menu. Paste your ID into GA4 measurement ID and press Save.

That is all a standard store needs. The Google tag loads on your store pages and every event above starts flowing. Product, cart and checkout events fire on the pages where shoppers do those things, and the purchase event fires on the order confirmation page.
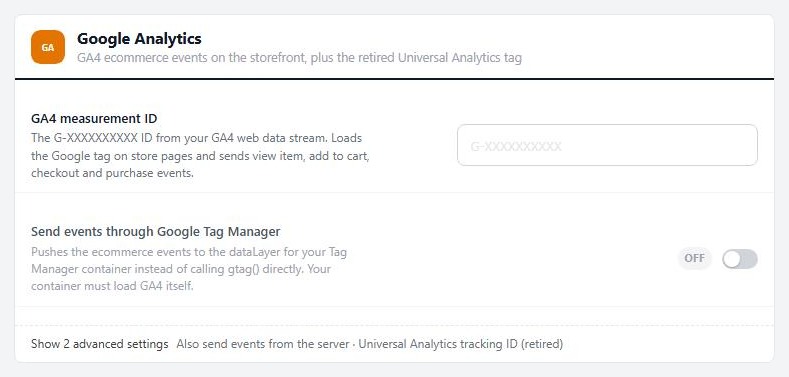
Settings › Integrations › Google Analytics, with the GA4 measurement ID row.

💡 Note: Google Analytics only needs the G- ID. A Google Ads tag and a Meta Pixel are separate settings, covered in the next guide.

Step 3 (optional). Send events through Google Tag Manager

For stores that already run a Tag Manager container

no stored settings

Turn on Send events through Google Tag Manager and the store pushes the same ecommerce events to your Tag Manager dataLayer instead of calling the Google tag directly. Your container decides what happens to them. The row’s own note says it: your container must load GA4 itself.

Keep the GA4 measurement ID filled in, because the events only fire while it is set. Then check your Realtime report after saving. If page views double, the container and the store are both loading GA4 and one of them needs to stop.

Step 4 (optional). Also send events from your server

Server events still count when a browser blocks tracking

no stored settings

Ad blockers and privacy browsers stop the Google tag before it runs. Server events fix that gap. Your store posts view item, add to cart, begin checkout, add shipping info, add payment info and purchase to Google from your own server. Open Show advanced settings on the Google Analytics card and turn on Also send events from the server. Then fill in the three values under it:

Measurement ID for server events: the same G- ID from your data stream.
Measurement Protocol API secret: in Google, open the data stream and create one under Measurement Protocol API secrets. It is only ever sent from your server.
Server container URL: the address of your Tag Manager server container, such as https://gtm.example.com.

Server events run only when all three values are filled in and your license is active. A lapsed license or an ended trial stops them. The browser tag keeps working either way.

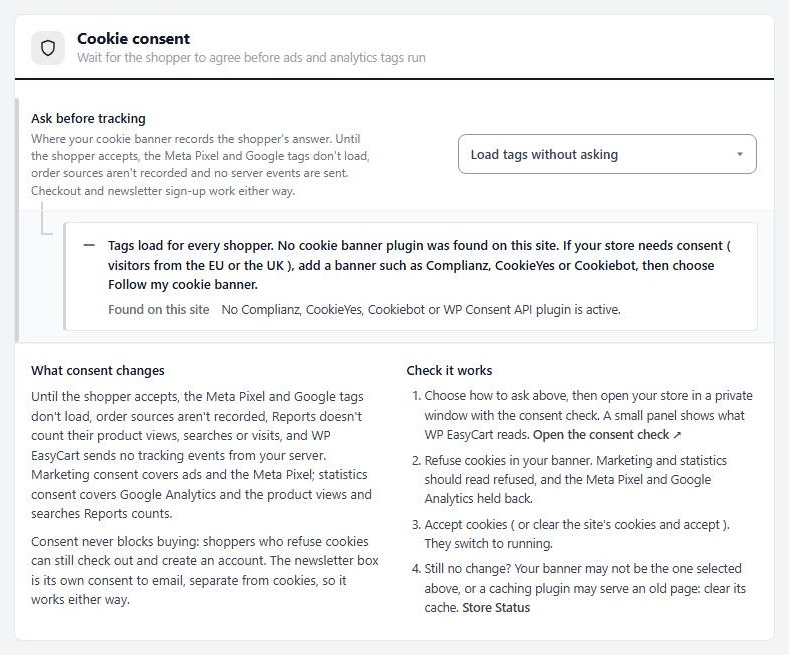
Events are skipped for known search-engine bots, and nothing is sent unless the shopper has given statistics consent when your Cookie consent setting asks for it.
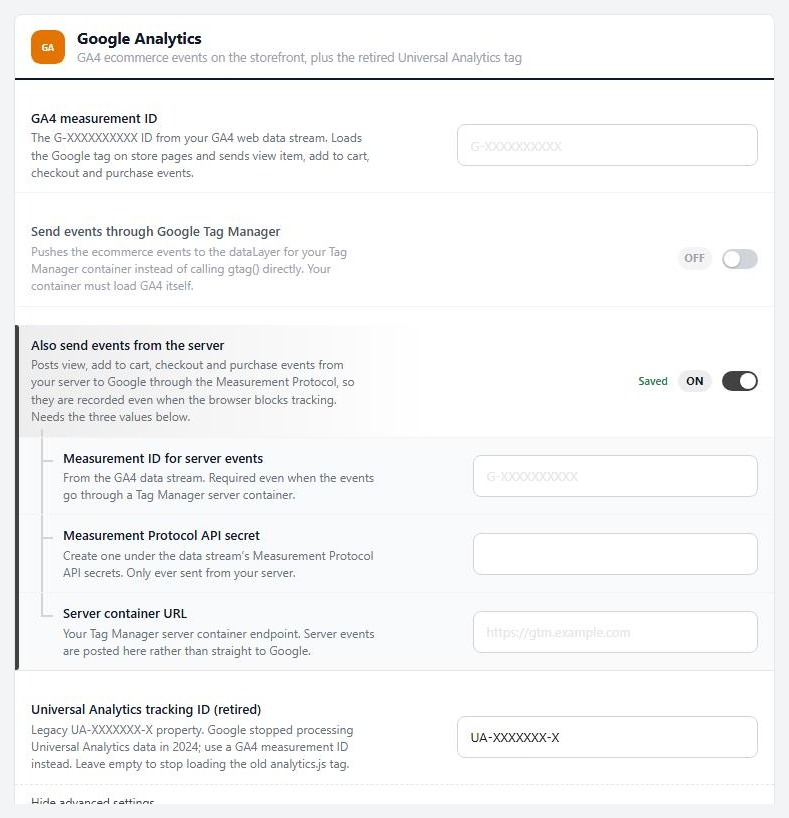
The Google Analytics card with Show advanced settings on and Also send events from the server turned on. No values are filled in.

⚠️ Careful: Server events need a Tag Manager server container. The store posts them to the container address you enter, not straight to Google, so leave this off unless you already run one.

Step 5. Retire the old Universal Analytics tag

Google stopped processing it in 2024

no stored settings

Under Show advanced settings is Universal Analytics tracking ID (retired). If it still holds a UA- number, clear it and save. Google stopped processing Universal Analytics data in 2024, so the old tag only slows your pages down. This one row works in the free plugin too.

While your Cookie consent setting is asking for permission, the store already skips the old tag. Clearing it removes it for everyone.

Step 6. Test it

Realtime, DebugView and one test order

no stored settings

Open your store in a private window, so an admin login does not get in the way.

1. In Google Analytics open Reports › Realtime. Browse your store. You should appear within a minute or so.
2. For a detailed look, connect Google’s Tag Assistant to your store. It puts the visit in debug mode, and DebugView under Admin then lists each event with its values as it arrives.
3. Open a product, add it to the cart and go through checkout with your gateway’s test card. You should see view_item, add_to_cart and each checkout step, then purchase on the confirmation page. Open the purchase and check that the transaction ID is your order number and the value is the order total.
4. Standard reports, such as the ecommerce purchases report, can take up to a day to fill. Realtime and DebugView do not wait.

To test server events, use your server container’s preview and repeat the same test order.

Keep it running

When something goes wrong

The usual reasons events are missing, doubled or wrong.

If it does not work

The usual reasons events are missing or doubled

no stored settings

No events at all. Check that the ID starts with G-, has no spaces and was saved. A store without PRO shows the row locked, and a locked row does not save. Then open your store with ?wpec_consent_check=1 on the address. If the panel says Google Analytics is held back, your cookie banner has not been accepted or Cookie consent is reading the wrong banner.

Events appear but purchase does not. The purchase event fires on the order confirmation page, so place a test order and watch that page load. Check that a caching plugin is not serving an old copy of it, and that your Cookie consent choice is not holding the Google tag back.

Everything is counted twice. Another plugin, your theme or a Tag Manager container is also loading GA4. Keep one. A leftover Universal Analytics ID is a separate tag, so clear it as in step 5.

Revenue looks wrong. Events always use your store’s base currency, not the currency a shopper browsed in. Check that your GA4 property’s currency setting makes sense for it.

Server events do nothing. All three values must be filled in, the toggle must be on, and your license must be active. Check that the API secret is from the same data stream as the measurement ID, and that your server container answers at its /mp/collect address.

Still stuck? Open a ticket from your account at wpeasycart.com/my-account.

Keep going

Related panels

Google Analytics

The Google Analytics integration guide.

Reports

Your store’s own sales numbers, to check Google against.

Checkout

Checkout settings, including the one-page checkout.

Store Status

Store Status shows what the Cookie consent setting found.

Ready to run your store on WP EasyCart?

Everything in this guide works with the free plugin. PRO and Premium add subscriptions, memberships, wholesale pricing and more. Try every PRO feature free for 14 days.

The WP EasyCart admin: orders and offers
Updated on September 30, 2026