Third party settings are integration with EasyCart that we include with our plugin. While most third party systems are developed as extensions in EasyCart, several we add directly into our software due to complexity or need to integrate directly.
Sections
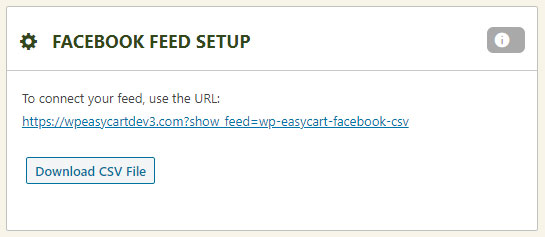
Facebook & Instagram Feed
This panel will only appear if you are a Premium member and have installed the Facebook & Instagram extension plugin. This plugin will allow you to sell and feed Facebook with your products into their custom Catalog system. Click Here to learn more about the Facebook & Instagram extension.
Video Guide – Facebook & Instagram Part 1of 4In this video we show you how to establish a Facebook pixel so you can begin tracking page visits and also ecommerce data, a great first step before using our Facebook & Instagram Feed Extension. |
 |
Google Analytics Setup
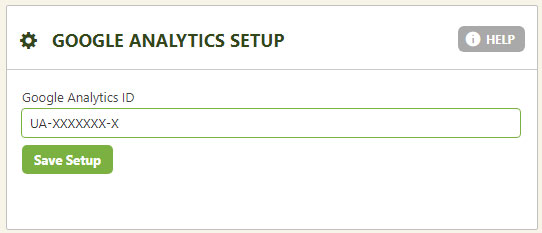
Enter your Analytics ID in this location will enable eCommerce transactions to be sent to google analytics for analysis. Please note that this does not enable google analytics page statistics on every page in your website.
Note: You should download one of the many free plugins or place in your theme the page settings code for google analytics.
What this section does is enable transactional data be sent, which is of great importance when included in your google analytics data. You can learn what products sell most, where the customers come from, what they view, etc.
Sample Google Analytics Reports
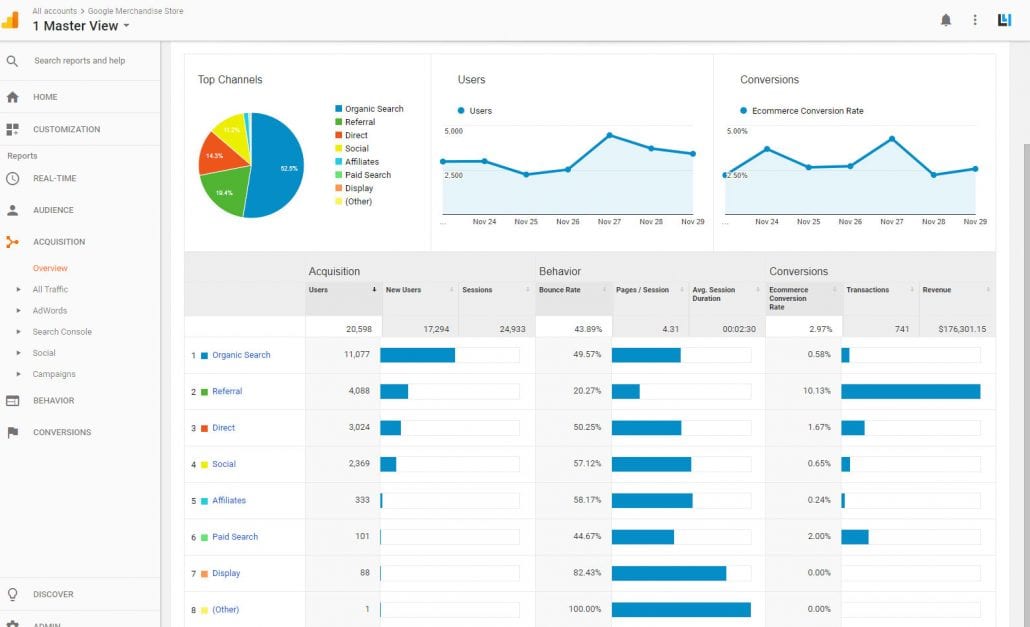
This report shows the acquisitions of users coming to your site, their behavior, and with ecommerce data enabled, you can see the conversion rates of each acquisition path.
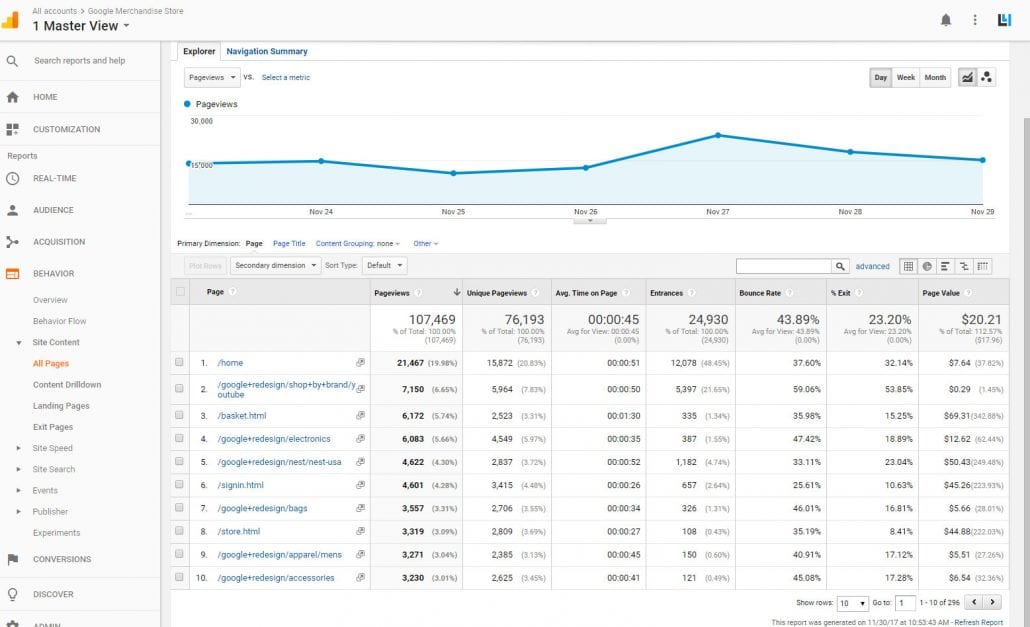
This report is an example of customers behavior on your website. You can look at each page and determine the value that it brings to your website by looking at the Page Value column. This tracks visitors who view the page and those who actually purchase.
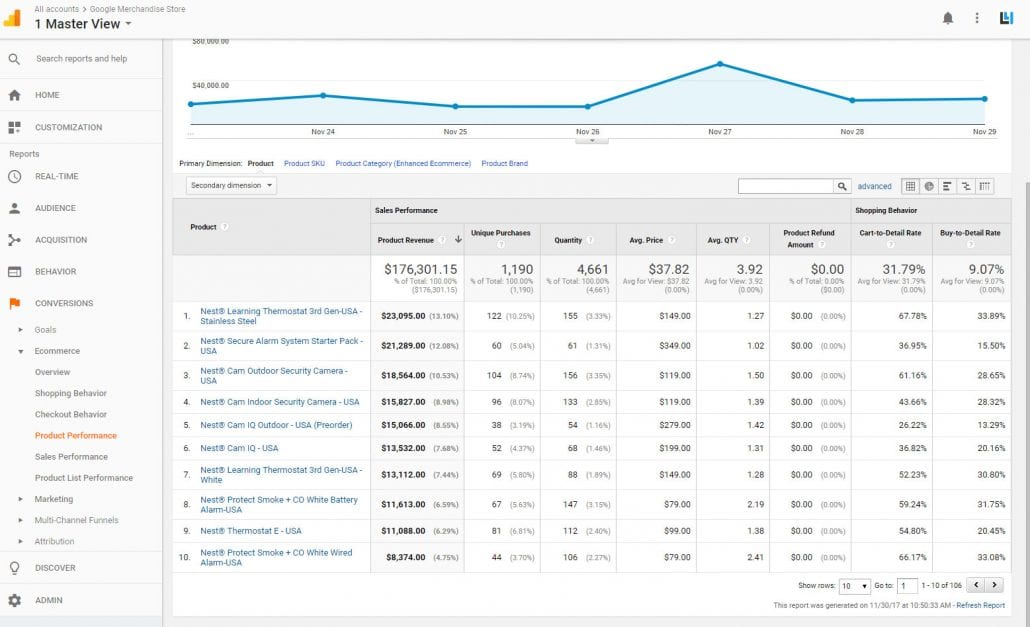
Google analytics also provides conversion data for products. Here we see what your top selling products are along with avg Price, avg Quantity, and total sold of each item over a given time period.
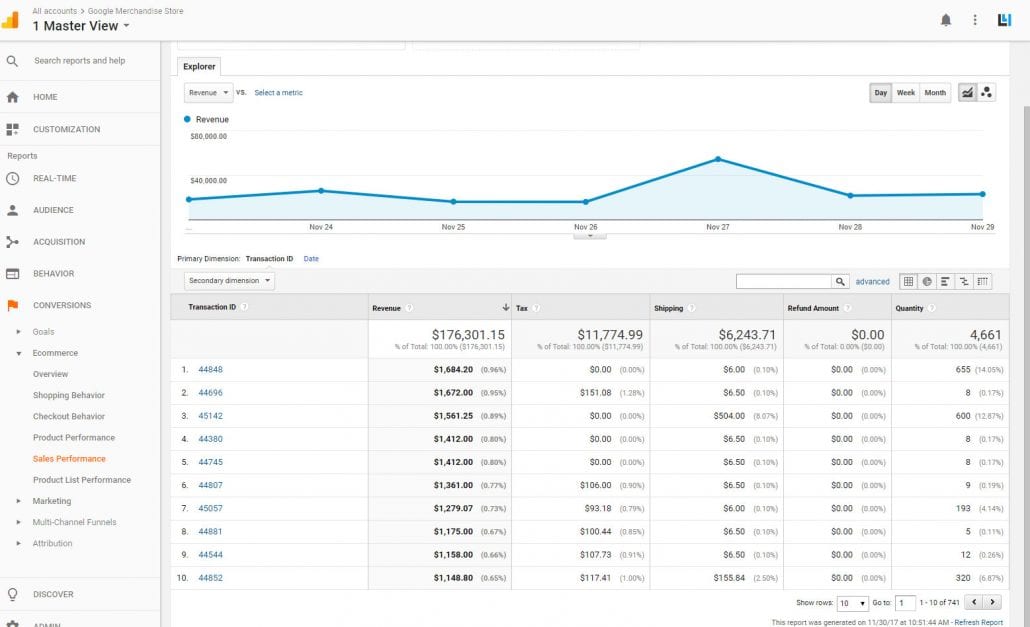
This report will show you order numbers of and totals for a given time period. Useful sales performance data is found in nearly all analytic categories of Google so you can see how helpful various areas and aspects of your website are performing. The data also lets you perform useful marketing tools and which referral areas you should target more or less.
Google Adwords Setup
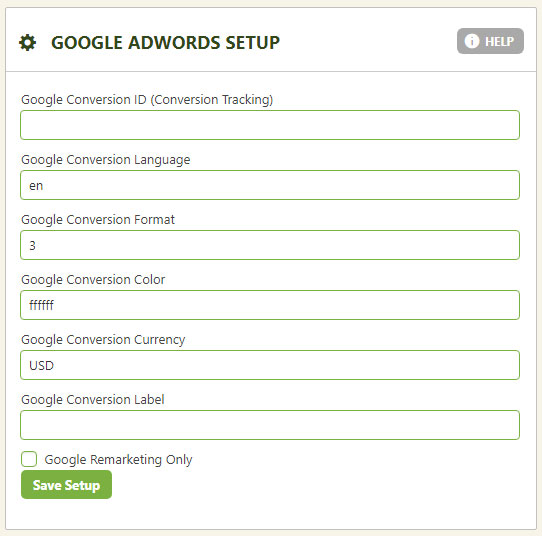
Setup google adwords conversion data based on your adwords account. Now your data will track back to adwords so you can establish which ads are converting customers and which are not. You may check the ‘Google Remarketing Only’ section to track the data only at the remarketing level.
Google Merchant Setup
Google Merchant setup allows you to create and import your products to a google merchant feed. Part of the process is within EasyCart, part of the process requires you to complete google specific fields before importing.
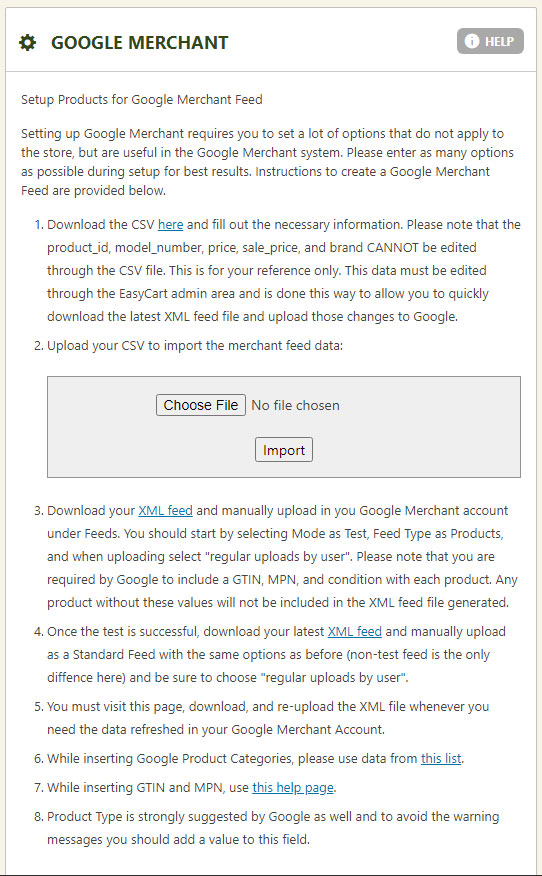
Follow the above steps found in your third party settings page to create a CSV file. You will need to add your GTIN, MPN and other google fields before re-uploading your CSV file in step 2. This will allow you to download a new XML feed file that you can import into google merchant as a test feed. Once you are happy with the results, you can import your products as a regular live feed. Please read the instructions fully and follow the steps given to complete the process.
Facebook Pixel Setup
Facebook pixel allows you to send custom events from your website to facebook to track pages, conversions, and other events. WP EasyCart is already integrated to send custom events for shopping to facebook. Simply enter your facebook pixel ID and you will start tracking Page View, Add Payment Info, Add to Cart, Initiated Checkout, and Purchase events.
Please note that this does not enable Facebook page statistics on every page in your website.
Note: You should download one of the many free plugins or place in your theme the page settings code for facebook pixel. The EasyCart Pixel integration primarily is only going to track specific events related to products and checkout.
![]()
Amazon S3 Setup
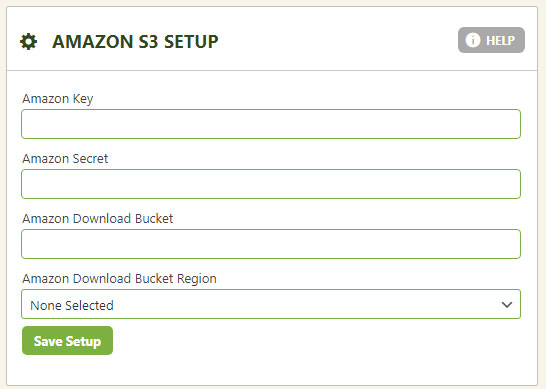
EasyCart is integrated with Amazon S3 to allow downloadable goods to be served from the powerful Amazon servers rather than your web hosting server. This is a great solution for those who offer large download files, music, or movies that would consume important web hosting bandwidth and resources. The customer would access their downloadable purchases the same way, but the products would be served from Amazon rather than your host.
To read a full setup guide on Amazon S3, Click Here.
Deconetwork Setup
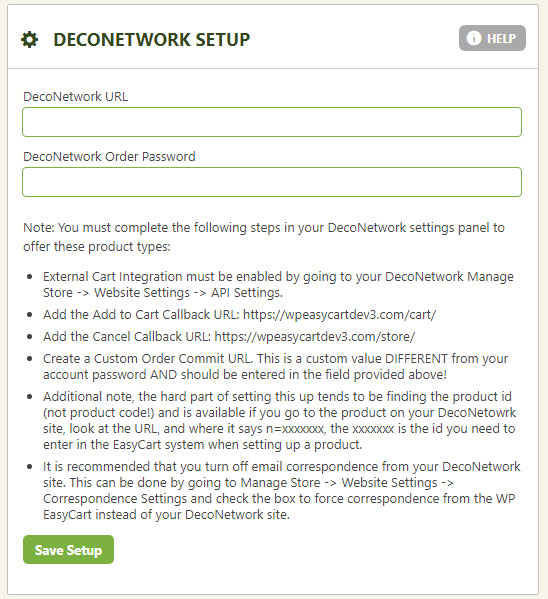
EasyCart integrated with the DecoNetwork to offer customizable products using their powerful configuration software. t-shirts, mugs, sweatshirts, etc. can all be customized through the DecoNetwork configurator in a few easy steps. First, setup your information below, along with a few settings you must setup at DecoNetwork. Once communications are established, you can configure products by specifically saying they are DecoNetwork products and EasyCart will take customers to the configurator when they choose to customize a product.
ShareASale Setup
ShareASale network connects online retailers to over 225,000+ affiliate partners around the world, increasing consumer reach and providing another source of revenue. EasyCart has integrated to allow easy sales tracking with your ShareASale affiliates. Leverage the marketing power of ShareASale and when a purchase is made on your site that came from a ShareASale affiliate, it is automatically counted and tracked via the ShareASale system.
Click Here to Sign Up for a ShareASale Merchant Account!
When you sign-up to become a ShareASale Merchant, you will walk through their wizard and on Step 4: select ‘Developer Install‘. This will give you a script to add to your site, which we just need to grab the Merchant ID from.
Example:
<img src=”https://www.shareasale.com/sale.cfm?tracking={{Order ID}}&amount={{Order Subtotal}}&merchantID=123456&transtype=sale” width=”1″ height=”1″> <script src=”https://www.dwin1.com/19038.js” type=”text/javascript” defer=”defer”></script>
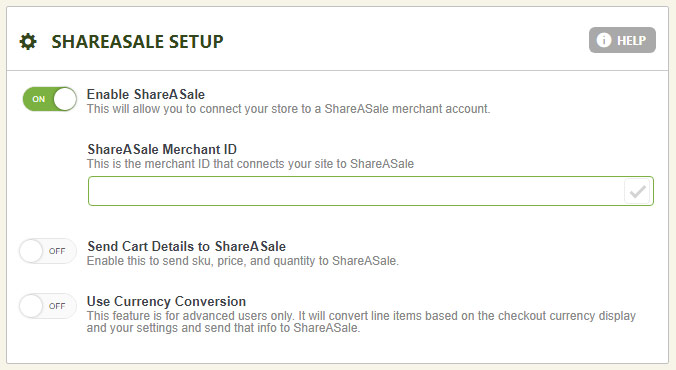
This merchant ID we will copy and paste into the EasyCart ShareASale Setup panel. Now when someone comes from a ShareASale affiliate, and makes a purchase, that revenue share will be tracked within your ShareASale Merchant system.
Special Note: We are working with ShareASale currently and may become listed in this Step 4 Dropdown of selectable shopping carts as ‘WP EasyCart’. In the mean time, you can choose the developer option and grab the Merchant ID that way though.
There is no need to copy or paste this full code into EasyCart, we have already done this integration for you, simply copy/paste that MerchantID into our settings and you are good to go.
Additional Options:
- Send Cart Details to ShareASale: This is optional, but does allow you to send individual SKU, Price, and Quantity to ShareASale for further detailed reporting.
- Use Currency Conversion: If you do plan to use this advanced option, it will convert your line items based on the currency used at checkout and send to ShareASale.
MailerLite Setup
Looking to easily add email campaigns to your EasyCart? MailerLite is a clean and easy to use service that provides just this for your subscribers. To utilize the email subscriber system with EasyCart, just follow these quick and easy steps.
Video Guide – MailerLiteWe walk you through the quick setup of getting your EasyCart + MailerLite Connected with this simple video. |
 |
- Be sure to enable subscribers sign-up in EasyCart. Go to settings -> Accounts and turn the ‘Subscribe to Newsletter‘ ON. This will give users a chance during the checkout process to check the box to opt-in to newsletters and email campaigns. It will also activate the subscribe box during account creation in the account area of your website.
- You can also utilize MailerLite tools and even WordPress plugins to subscribe users via popups or other methods on your WordPress. EasyCart mainly focuses on the subscribe during a checkout process, but it can all be combined for a complete solution.
- Now you can visit www.mailerlite.com and acquire an account. Once you sign-in to MailerLite, you must go to the Integrations -> API section and click ‘Use‘.
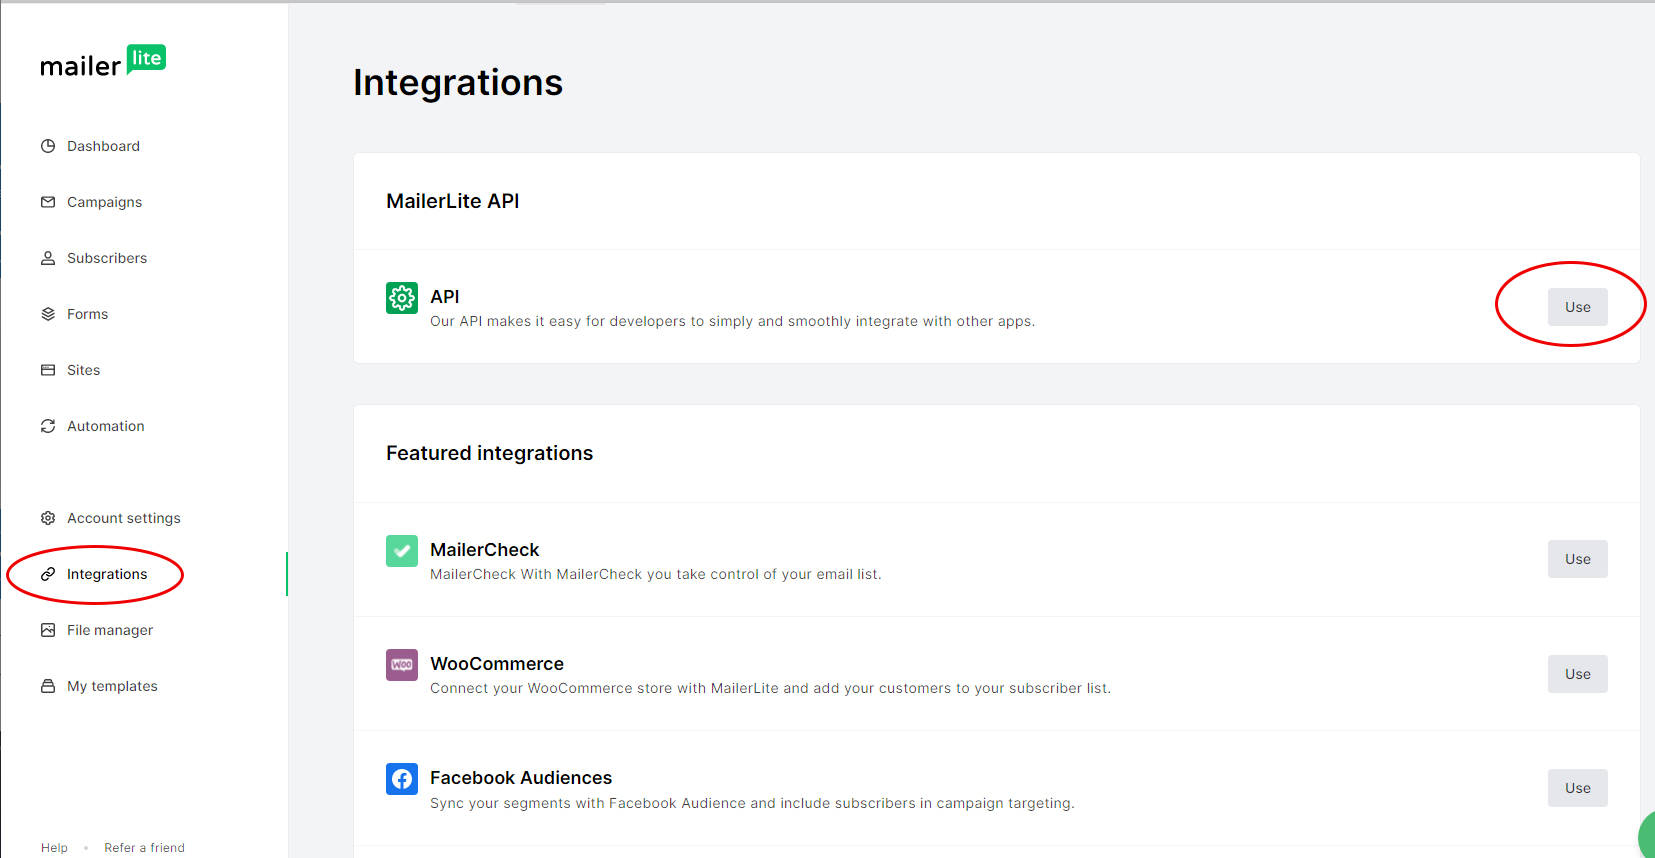
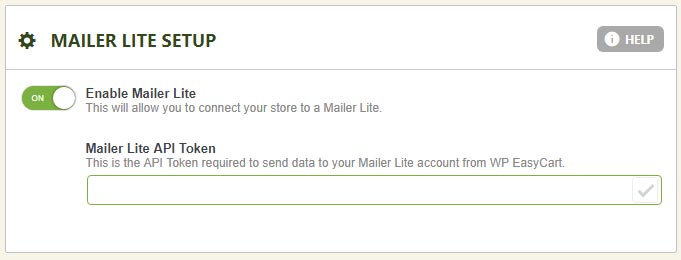
3. You can created a new API key and token by simply giving it a new name and copying/pasting the token into the EasyCart Settings -> Third Party -> Mailer Lite section. Now you are connected and subscribers will go from your checkout process into MailerLite automatically.
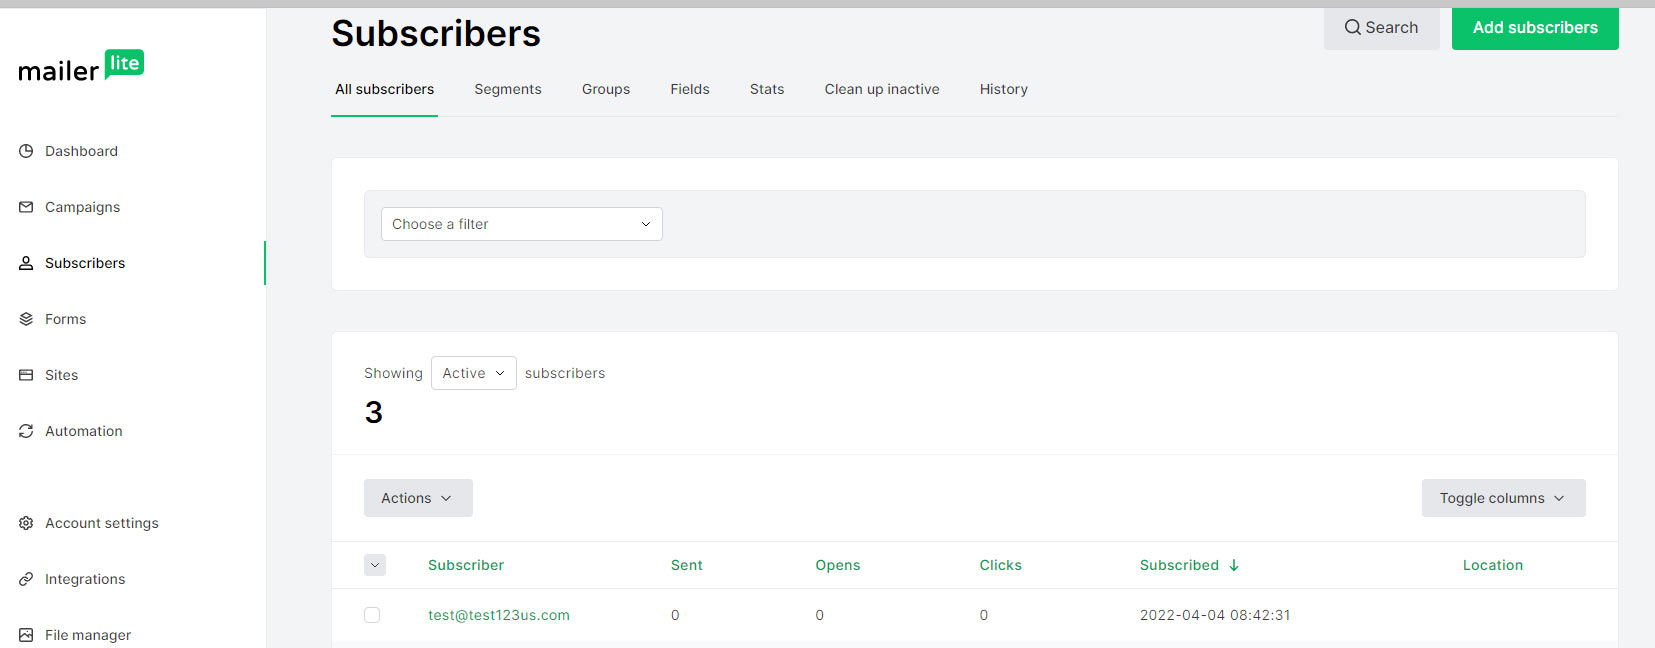
4. Subscribers will begin appearing in your Subscribers section of MailerLite, ready to make campaigns and start sending. We will refer you to their services for more specifics on what they can offer and do within their own software.
ConvertKit Setup
ConvertKit is a email campaign and automation system to send emailers and autoresponders to your users. The connection for ConvertKit is quite easy between EasyCart -> ConvertKit with the integration already integrated on our end. Just enter your API keys and start collecting subscribers.
Video Guide – ConvertKit SetupWe walk you through the quick setup of getting your EasyCart + ConvertKit Connected with this simple video. |
 |
- You can also utilize ConvertKit code and even WordPress plugins designed for ConvertKit to subscribe users via popups or other methods on your WordPress. EasyCart mainly focuses on the subscribe during a checkout process, but it can all be combined for a complete solution.
- Be sure to enable subscribers sign-up in EasyCart. Go to settings -> Accounts and turn the ‘Subscribe to Newsletter‘ ON. This will give users a chance during the checkout process to check the box to opt-in to newsletters and email campaigns. It will also activate the subscribe box during account creation in the account area of your website.
- Now you can visit www.convertkit.com and sign up for an account. Here you will visit the top right corner and click on ‘Settings‘ -> ‘Advanced‘.
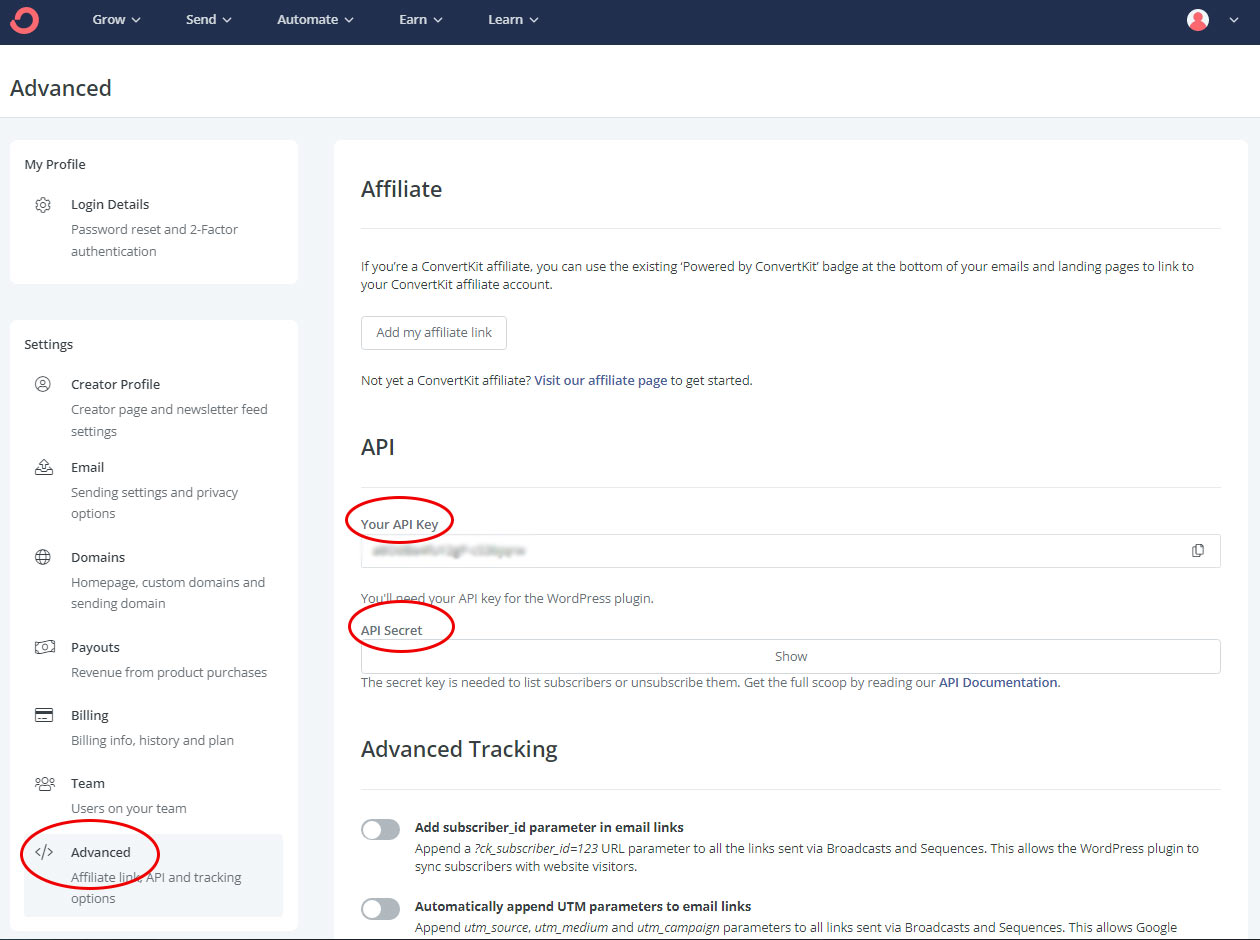
4. Here you will find your API Key and API Secret. You will copy/paste these into the EasyCart Settings -> Third Party -> ConvertKit Setup panel.
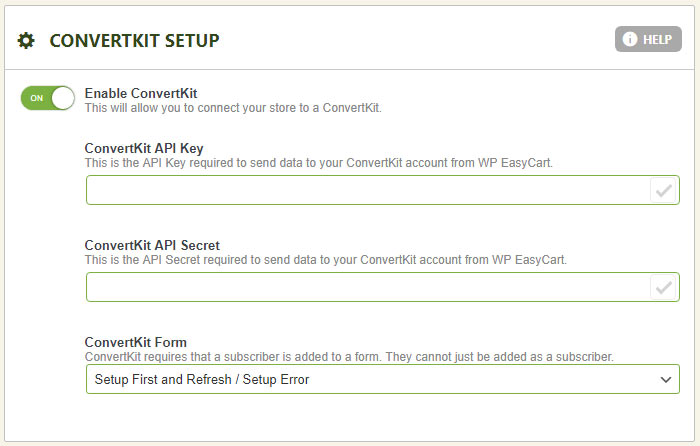
5. Once you establish the connection and save your API keys, go ahead and refresh the panel and it will show you the forms from your ConvertKit account. You must select a form, which is essentially what group do you want your customers to go into on the ConvertKit side. It really doesn’t matter since we use our own collection form here in EasyCart. Any user checking out can ‘subscribe to newsletter’ and will go over as well as order prodcuts.
6. Optionally, you can build special automation routines on ConvertKit now based on which product they purchase. We will not go into much detail here as you can contact ConvertKit on how to handle their own software. That’s it, you are using ConvertKit!
Active Campaign Setup
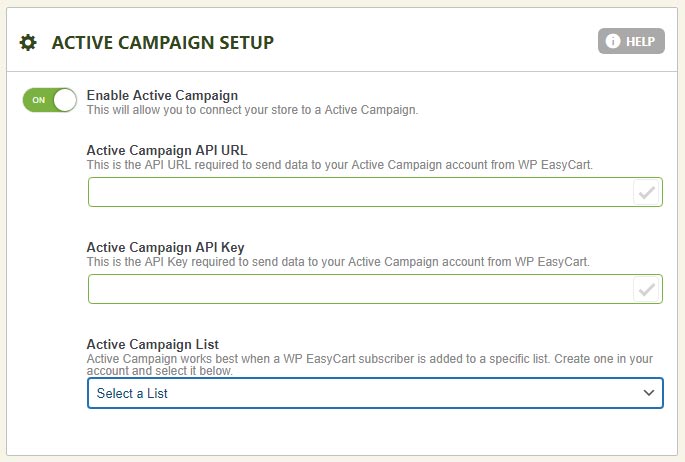
Active Campaign is an online email and newsletter sending and automation system designed to give you great looking email and sending control. EasyCart gives you an integration that sends email subscribers directly into an ActiveCampaign list. The programming is all done, just setup your API keys and start collecting subscribers.
Video Guide – ActiveCampaign SetupWe walk you through the quick setup of getting your EasyCart + ActiveCampaign connected with this simple video. |
 |
- You can also utilize ActiveCampaign code and even WordPress plugins designed for ActiveCampaign to subscribe users via popups or other methods on your WordPress. EasyCart mainly focuses on the subscribe during a checkout process, but it can all be combined for a complete solution.
- Be sure to enable subscribers sign-up in EasyCart. Go to settings -> Accounts and turn the ‘Subscribe to Newsletter‘ ON. This will give users a chance during the checkout process to check the box to opt-in to newsletters and email campaigns. It will also activate the subscribe box during account creation in the account area of your website.
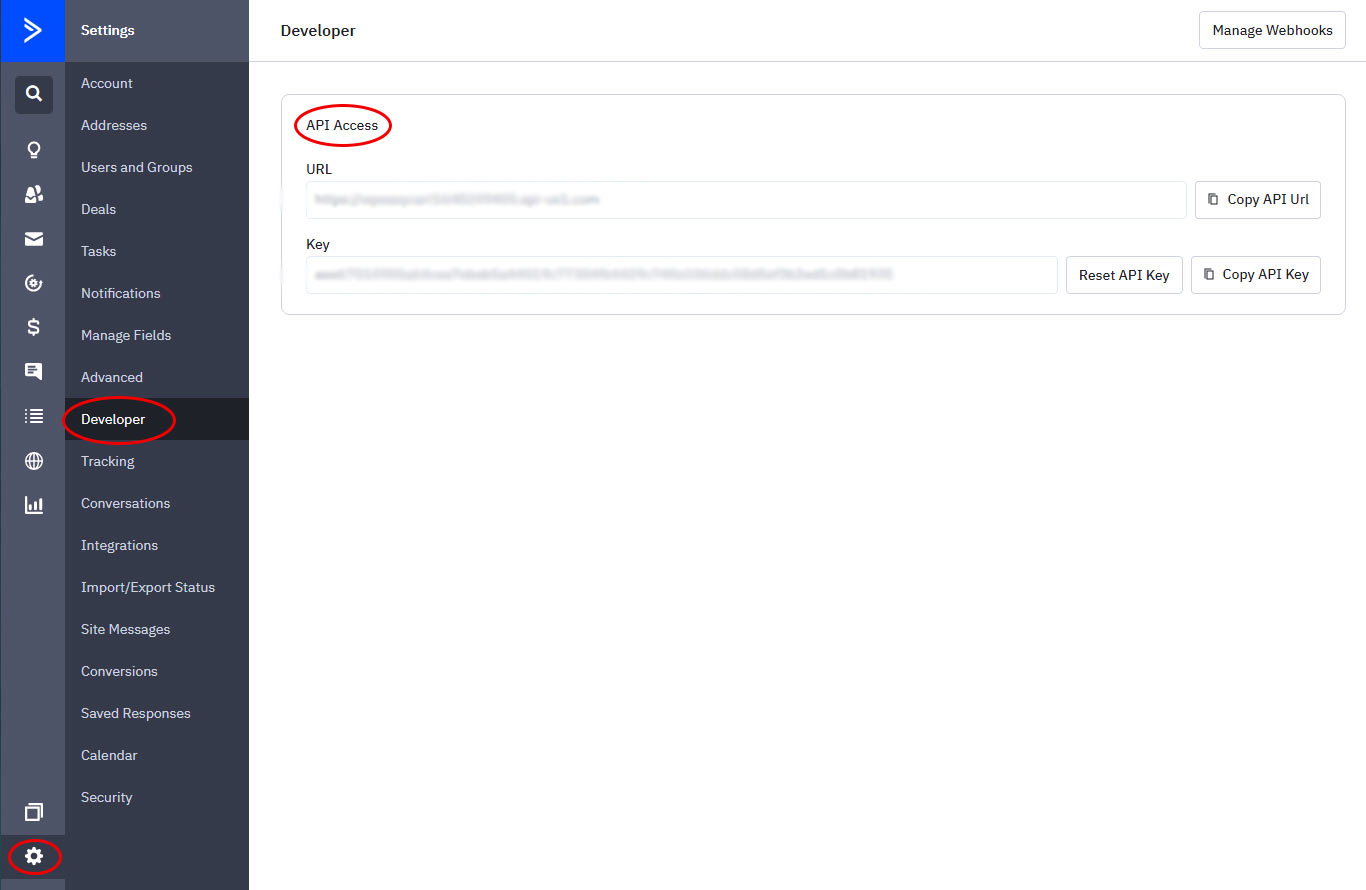
- Next, log into your Active Campaign account and you will navigate to the bottom left Settings -> Developers panel. From here you can copy and paste credentials for the API URL and also the Key.
4. Next, you must create an ActiveCampaign List in order to save your subscribers to. Without a list, they don’t know where to store your subscribers. Navigate back to your ActiveCampaign dashboard and select ‘Lists‘ on the left menu and create new. Give it a new name and that’s it!

5. Now you can come back to your EasyCart Settings and refresh your page. you should see your new list show up in the bottom pulldown. Select it and save it and you are good to go. Now your Opt-In subscribers will show up in your ActiveCampaign list ready to be emailed!
