
Before you start
What Tabs adds, what it needs and where its screens are
no stored settingsTabs puts your own tabs on product pages next to WP EasyCart’s Description, Specifications and Customer reviews: size charts, nutrition labels, care symbols, FAQs, downloads and more, built from blocks in a full-screen designer, per product or shared across your catalog.
What you need. A Premium license, with Tabs installed from EasyCart › Extensions, which also installs WP EasyCart Premium. Adding and changing tabs needs the license to be active; product pages show your tabs whatever its state.
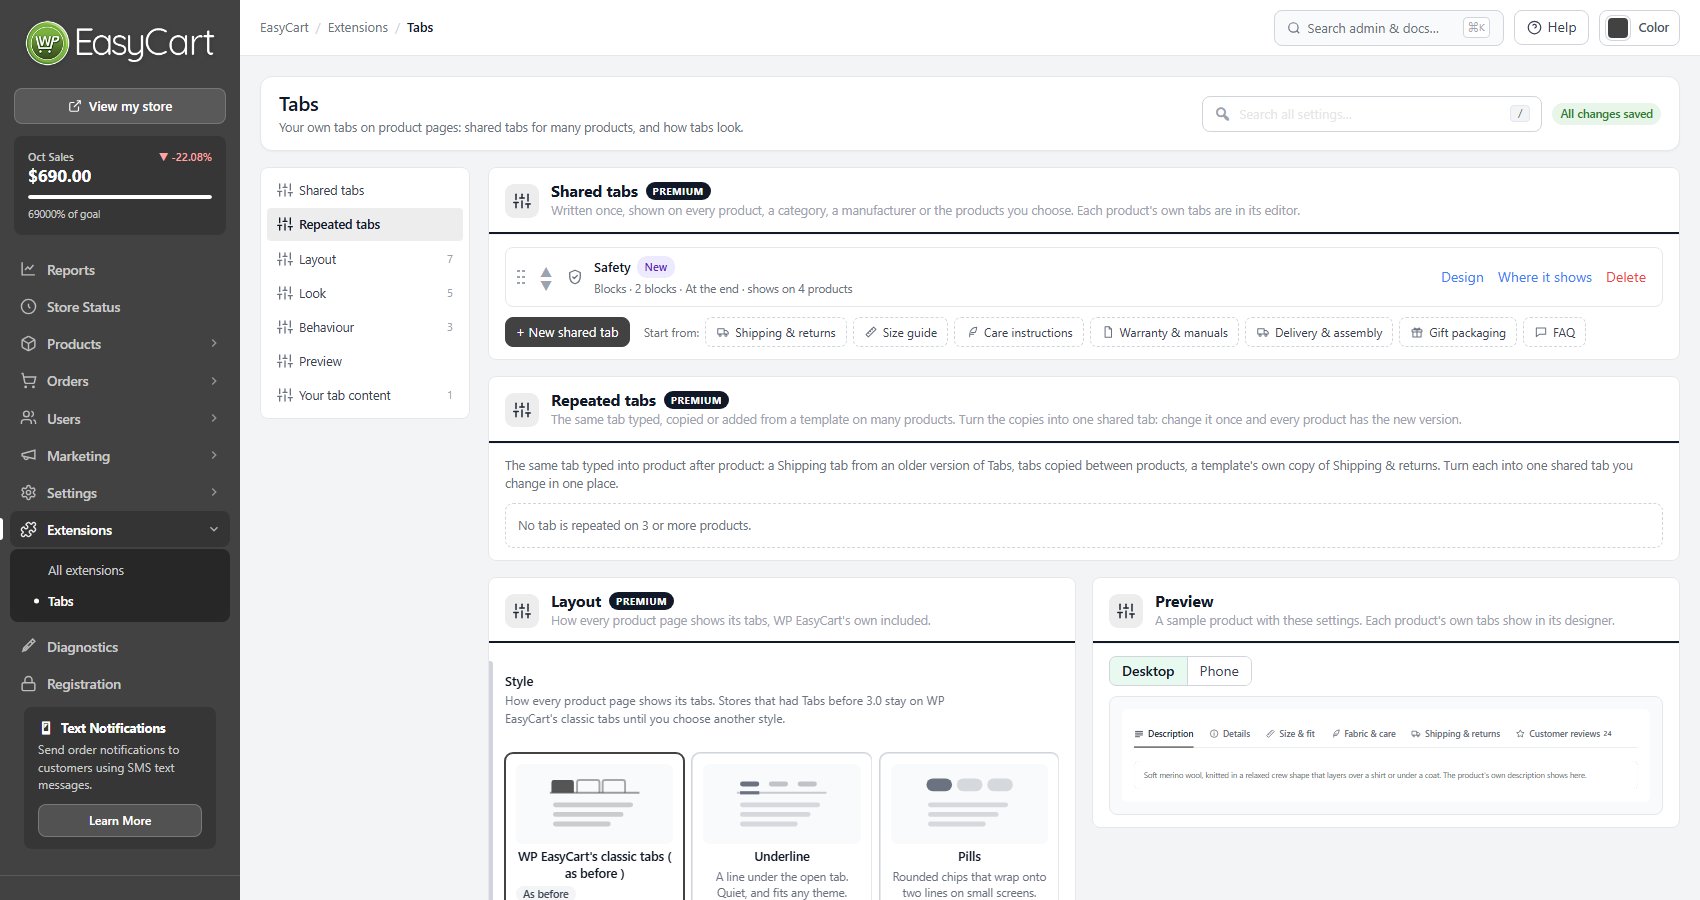
Where things are. A product’s tabs are in its product editor, in the Product tabs card at the top of Basics. Its Design tabs button opens the tab designer. Everything shared lives at EasyCart › Extensions › Tabs: Shared tabs, Repeated tabs, and the Layout, Look and Behaviour settings with a live Preview.
Tab types. A tab built in the designer is a Blocks tab. Tabs made with an older version of Tabs can also be Text, FAQ or Downloads. They keep showing and keep a quick editing drawer, and turn into blocks when you save them from the designer.
The Product tabs card
Each product’s tabs, in page order, at the top of Basics
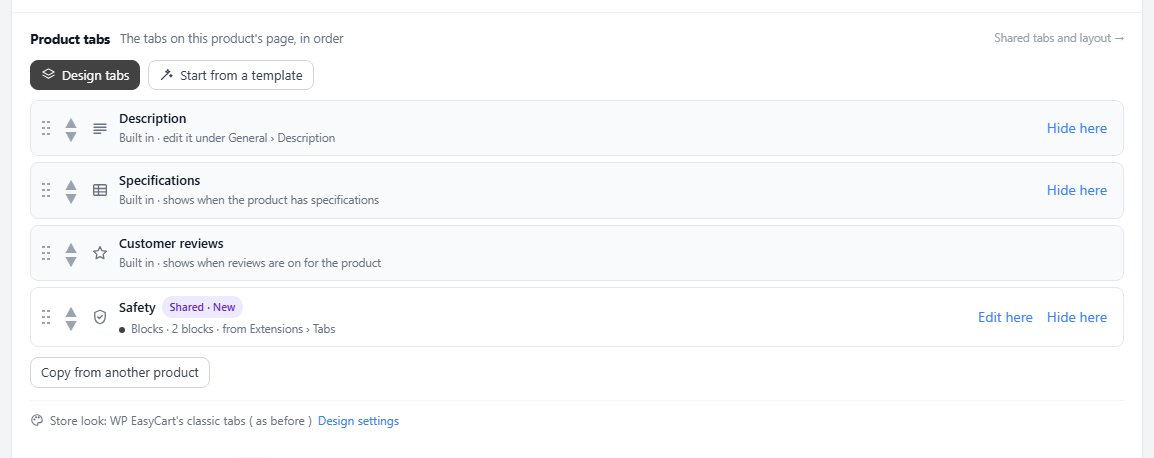
no stored settingsOpen a product. The Product tabs card sits at the top of the Basics section, above the Product page text card. It lists every tab on the product’s page in order: WP EasyCart’s Description, Specifications and Customer reviews, the product’s own tabs ( marked This product ) and the shared tabs that reach it ( marked Shared with where they show ). A new product gets the card once it has been saved.
Design tabs opens the tab designer. Start from a template opens it at the templates. New tabs are added in the designer.
Order. Drag a row, or use its arrows. Description, Specifications and Customer reviews move too, so a tab can come before Description and open first on the page.
Each row’s buttons. A product’s own tab has Edit and Delete. Hide here on Description or Specifications takes that tab off this product’s page; the text stays in the product editor and Show here brings the tab back. Customer reviews is marked Reviews off when reviews are off for the product. On a shared tab, Hide here keeps it off this product only, and Edit here opens the designer so single blocks can have this product’s own content. A shared tab from an older version has Use own text and Use shared text instead.
Copy from another product finds a product by name or SKU and brings its tabs over. A product with no tabs of its own gets an exact copy, places included; otherwise the copied tabs are added at the end. The line at the bottom names the store’s tab style, with a link to Design settings.
The tab designer
Build a product’s tabs beside a live preview
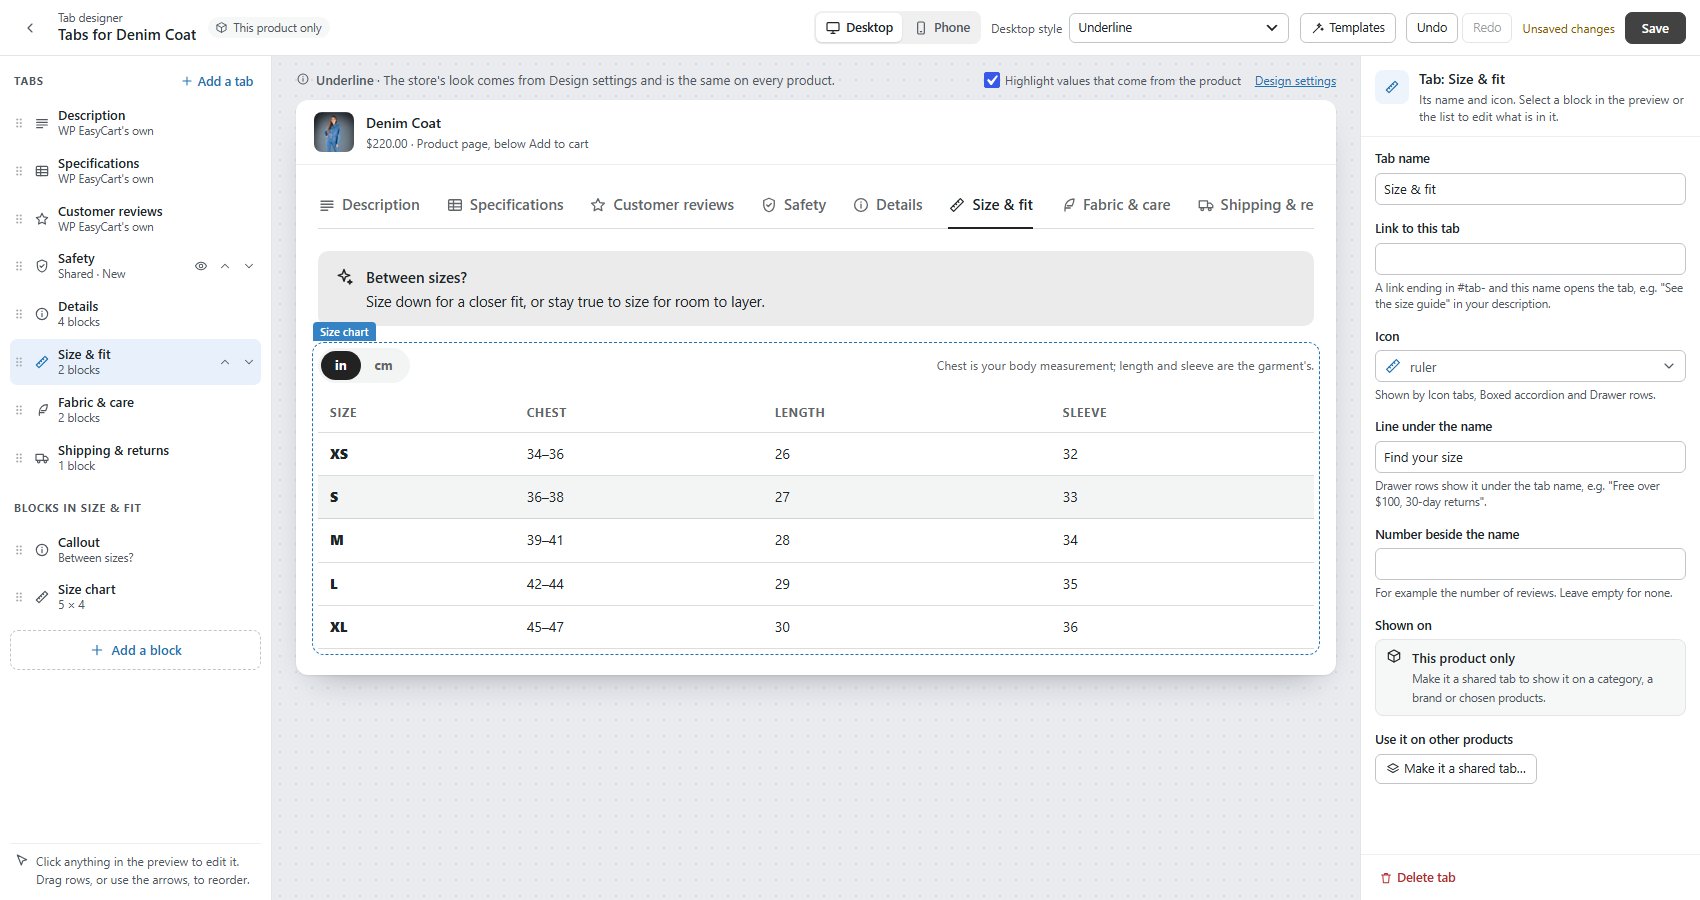
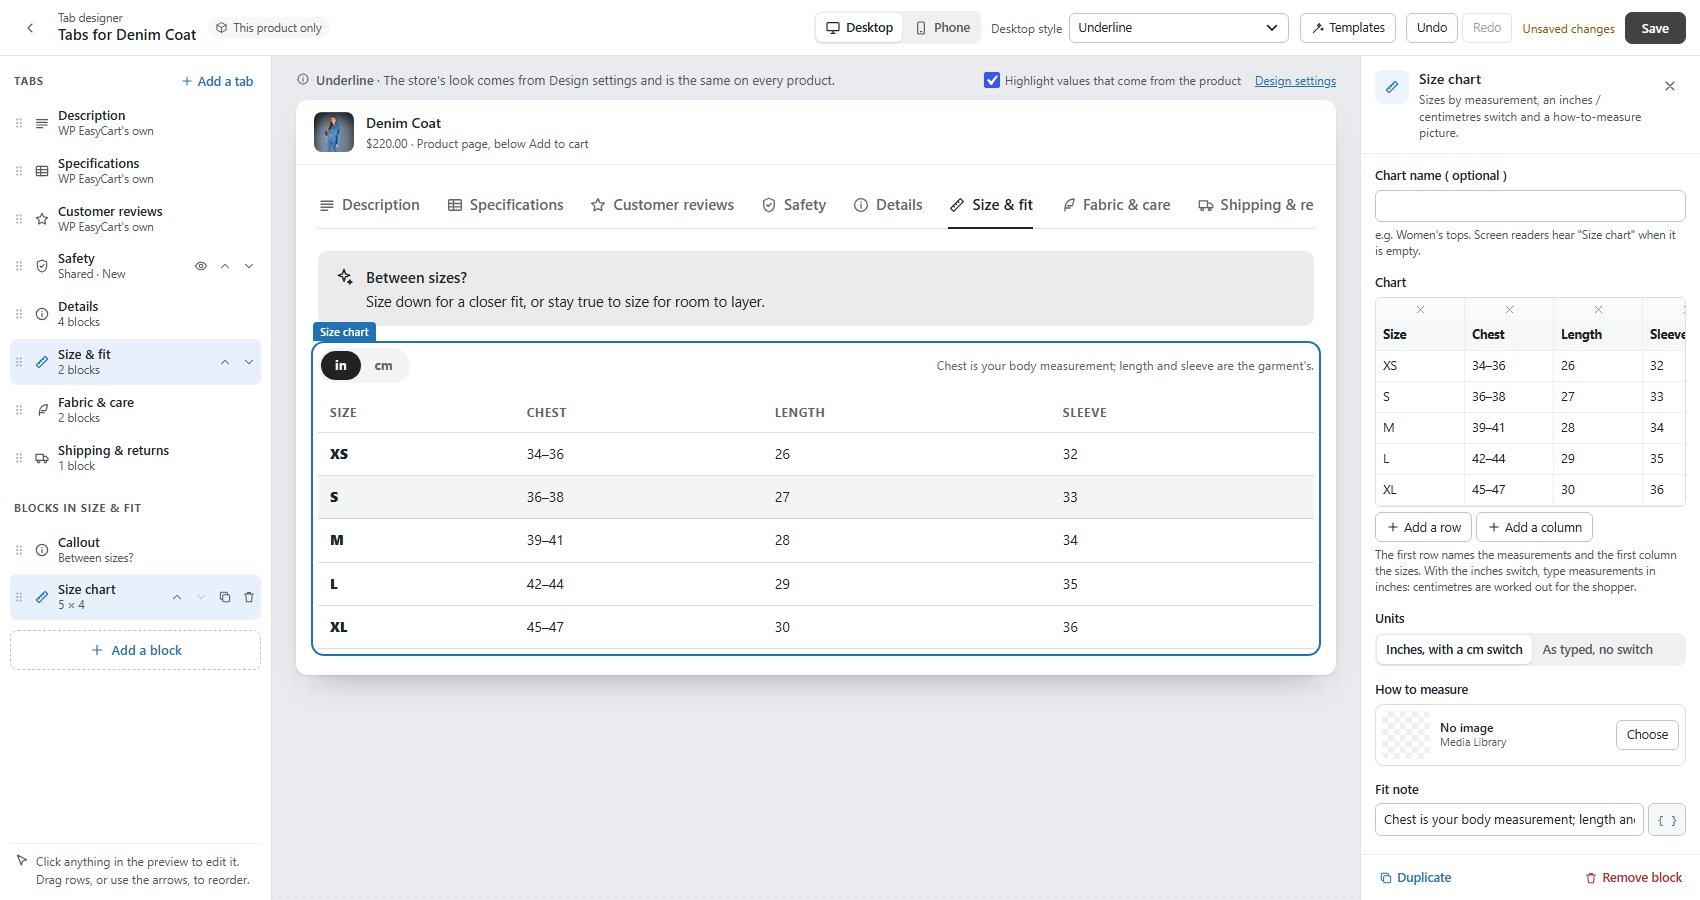
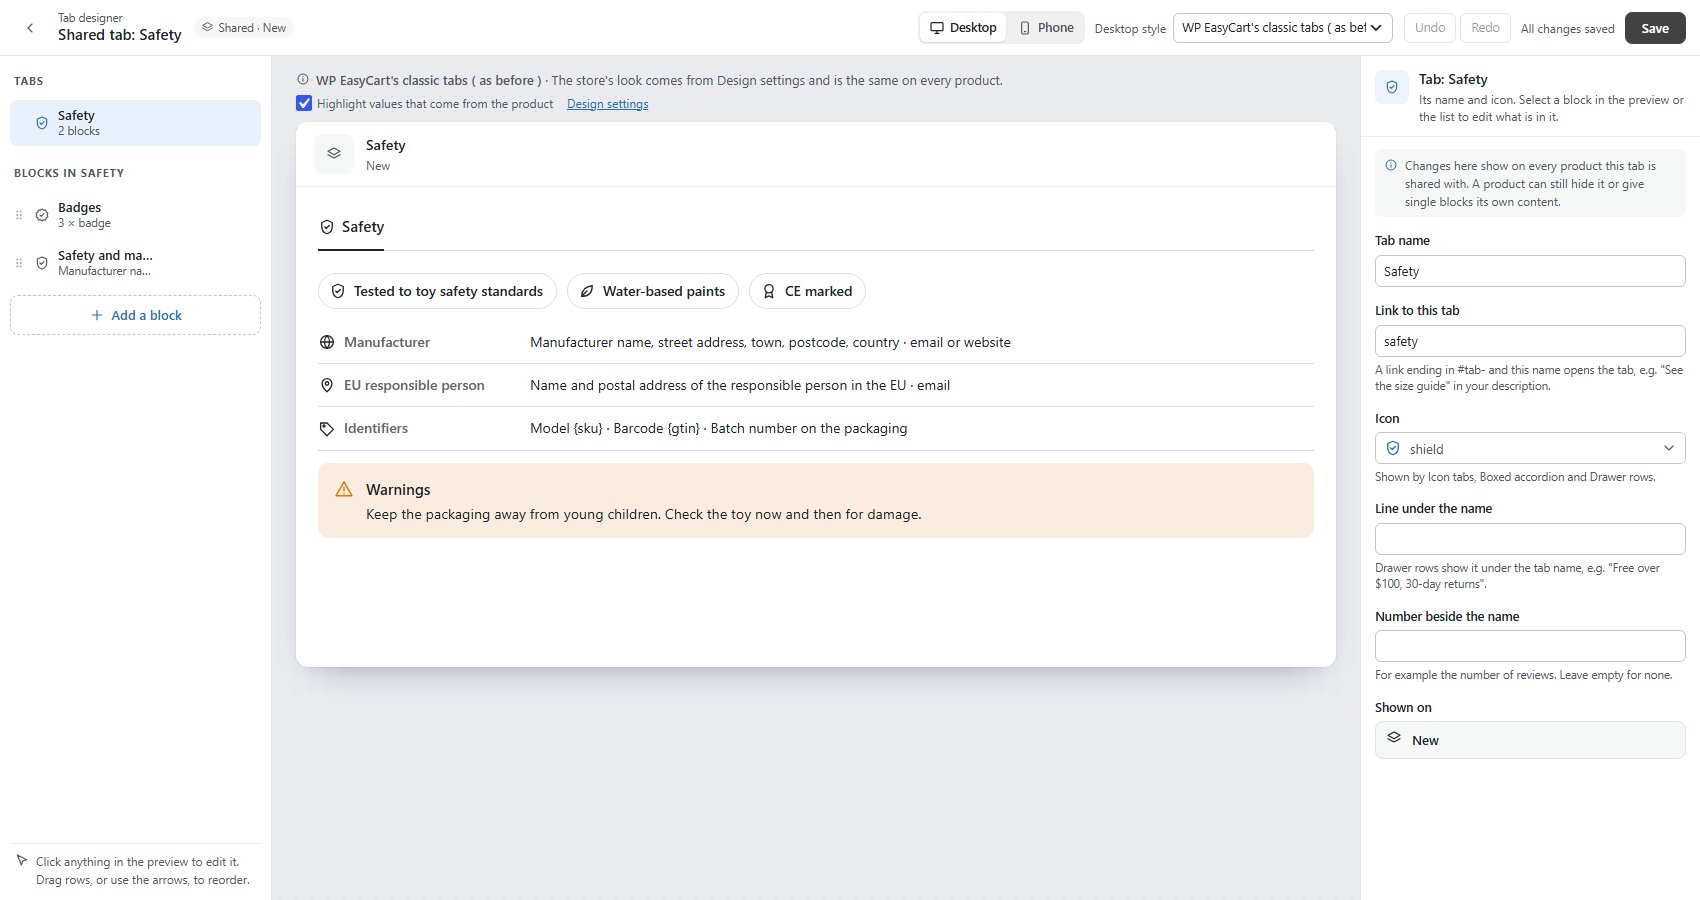
no stored settingsThe designer opens full screen over the product editor, titled Tabs for and the product’s name. It has three columns.
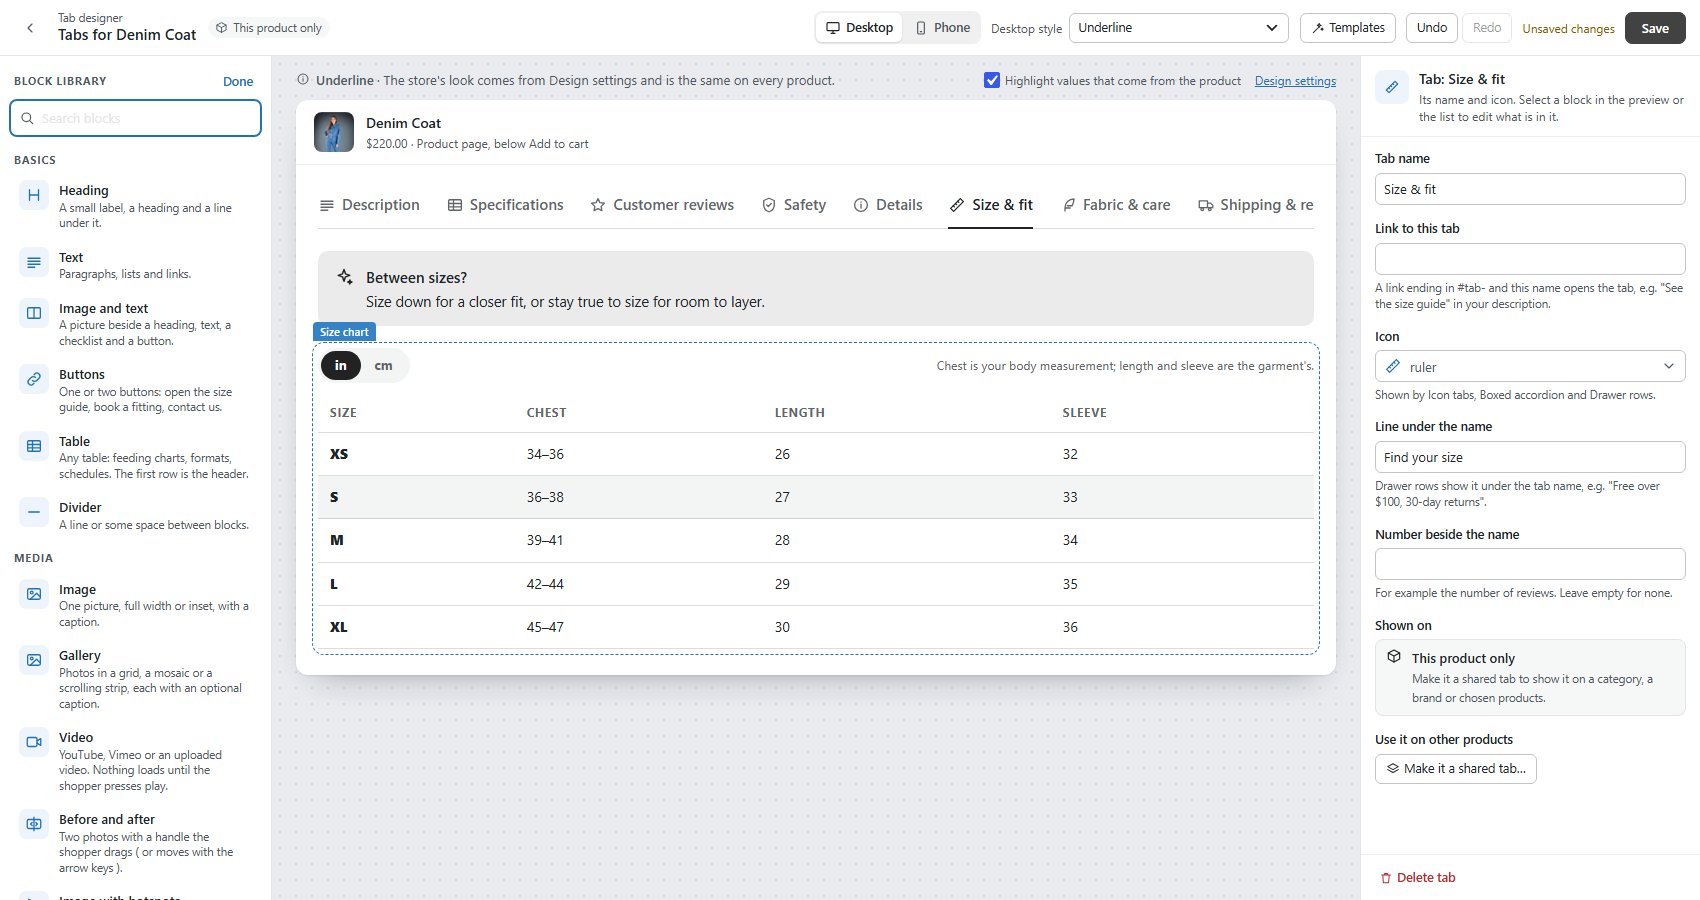
Left: Tabs and blocks. Every tab in page order, WP EasyCart’s own included. Add a tab adds a new one. Drag a row or use its arrows to move it; the eye button hides a shared or built-in tab on this product. Under the list, the selected tab’s blocks, with Add a block.
Middle: the preview. The product page’s tab area, drawn with your tabs as they are now, saved or not. Click anything in it to edit it. Desktop and Phone at the top switch the width, and Desktop style tries another style in the preview only: the store’s style is set under Design settings and is the same on every product. Highlight values that come from the product marks the values blocks fill in for you.
Right: settings for what is selected. For a tab: Tab name, Link to this tab ( the #tab- name ), Icon ( shown by Icon tabs, Boxed accordion and Drawer rows ), Line under the name ( shown by Drawer rows ) and Number beside the name. Delete tab asks for a second click.
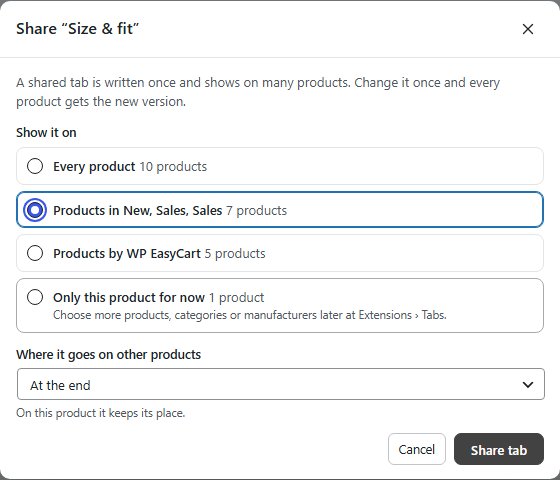
Make it a shared tab… turns one of this product’s tabs into a shared tab. Pick where it shows: every product, the product’s categories, its manufacturer, or only this product for now, each with how many products it reaches. Pick where it goes on other products; on this one it keeps its place. When some of those products already have their own tab of that name, you can leave the shared tab off them.
Undo and Redo ( Ctrl+Z, Ctrl+Shift+Z ) step through your changes, and Save ( Ctrl+S ) puts them on the product page. Closing with unsaved changes asks first.
Blocks
36 blocks to build a tab from, and the values they fill in
no stored settingsAdd a block opens the Block library, with a search box and five groups:
Basics: Heading, Text, Image and text, Buttons, Table, Divider.
Media: Image, Gallery, Video, Before and after, Image with hotspots.
Product details: Specifications, Product details, Dimensions, What’s in the box, Comparison, Materials and colours, Downloads, Safety and manufacturer.
Story and trust: Feature grid, Badges, Stats, Steps, FAQ, Review highlights, Testimonial, Callout, Good to know, Story timeline, Maker profile, Pairs well with.
Made for your industry: Size chart, Ingredients, Nutrition facts, Care, Curriculum.
Select a block in the list or the preview and its fields open on the right, with Duplicate and Remove block underneath. A tab holds up to 60 blocks.
Values from the product. Many fields take values like {weight} or {sku}, which fill in from each product: name, SKU, brand, price, weight, width, length, height, size, stock and barcode. The { } button beside a field inserts one. That is what makes one shared tab right on every product.
A few worth knowing. Size chart gives shoppers an inches and centimetres switch and can carry a how-to-measure picture. Nutrition facts draws a Nutrition Facts or Supplement Facts label, an EU table or a pet food guaranteed analysis as a real table, not a picture. Video takes a YouTube or Vimeo link or a Media Library file and loads the player only when the shopper presses play. Care shows care symbols with plain words.
Start from a template
Fourteen industry templates and a blank start
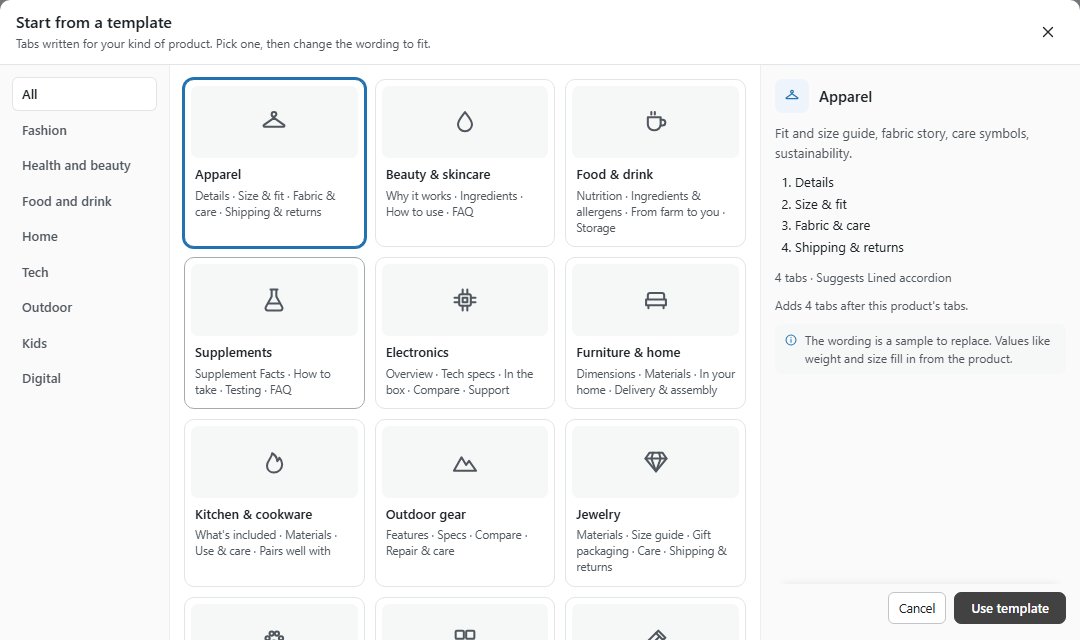
no stored settingsStart from a template on the card, or Templates in the designer, opens tabs written for your kind of product. Filter by industry ( Fashion, Health and beauty, Food and drink, Home, Tech, Outdoor, Kids, Digital ) or show All: Apparel, Beauty & skincare, Food & drink, Supplements, Electronics, Furniture & home, Kitchen & cookware, Outdoor gear, Jewelry, Handmade & art, Pet, Tools & hardware, Toys & kids, Courses & digital, and Blank, one empty tab.
Each template lists its tabs, how many there are and the style it suggests. When the product already has tabs of its own, choose Replace this product’s tabs ( shared tabs and WP EasyCart’s own tabs stay ) or Add after them. A tab one of your shared tabs already shows on the product is not added again.
Use template loads it into the designer. The wording is a sample to replace; values like weight and size fill in from the product. Nothing is kept until you press Save.
WP EasyCart’s own tabs
Description, Specifications and Customer reviews
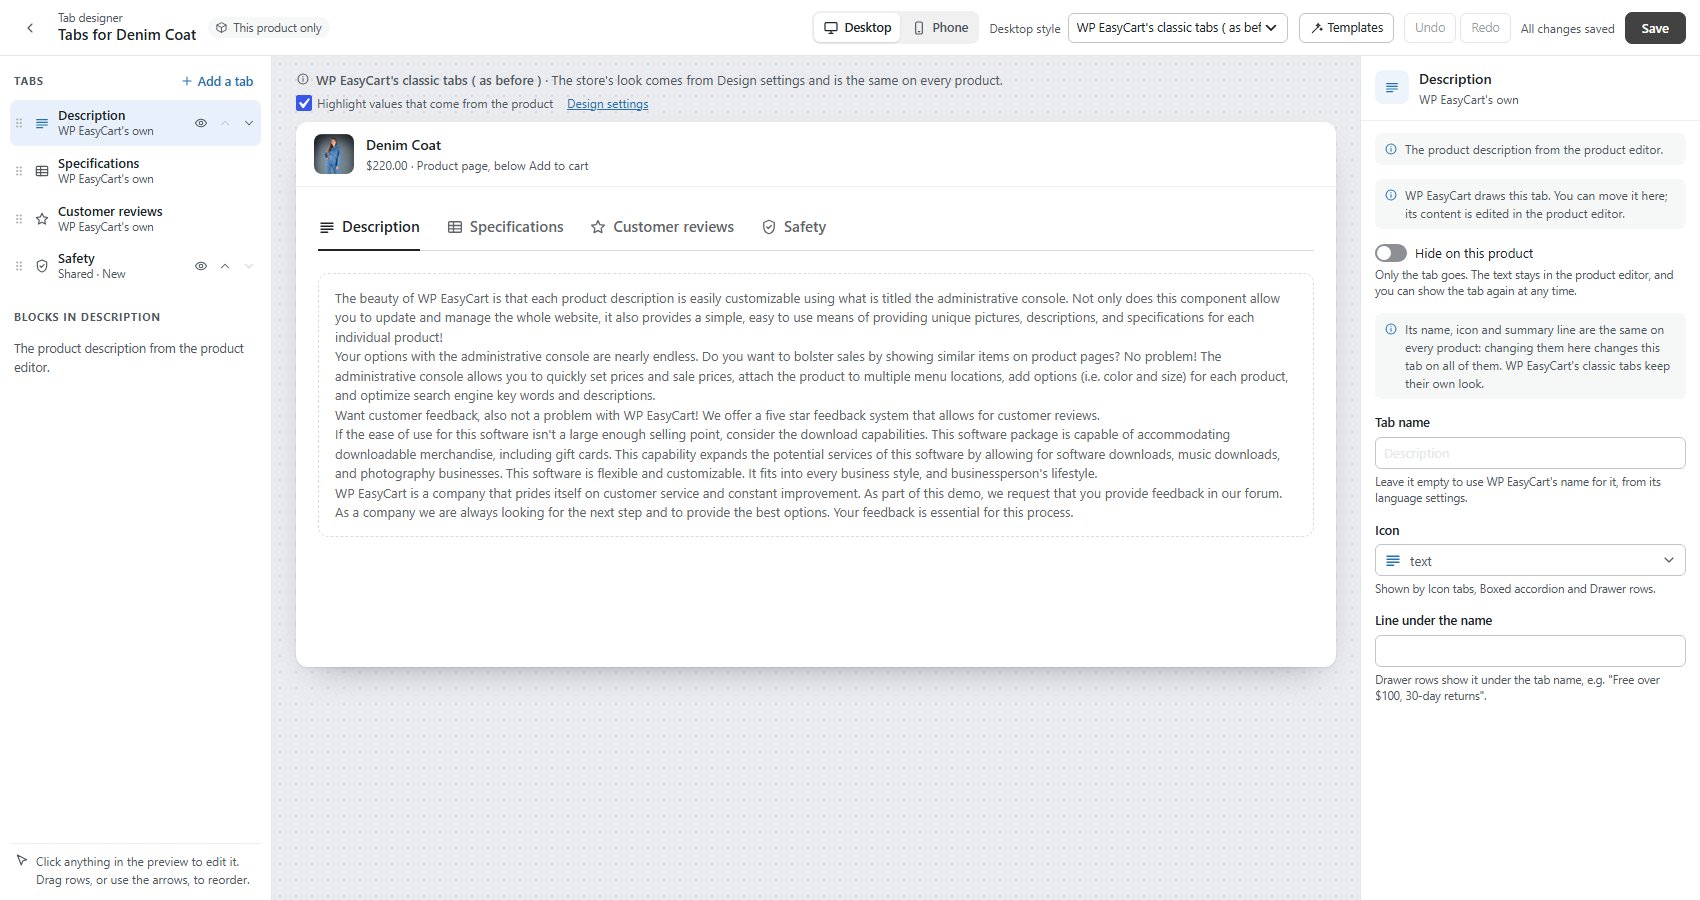
no stored settingsSelect Description, Specifications or Customer reviews in the designer. Their content still comes from the product editor: the description, the specifications ( the tab shows when the product has some ) and the product’s reviews.
On this product. Hide on this product, on Description and Specifications, takes only the tab away. The text stays in the product editor and you can show the tab again at any time. Customer reviews has Customer reviews on this product instead: the same switch as Customer reviews in the product editor. Off hides the tab and the star rating on this product; its reviews are kept.
On every product. Tab name ( leave it empty for WP EasyCart’s own name, from its language settings ), Icon, Line under the name and, for reviews, Show how many reviews. These are the same on every product, so changing them here changes the tab everywhere. The classic tabs keep their own look.
Shared tabs
Written once, shown on every product, a category, a manufacturer or the products you choose. Each product’s own tabs are in its editor.
no stored settingsShipping & returns on every product, a size guide on one category: a shared tab is written once and shows on many products.
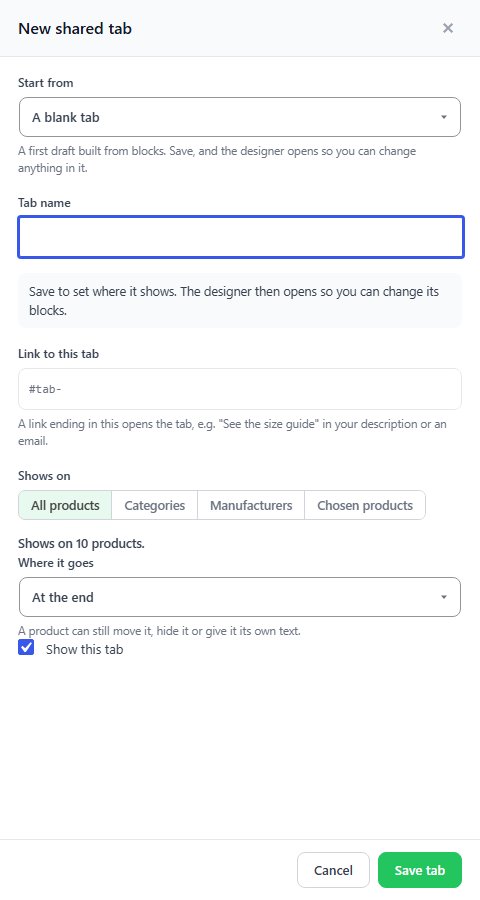
New shared tab opens a drawer, and the buttons beside it start from Shipping & returns, Size guide, Care instructions, Warranty & manuals, Delivery & assembly, Gift packaging or FAQ. The drawer asks:
Start from: a blank tab, one of those, or any tab of the industry templates.
Tab name and Link to this tab.
Shows on: All products, Categories, Manufacturers, or Chosen products found by name or SKU. The drawer counts the products it will reach, and can leave it off products that already have their own tab of the same name, so no page shows it twice.
Where it goes: Before Description, After Description, After Specifications or At the end. Each product can still move it, hide it or give it its own content.
Show this tab: untick to take it off every product without deleting it.
Save tab and the designer opens on the new tab, to change its blocks.
The list. Each shared tab shows where it shows ( or Off ), its blocks, its position and how many products it shows on. When products hide it or have their own content, the counts open a list of them, with Show it here, Use the shared content and Open product for one product, or for all of them at once. Drag rows to set the order of shared tabs in the same position.
Design opens the designer on the shared tab: changes there show on every product it reaches, except blocks a product has made its own. Where it shows reopens the drawer. Delete asks first and says how many products show the tab.

Repeated tabs
The same tab typed, copied or added from a template on many products. Turn the copies into one shared tab: change it once and every product has the new version.
no stored settingsA Shipping tab typed into product after product, tabs copied between products, a template’s own copy of Shipping & returns: this section lists every tab name found on 3 or more products, with how many, and whether a shared tab of that name already exists.
Review opens the name’s copies as a table of versions: how many products hold each, its type, what it holds and an example product. Pick the version to share, then show the shared tab on only the products that have this version or on every product, and where it goes on products without a copy. Products with a different version can keep their own, with the shared tab left off them. Merge turns the copies into one shared tab in the same place on each product.
When a shared tab of that name already exists, the choice is to Remove the copies identical to it, so no product shows it twice.
Large stores are done in batches. Keep the window open while it works; Pause stops after the current products, and the top of the section offers Continue or Stop here later. Stopping keeps what is done: those products use the shared tab, the rest keep their own.

Layout
How every product page shows its tabs, WP EasyCart’s own included.
7 settingsStyle
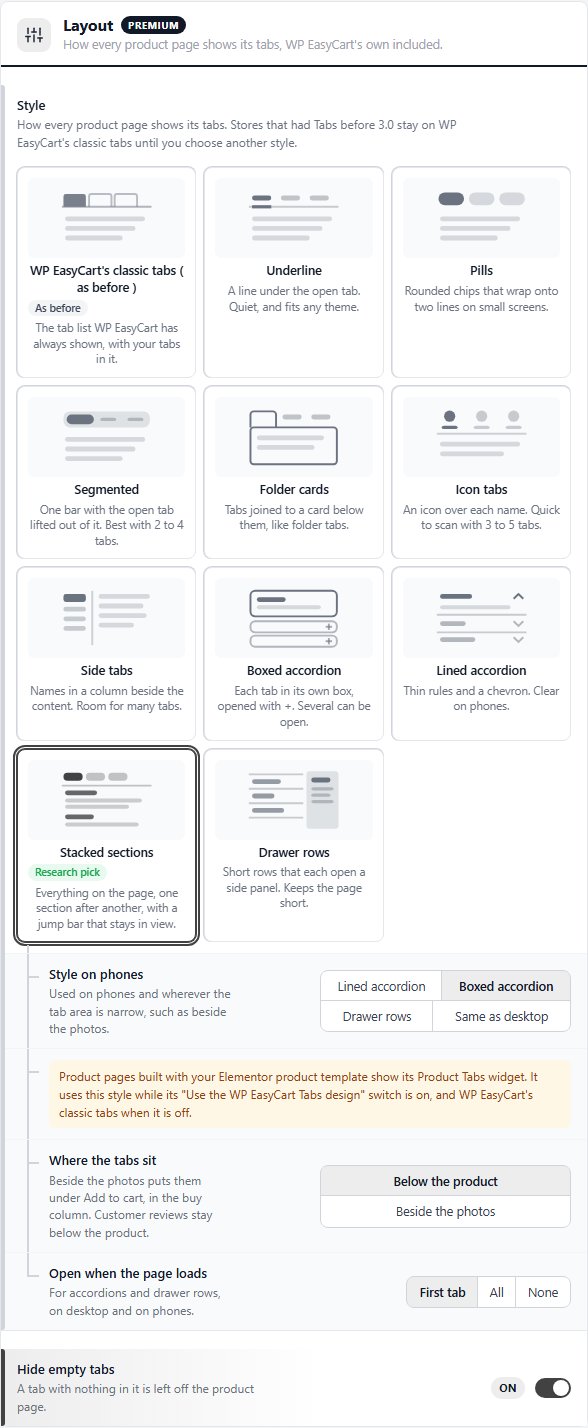
How every product page shows its tabs. Eleven styles, each drawn on its tile: WP EasyCart’s classic tabs ( as before ), Underline, Pills, Segmented, Folder cards, Icon tabs, Side tabs, Boxed accordion, Lined accordion, Stacked sections ( every tab open, one after another, with a jump bar that stays in view ) and Drawer rows, where each row opens a side panel. New stores start on Stacked sections. Stores that had Tabs before keep the classic tabs until you pick another style. When a style cannot show yet, a note under the tiles says why: your theme’s own copy of the product page template, or an Elementor product template, whose Product Tabs widget follows this style while its Use the WP EasyCart Tabs design switch is on.
Style on phones
The style on phones, and wherever the tab area is narrow, such as beside the photos: Lined accordion, Boxed accordion, Drawer rows, or Same as desktop. Shows for every style but the classic tabs.
Classic tab layout
Only with the classic tabs. Horizontal puts the tab names in a row above the content, Vertical in a column beside it, and Accordion shows each tab’s content under its name.
On phones
Only with the classic tabs. Accordion stacks the tabs on a phone. Drop-down list is WP EasyCart’s own: the open tab’s name, with the others underneath when tapped.
Where the tabs sit
Below the product or Beside the photos, which puts the tabs under Add to cart in the buy column. Customer reviews stay below the product either way.
Open when the page loads
For accordions and drawer rows, on computers and on phones: the First tab, All of them or None.
Hide empty tabs
A tab with nothing in it stays off the product page: an empty text tab, an FAQ with no questions, a Downloads tab with no files, a blocks tab with nothing filled in. The Product tabs card marks these tabs empty, so hidden.
Look
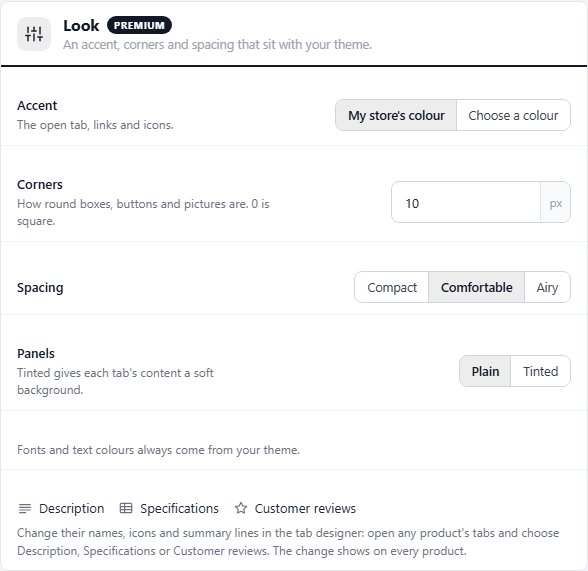
An accent, corners and spacing that sit with your theme.
5 settingsAccent
The colour of the open tab, links and icons. My store’s colour uses the main colour of your store’s design; Choose a colour picks your own.
Accent colour
Your own accent. A contrast line underneath checks it against white: it passes WCAG AA for text, or it is too light and tab names and links will be hard to read.
Corners
How round boxes, buttons and pictures are, from 0 ( square ) to 20 px.
Spacing
The space in and around the tabs: Compact, Comfortable or Airy.
Panels
Tinted gives each tab’s content a soft background; Plain leaves it on the page.
Behaviour
Links into tabs and small helpers for shoppers.
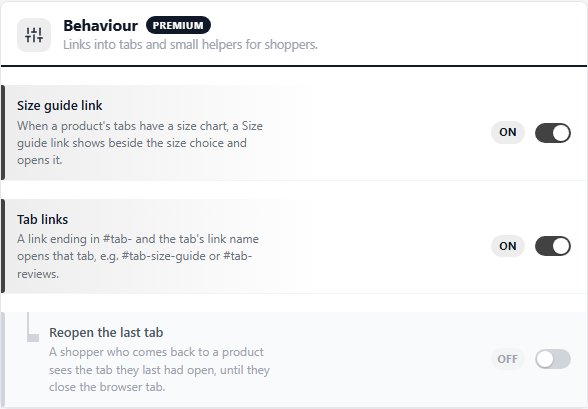
3 settingsSize guide link
When a product’s tabs have a size chart, a Size guide link shows beside the size choice ( swatches and advanced options included ) and opens the chart.
Tab links
A link ending in #tab- and a tab’s link name opens that tab, such as #tab-size-guide or #tab-reviews. Use it for a “See the size guide” line in your description or in an email. Each tab’s link name is set in the tab designer, under Link to this tab.
Reopen the last tab
A shopper who comes back to a product sees the tab they last had open, until they close the browser tab. Not with the classic tabs.
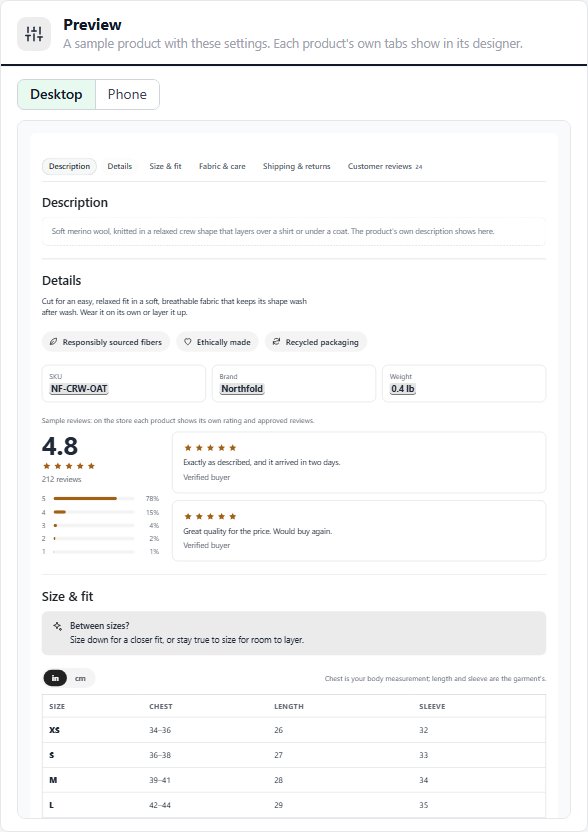
Preview
A sample product with these settings. Each product’s own tabs show in its designer.
no stored settingsA sample product drawn with the Layout, Look and Behaviour choices on this page, on Desktop or Phone. It follows each change you make, so you can compare styles before you leave the page. To see a real product’s tabs, open its designer.
Your tab content
Tabs are kept when the plugin is deactivated or updated.
1 settingRemove tab content when Tabs is deleted
Off, deleting the plugin keeps every tab, so installing it again brings them back. On, deleting the plugin from the Plugins screen removes every product’s tabs, your shared tabs and these settings for good. Deactivating or updating never removes anything.

Ready to run your store on WP EasyCart?
Everything in this guide works with the free plugin. PRO and Premium add subscriptions, memberships, wholesale pricing and more. Try every PRO feature free for 14 days.
