Elementor Page Builder
Creating a Product Template
WP EasyCart makes it easy to create custom templates for your products using our Elementor modules. A full set of modules with all product information is available to you as a designer — build a simple template once, then attach it to all products or even specific categories of products.
Watch the Walkthrough
Prefer to watch? This video takes you from blank template to a fully applied product design.
Creating Product Template with Elementor
Learn how to build a product template using WP EasyCart + Elementor page builder. Templates let you create a single design and apply it to all your store items, or maybe just a single category — easily and visually!
Step 1 — Build a Template in Elementor for Products
One template, reused design-wise across your entire EasyCart store. If no template is applied, EasyCart simply uses our default product styling.
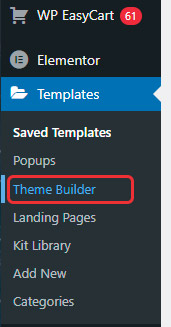
Open Templates › Theme Builder
To get started, you should have WP EasyCart installed as well as Elementor page builder. You may attach a template to all products, or to specific categories of products — we’ll teach you how! Start by clicking the Templates › Theme Builder menu on your WordPress menu.
Beginning Note — flip this switch first
You must go to WP EasyCart › Settings › Design and turn ‘Enable Custom Post Template’ to ON. Without it, your template will never apply.
WordPress — Templates › Theme Builder Menu
Step 2 — Select a Single Post Style Template
Products in EasyCart are custom posts — so a Single Post template is the one you want.
Choose Single Post
Because we are working with product details, every single product you add to your WP EasyCart becomes a custom post within your system with its own unique URL and post. So select to create a Single Post template — either from the side menu or the main screen selection.
💡 Note: You may get a popup here asking you to pick from some predefined templates — go ahead and close that window if needed!
Elementor — Single Post Template Selection

Step 3 — Pick the WP EasyCart Modules & Layout
Now for the fun part — find our modules and rough in your page structure.
Find the WP EasyCart Modules
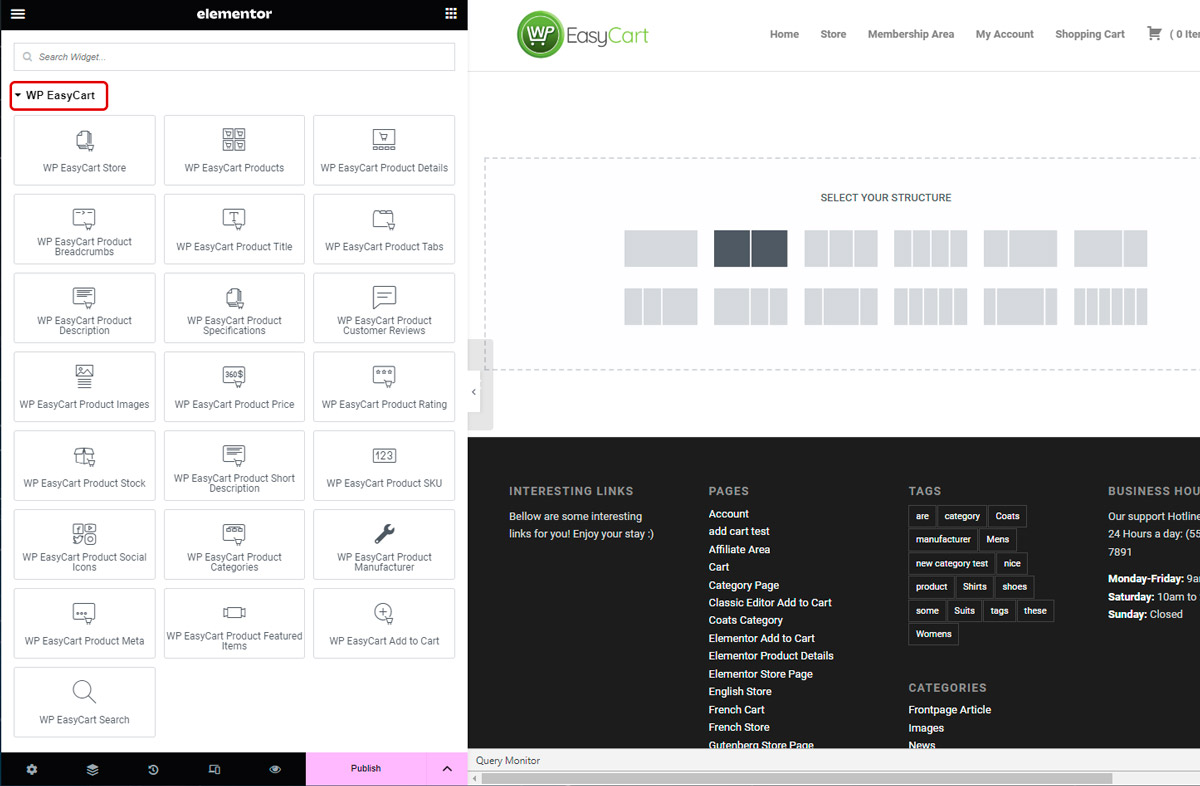
Scroll down the Elementor modules on the side until you find the ‘WP EasyCart’ modules as pictured below. You may also click the ‘+’ sign in the middle to choose the initial layout of your product page. Here we have chosen a 2 column layout… but you may choose what you like.
Elementor — WP EasyCart Modules & Layout Choice
Step 4 — Add Your Favorite Modules!
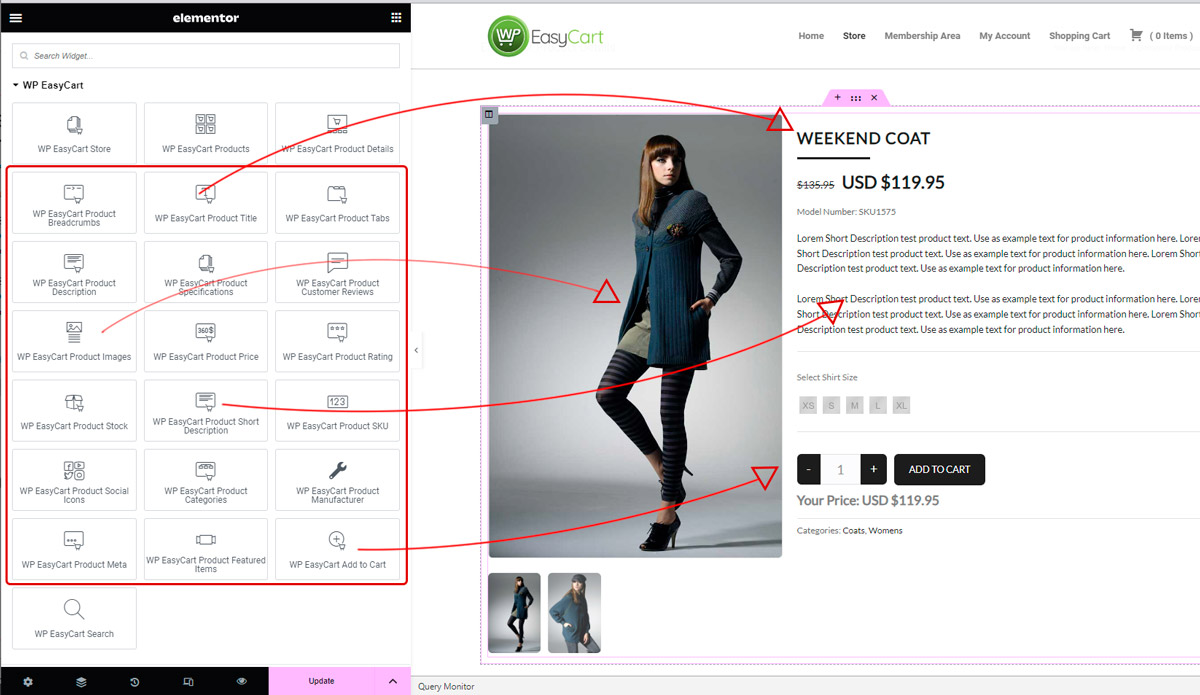
We have modules for nearly every product section found on our product details page — product titles, images, descriptions, prices, add to cart buttons, SKU, categories, stock, and more. Experiment for a while to become familiarized with each module and what it offers.
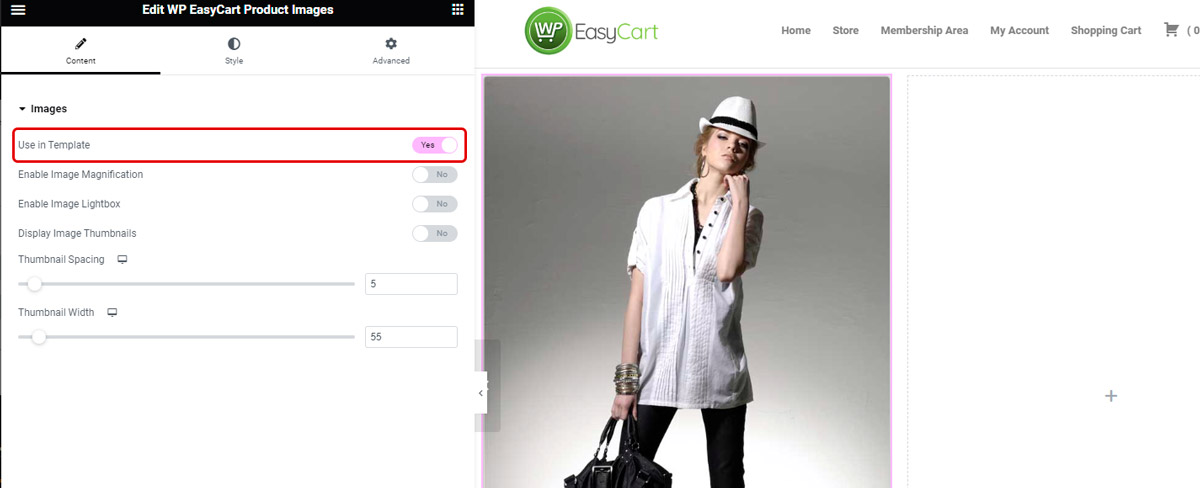
Drag a Module Out & Engage ‘Use In Template’
As you drag a module to the design area, engage the ‘Use In Template’ option as pictured below. This pulls in the first product you have and gives you an idea of what it may look like as you build. In this example, notice we dragged out a Product Images module and engaged the ‘Use In Template’ feature to show our example product.
💡 Tip: If you do not have any products in your store, be sure to add a product before designing a template!
Elementor — Use In Template Option

Customize Content & Styles
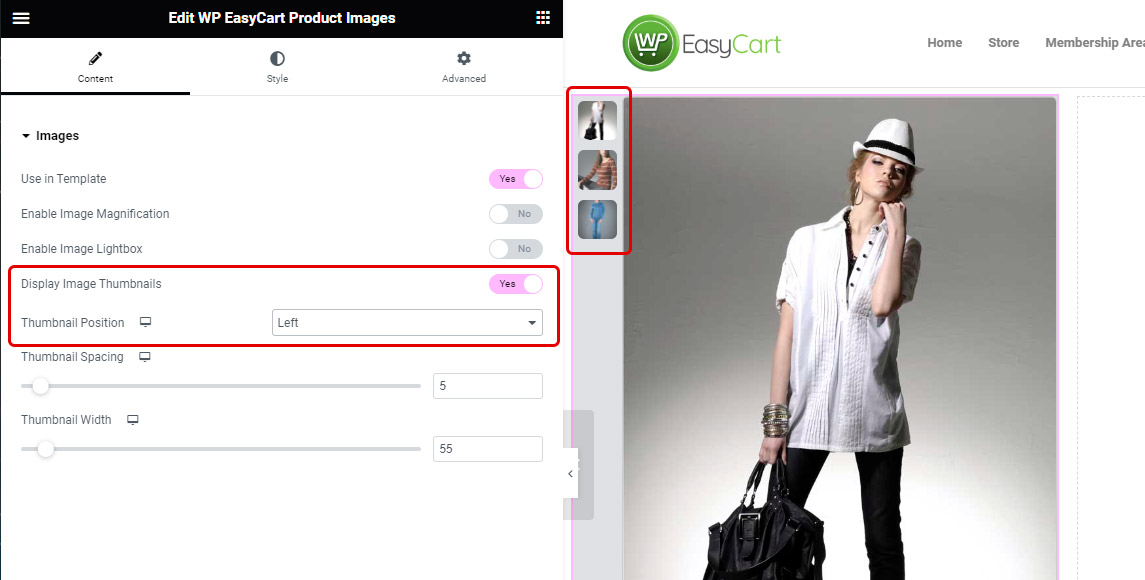
Each module has custom ‘Content’ settings — like this example with the Product Images module. Engage or disengage certain features, change locations, spacing, and more, making these highly efficient design tools.
Elementor — Module Content Settings

Along with the content of a module, there are nearly unlimited Style choices as well. Each module can be configured to provide the design impact you are looking for — everything from buttons, borders, and shading to paddings, margins, and more! In this example, we simply selected the Product Image module and opened the ‘Style’ menu to see the options.
Elementor — Module Style Settings

Remember — You’re Customizing a Template!
You have complete control with your template and Elementor here. Whatever you design can be applied to products and categories in EasyCart. Drag various modules out, apply them, design them, and dial in the look you are going for!
Elementor — Building the Template with Modules
Step 5 — Applying a Template
Template designed? Let’s apply it — you control exactly when and where it appears.
Open Display Conditions
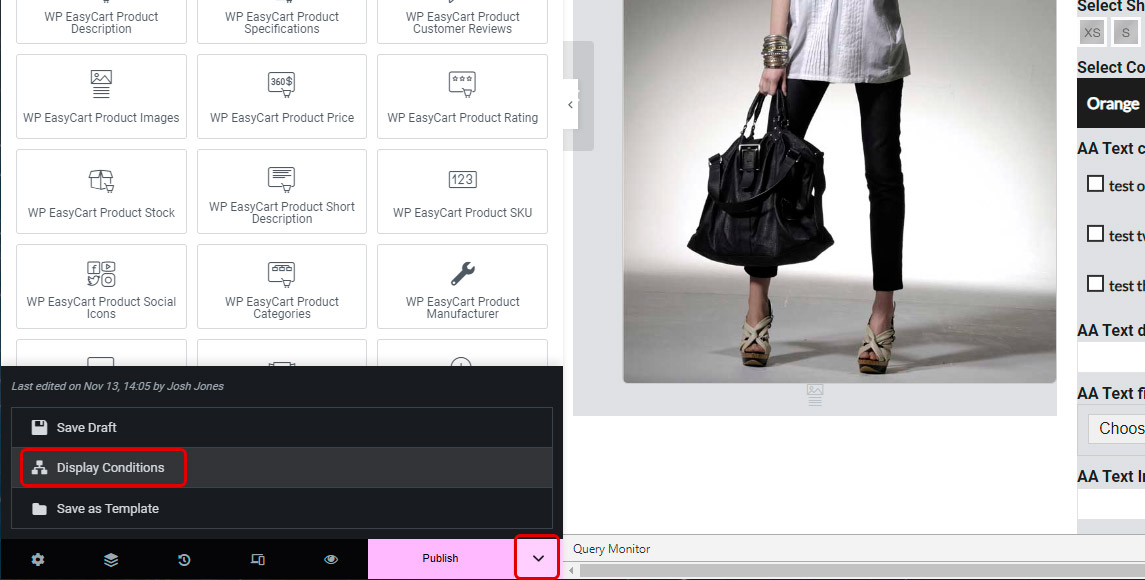
Go to the lower Elementor Update/Publish button and click the arrow. Choose ‘Display Conditions’, which allows you to control when and where this template is to be applied.
Elementor — Display Conditions Menu

Targeting ALL Store Products
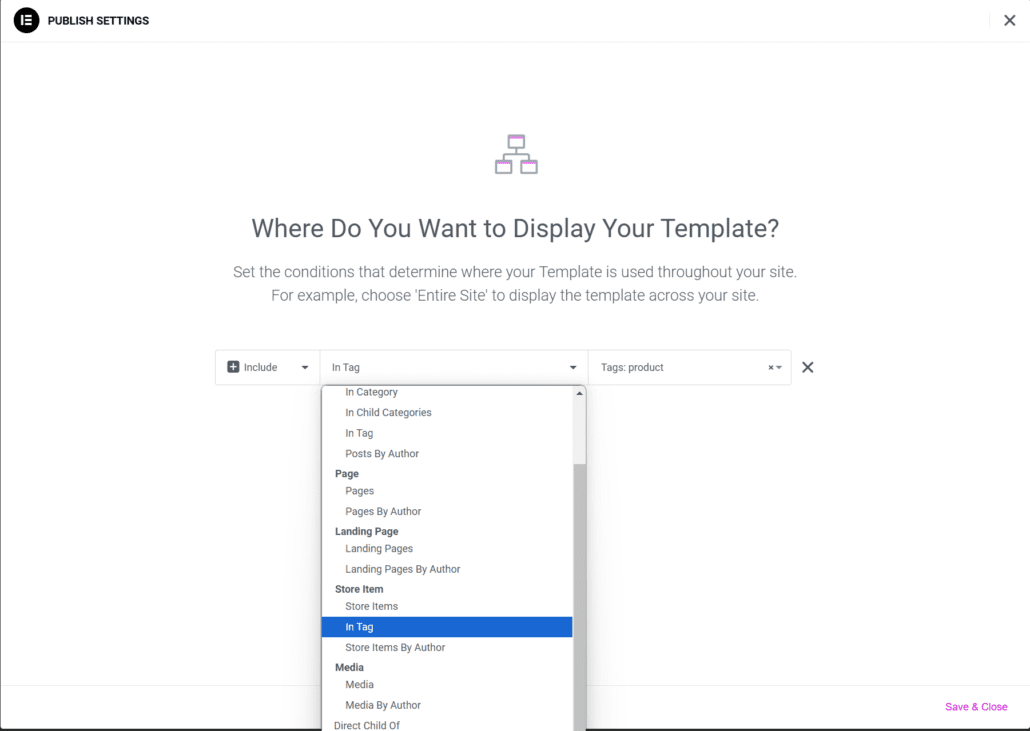
Target ALL products by choosing the ‘Store Items › In Tag › Tags: product’ condition. Click the Save & Close button in the bottom right and this template will now apply to all products. Remember the beginning note: ‘Enable Custom Post Template’ must be turned ON under WP EasyCart › Settings › Design.
Use ‘In Tag’ — never ‘Store Items › All’
It is really important to note that using ‘Store Items › Store Items › All’ will apply the template to categories, manufacturers, and menu items — which will cause those pages to malfunction. You must use the ‘In Tag’ feature!
Elementor — In Tag Condition for All Products
Targeting Specific Products IN Categories
Want the template on just a group of products? Create Categories in WP EasyCart just for those items. For example, if you have Mens, Womens, and Children’s clothing and only want this template on the Women’s category, you must first create that category in EasyCart.
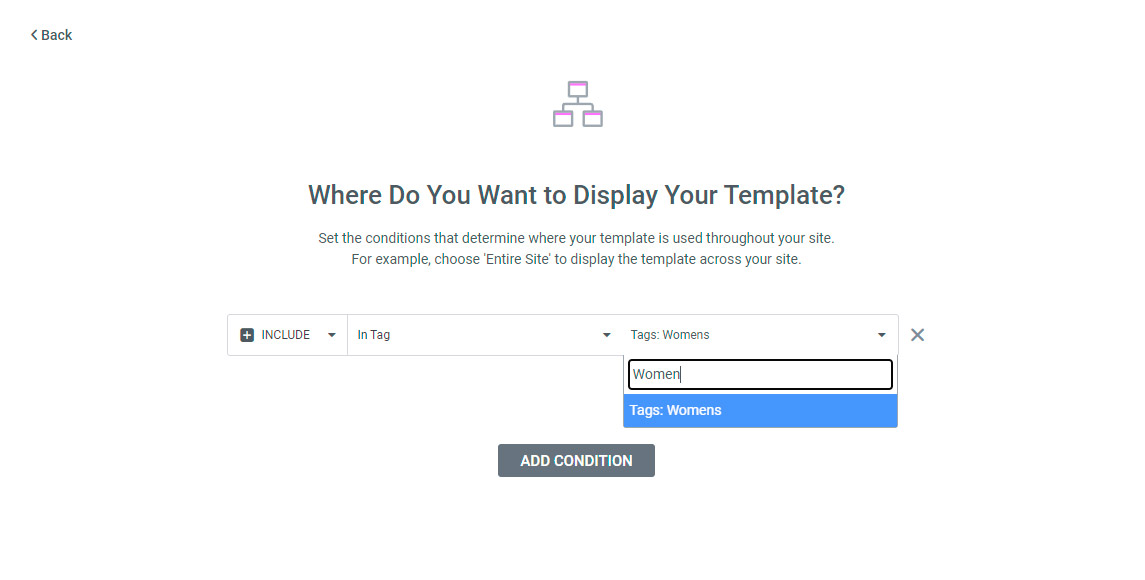
In the example below, we chose the ‘In Tag’ option and searched for Women’s — which applies this template to a single category. You may apply it to others by adding conditions as needed. It’s very flexible this way.
💡 Important: You MUST use the ‘In Tag’ options. Tags are created each time you build a category or product, and you can search for them when you select the ‘In Tag’ option. Essentially, think of Store Items › In Tag as our Categories.
Elementor — In Tag Condition for a Single Category
That’s It!
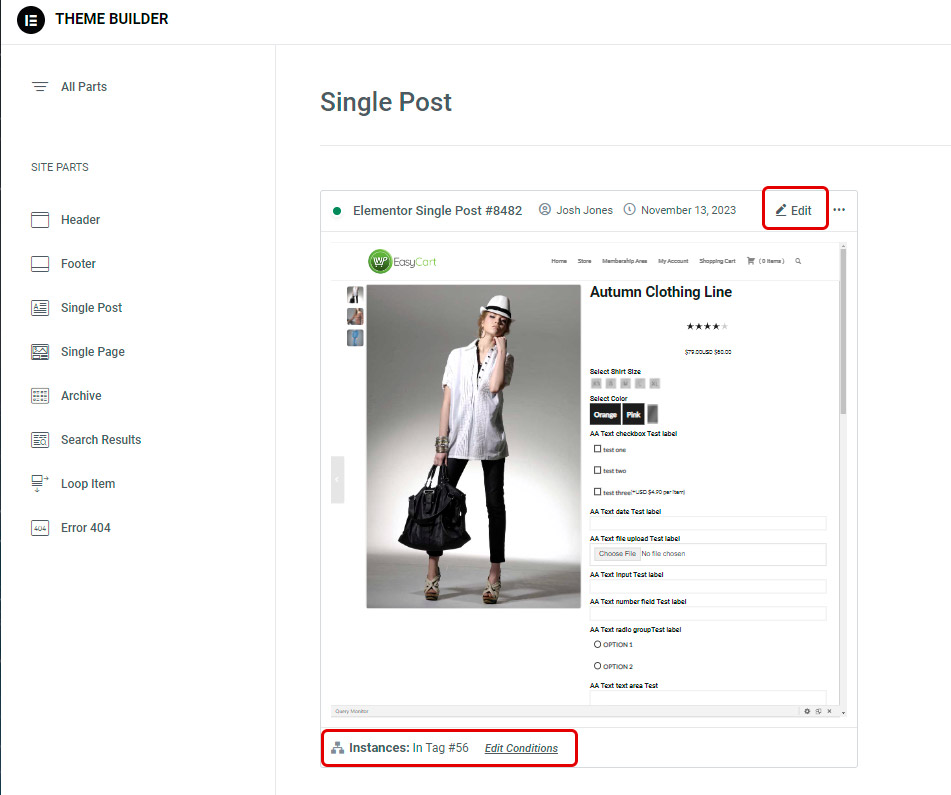
You may edit this feature later at any time by going to your Templates › Theme Builder panel. Edit conditions to change when and where the template applies, or edit the template itself by clicking Edit as shown below. View your store or category of products and see the changes reflected with your new template. Enjoy!
💡 Tip: We advise you also make sure to clear any caching systems you may have holding old styles.
Elementor — Edit Template & Conditions Later
Design Once. Apply Everywhere.
Build one product template and let it style your entire store — or just the categories you choose. If display conditions get tricky, our support team has your back.