How to Setup a Restaurant using WP EasyCart

5 min read

Products

Restaurant Setup with WP EasyCart

Take restaurant orders right from your WordPress site. Customers order today and pick up right away, or schedule a future pickup on a day and time slot you control — all built around your real operating hours, holidays, and closures. Flexible and powerful, exactly when you need it.

Watch the Walkthrough

Prefer to watch? This short video walks through pickup, preorder, and store scheduling setup from start to finish.

Restaurant Setup

Watch a short video on how our restaurant system provides pickup and preorder scheduling alongside full store schedule setup.

How It Works — Quick Start

Four settings, and your restaurant system is live.

1

Set Your Store Schedule

In Settings › Store Schedule, set your days open, pickup windows, expected wait times, and available options.

2

Enable the Restaurant System in Checkout

In Settings › Checkout, turn it on. This lets you set expected wait times and scheduling to show shoppers at the final payment panel of checkout.

3

Enable Products for Preorder or Pickup

In Product › Basic Settings, enable each item for either preorder scheduling or daily restaurant pickup scheduling.

4

Turn On Order Management Columns

In Settings › Additional Settings, turn on order pickup date and time columns. Not needed for every store, but a big help when managing and sorting incoming orders.

Set Your Store Schedule

Start with a base 7-day schedule in Settings › Store Schedule. Click the pencil icon to adjust an existing day, or click ‘Add New’ to create your own holiday and special exemptions.

WP EasyCart — Store Schedules
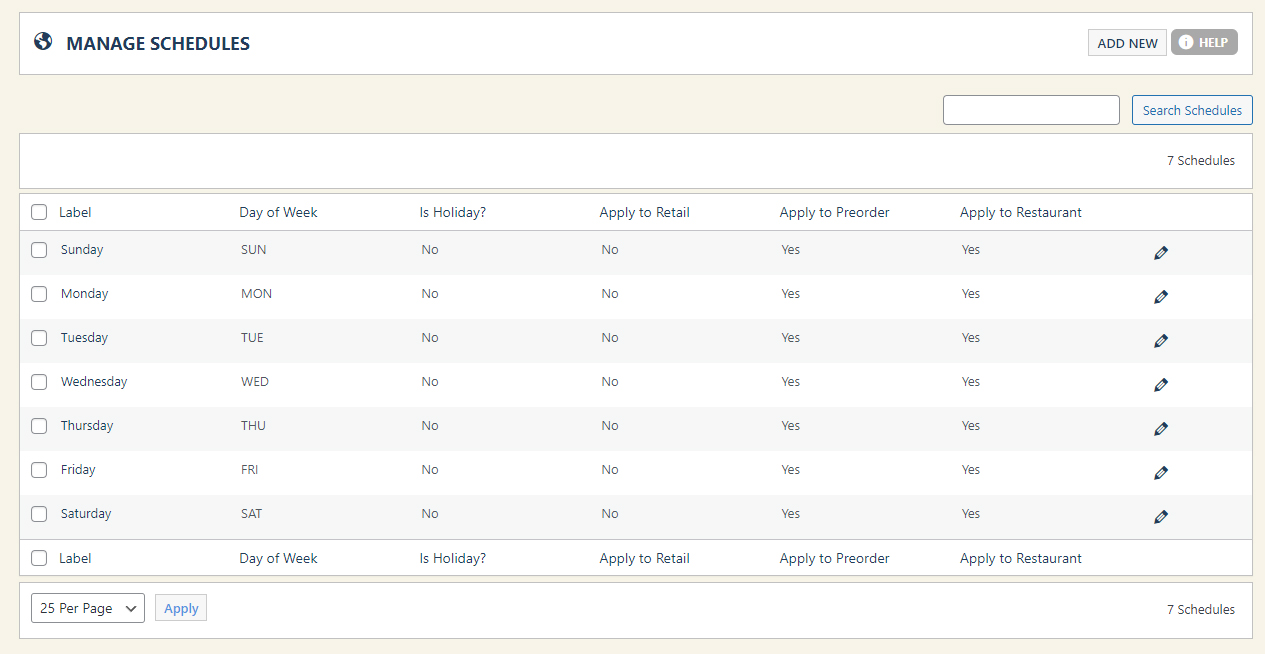
WP EasyCart store schedules list with base days and holiday exemptions

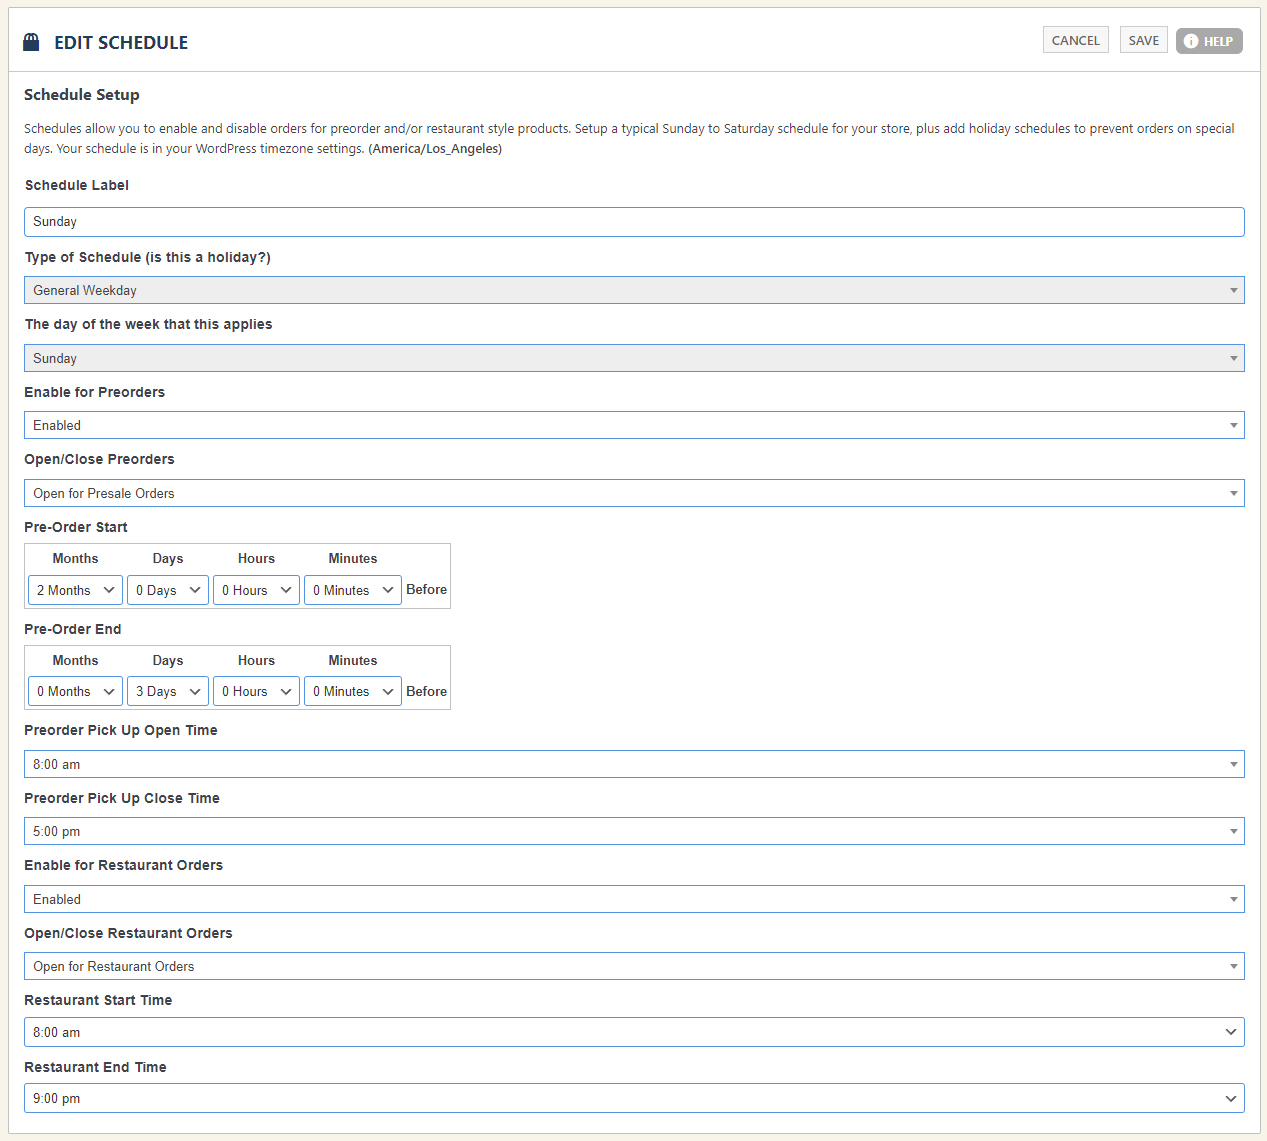
Once you’re editing a day, you can adjust the timeframe plus preorder and restaurant options. Some days you may not want to allow preorders; other days you may want to skip in-store pickup entirely — holidays are a good example, and they act as overrides to your base schedule. No custom day set up? The system just follows your base schedule.

Preorder times have an open/close period for that day, plus a timeframe for when preordering can start and end — for example, letting customers preorder up to 2 weeks in advance, with pickup only in the morning or afternoon the day of. Restaurant times have a simple start/end period for that day. Shoppers can choose ASAP (As Soon As Possible), which follows your checkout prep time, or pick a later time that same day based on the block schedule you set in checkout settings.

WP EasyCart — Store Schedule Details

WP EasyCart store schedule detail with preorder and restaurant time settings

Configure Checkout Scheduling

With your base schedule set, it’s time to switch on scheduling at checkout.

During checkout, shoppers get the option to schedule a same-day pickup time for restaurant orders, or a future pickup date for preorders. Go to Settings › Checkout to engage scheduling — you can set the scheduling range for restaurant orders (15 minutes in this example) and the prep time (30 minutes in this example), plus your own custom messages and instructions.

Here’s the logic: if you run a coffee shop and today’s restaurant orders need 20 minutes to prep, set 20 minutes here. Shoppers who choose ASAP will be given an estimated pickup time 20 minutes out — giving you the time you need to get the order ready. Useful for most meal, coffee, and restaurant businesses.

WP EasyCart — Checkout Scheduling Settings
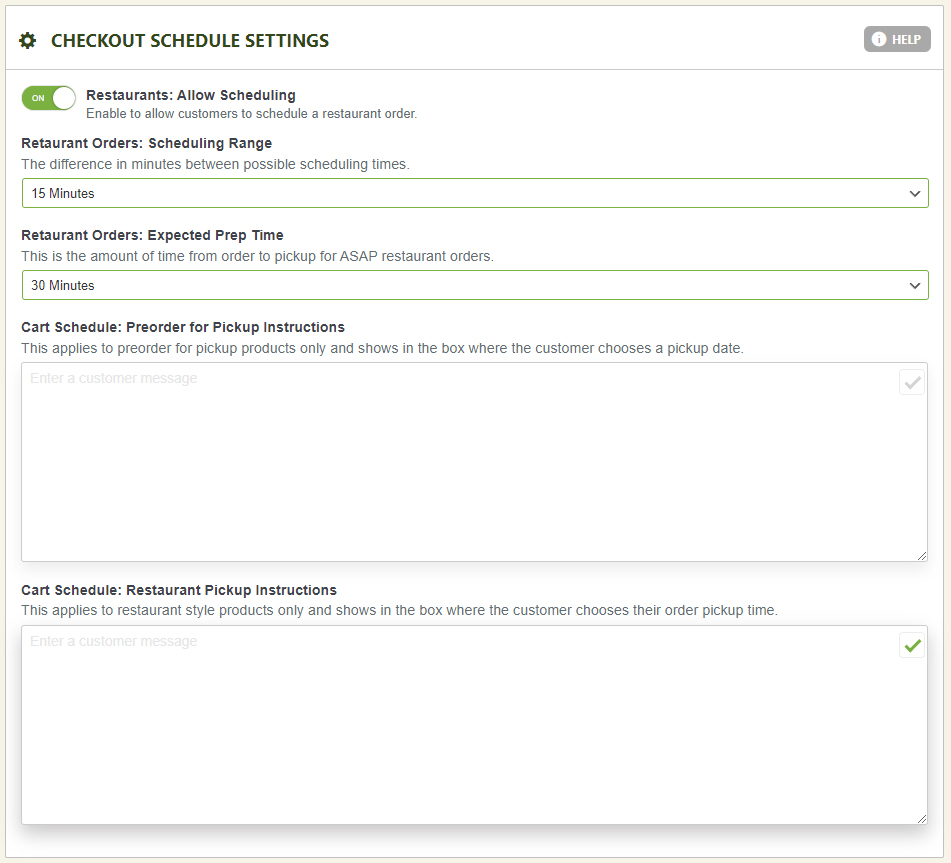
WP EasyCart checkout settings for restaurant scheduling range and prep time

Turn On Product Settings

With a schedule and checkout in place, it’s time to dial in each product.

Every product can be either a preorder item or a restaurant pickup item. Restaurant pickup items mean the customer orders and picks up that same day — with the option to pick up ASAP (adhering to your schedule above) or schedule it for a later hour based on the blocks you set. Go to a Product › Basic Settings panel to engage either option.

WP EasyCart — Product Preorder & Restaurant Pickup Settings
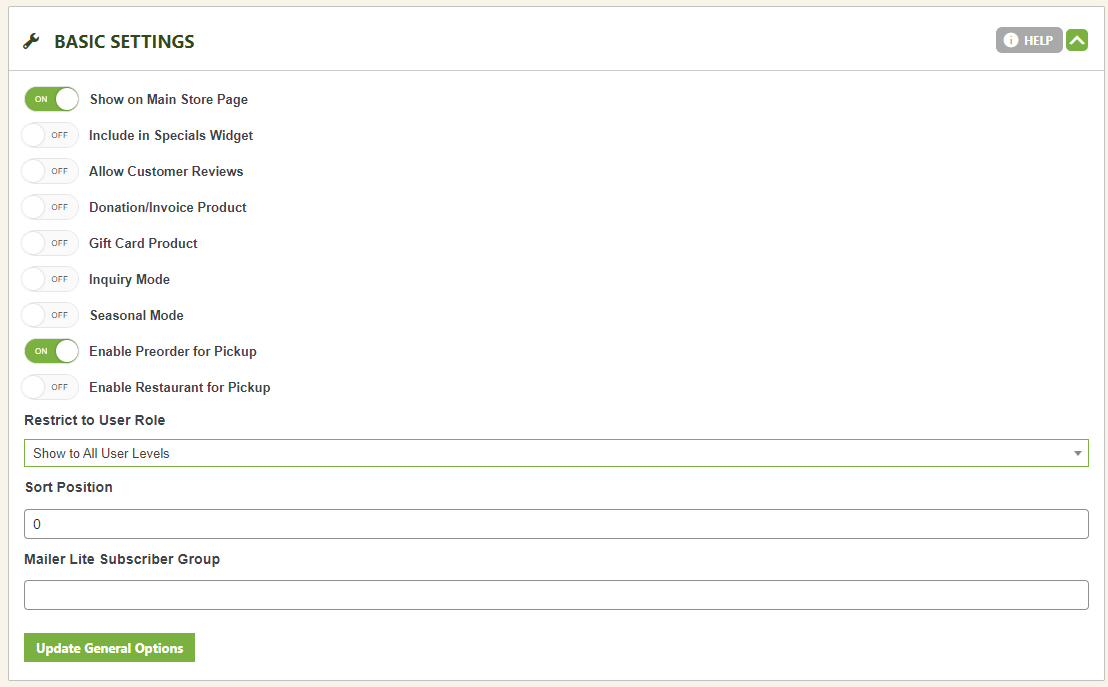
WP EasyCart product basic settings with preorder and restaurant pickup options

What Shoppers See at Checkout

The scheduling screen changes depending on whether the order is a preorder or a same-day restaurant pickup.

During checkout, a preorder shopper sees the screen below for scheduling. Notice they can select a future date and pickup time, all according to your store schedule and hours.

WP EasyCart — Preorder Checkout Scheduling
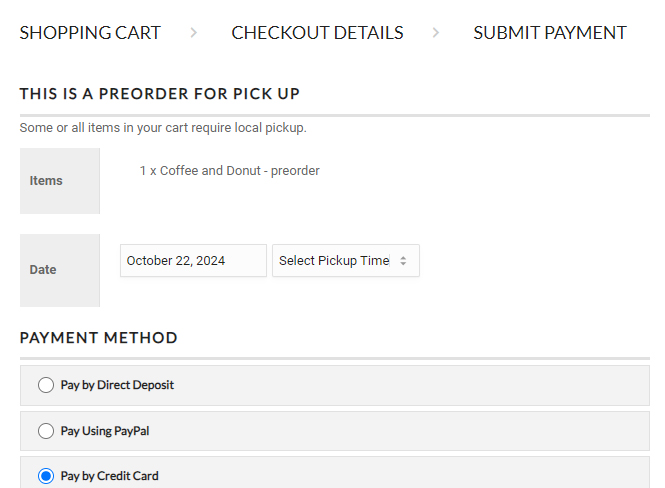
WP EasyCart preorder checkout screen with future date and pickup time selection

During checkout, a restaurant order shopper sees the screen below instead. There are 2 options: ASAP means they pick up as soon as possible, with a time frame based on your checkout prep time setting, and Schedule for Later shows future times and blocks — again based on your schedule — for pickup later that same day.

WP EasyCart — Restaurant Pickup Checkout Scheduling
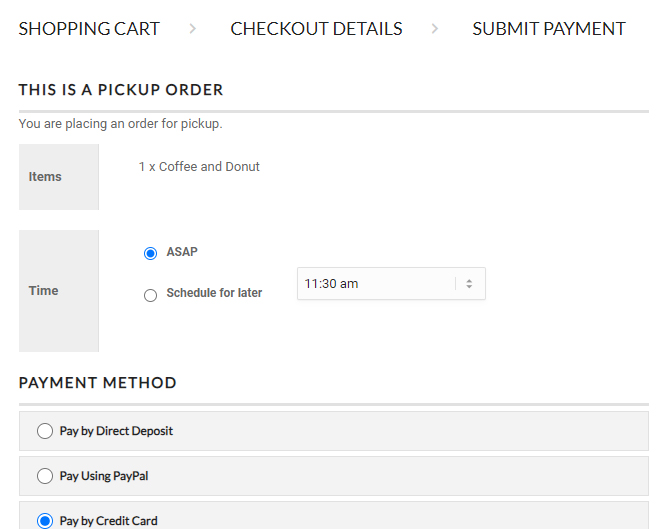
WP EasyCart restaurant pickup checkout screen with ASAP and schedule for later options

Manage Incoming Orders

Once customers schedule and place an order, you’ll manage it all right in the order manager. A couple of settings help you see the dates and times unique to restaurant orders.

Go to Settings › Additional Settings to turn on the 2 extra order columns.

WP EasyCart — Additional Settings Panel

WP EasyCart additional settings panel enabling pickup date and restaurant time order columns

With those on, your order manager shows 2 extra columns: Pick Up Date and Restaurant Time — handy for sorting orders by time. Another useful option: use Bulk Actions to export orders straight to a CSV spreadsheet.

WP EasyCart — Order Manager with Pickup & Restaurant Time Columns

WP EasyCart order manager showing pickup date and restaurant time columns

Open any single order and you’ll also see the Pickup Date or Restaurant Time the customer entered — edit it right there if you ever need to.

WP EasyCart — Order Detail with Pickup Date & Restaurant Time
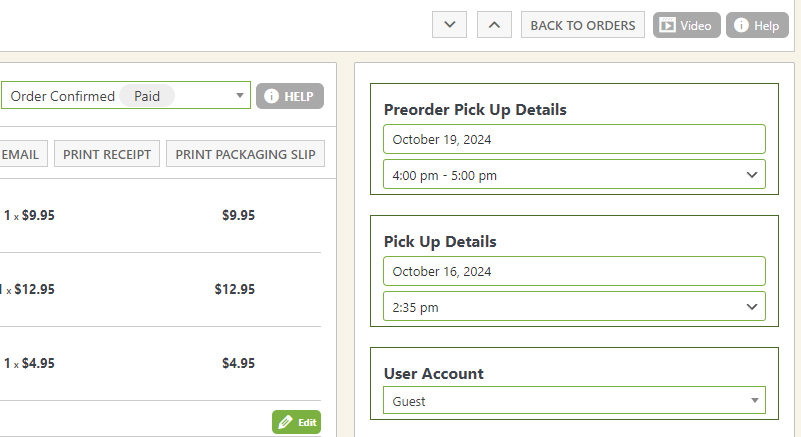
WP EasyCart order detail manager showing pickup date and restaurant time fields

Add Tips & Gratuity

A useful extra for restaurant businesses: let customers tip right at checkout.

Go to Settings › Checkout and enable the Tips / Gratuity section. Be sure to provide default values here too, such as 10, 15, 20, 25, all separated by a comma — these let shoppers pick a tip quickly or enter a custom amount of their own.

WP EasyCart — Tips / Gratuity Checkout Setting

WP EasyCart checkout settings enabling tips and gratuity with default amounts

During checkout, shoppers get the option to add a tip or gratuity — customary in this industry. The default values are pre-calculated for them, and a custom entry amount is always available.

WP EasyCart — Tips & Gratuity at Checkout
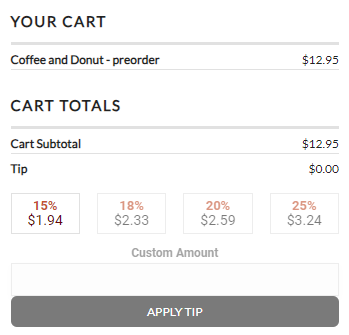
WP EasyCart checkout screen with pre-calculated tip options and custom entry

Premium Feature

Using WP EasyCart for Restaurant Businesses

WP EasyCart’s Premium Edition unlocks the full power of a restaurant business online. Post-pandemic changed the rules, and many restaurant businesses looked for new ways to make food and takeout convenient. WP EasyCart provides a powerful solution at an economical price for small to medium businesses ready to get on board. To learn more, visit www.wpeasycart.com and review our Premium Edition.

Ready to Take Restaurant Orders Online?

Set your schedule, enable checkout, and let WP EasyCart handle preorders and same-day pickup for you.

Updated on July 20, 2026