How to sell downloads using Amazon

3 min read

Third Party

Amazon S3 Setup for Large Downloadable Products

Amazon S3 is storage built for the web — scalable, secure, fast, and inexpensive, running on the same infrastructure Amazon uses for its own sites. Connect it to WP EasyCart and your biggest downloadable files stream straight from AWS, taking the load completely off your own web server.

Part I — Create Your User, Group & Access Key

Before EasyCart can talk to S3, AWS needs a locked-down user and a key just for this connection.

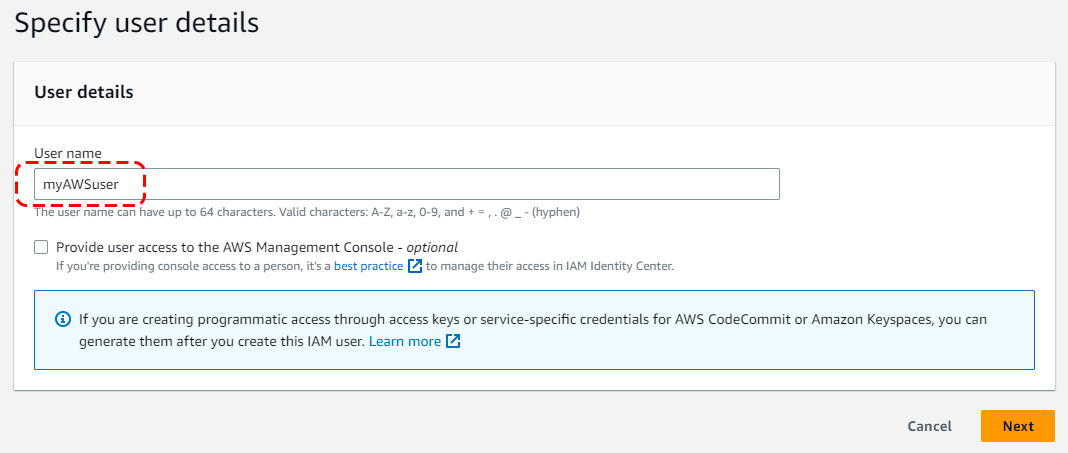
1

Create Your AWS Account

Sign up at the Amazon Web Services site, or log in here if you already have one: aws.amazon.com.

2

Open Your Security Credentials

From the AWS dashboard, click your name in the top right and choose Security Credentials.

AWS — Security Credentials Menu
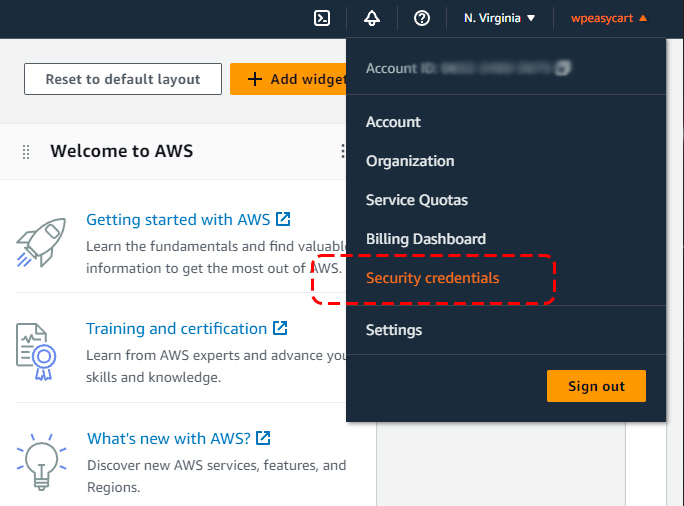
AWS console menu showing the Security Credentials option
3

Select Users

From the left menu of the AWS dashboard, click Users.

AWS — Users Panel

AWS Users panel in the left navigation menu
4

Click Add User

Top left of the Users panel.

AWS — Add User Button

AWS Users panel with Add User button highlighted
5

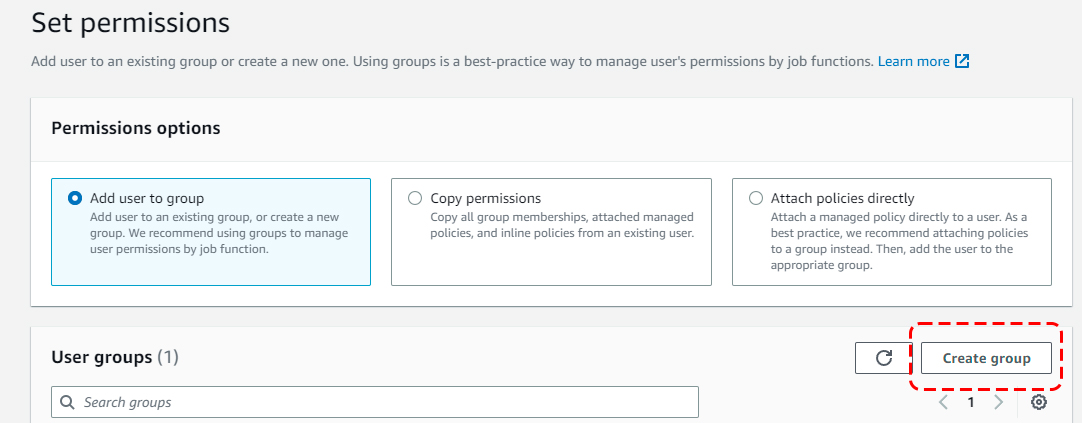
Click Create Group

We want a group so your key’s permissions stay as tight as possible — this prevents unauthorized access elsewhere in your AWS account.

AWS — Create Group

AWS user setup screen with Create Group button
6

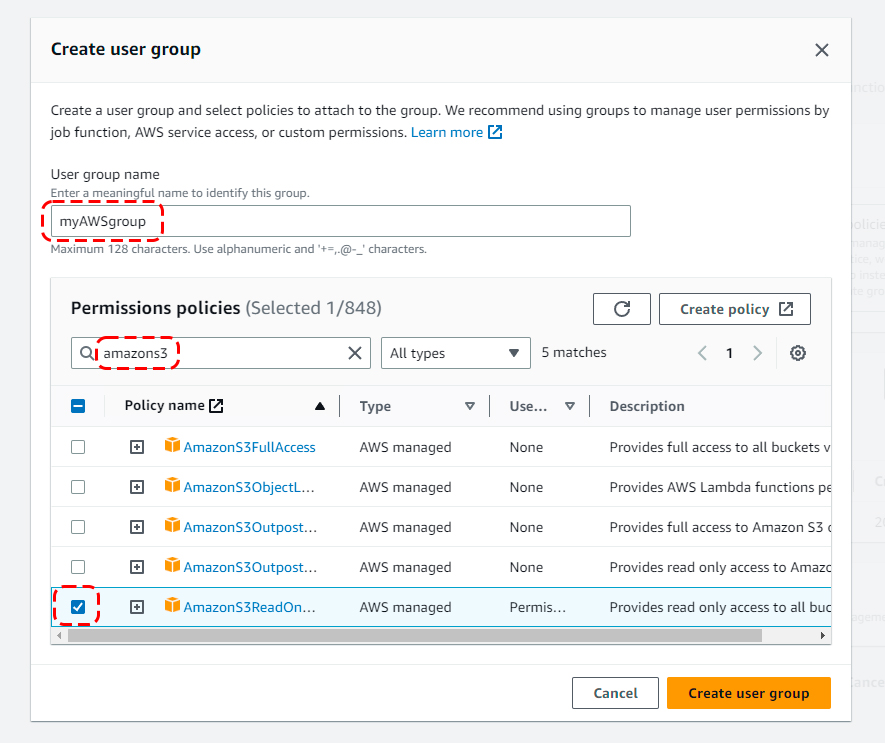
Name the Group & Grant Read-Only Access

Enter any group name, search for “amazons3”, and select ONLY AmazonS3ReadOnlyAccess from the policy list. Click Create group.

AWS — Group Permissions

AWS group permissions screen with AmazonS3ReadOnlyAccess policy selected
7

Select Your New Group

Click Next: Review.

AWS — Review the New Group

AWS review screen showing the newly selected group
8

Click Create User

This completes the user setup.

9

Open the User’s Security Credentials Tab

Click your new user to open its properties, then click the Security Credentials tab — this is where you’ll make an Access Key ID and Secret for this user.

AWS — User Security Credentials Tab

AWS user properties page with the Security Credentials tab open
10

Create an Access Key

Scroll down to the Access Key section and click Create Access Key.

AWS — Create Access Key

AWS access key section with Create Access Key button
11

Choose Third-Party Service

Select Third-Party Service as the type of key. Click next — you may be asked for an optional description, add one or skip it — then click Create Access key.

AWS — Third-Party Service Key Type

AWS access key type selection showing Third-Party Service option
12

Save Your Access Key ID & Secret

Copy both somewhere safe — you’ll need them again once you connect EasyCart to your bucket.

AWS — Access Key ID & Secret

AWS access key ID and secret access key ready to copy

Part II — Create Your AWS Bucket

Your key needs somewhere to store files — that’s the bucket.

1

Return to the S3 Management Page

From the top-left Services menu, under Storage.

2

Create a New Bucket

Click ‘Create bucket’.

AWS S3 — Create Bucket

AWS S3 create bucket button
3

Name Your Bucket

Any name works. Click next.

AWS S3 — Name Your Bucket

AWS S3 bucket naming screen
4

Accept the Default Properties

Nothing needed here unless a specific property helps your setup — click next in most cases.

5

Keep Permissions Locked Down & Create

The default permissions are correct — make sure ‘Block All Public Access’ stays on so the bucket is secure. The security you set up in Part I still lets the cart access and deliver the file to anyone who purchases your download. Click Create Bucket to finish.

6

Connect the Bucket to EasyCart

Back in WordPress, add your Key, Secret, Bucket, and Bucket Region under WP EasyCart › Settings › Third Party.

WP EasyCart — Amazon S3 Settings

WP EasyCart third party settings with Amazon S3 key, secret, bucket, and region fields

Part III — Add a File to AWS

Bucket’s ready. Now upload the file your customers will download.

1

Navigate to Your Bucket

Click the bucket name in your list of buckets — if you just created it, you’re already there.

2

Click Upload

Do not create a folder for WP EasyCart files — that can cause issues on the product setup side in EasyCart.

AWS S3 — Upload Files

AWS S3 upload files button and drag-and-drop area
3

Add Your Files & Leave Permissions Default

Click Add Files, or drag and drop them into the upload area. Nothing to change on permissions — the owner (your user and API key) has access, and public access stays blocked by default.

4

Click Upload — You’re Done

Your file now lives in the bucket, ready to attach to a product back in EasyCart.

Premium Feature

Attach the Download to Your Product

Create or edit any product and open the Download Options section. Choose Download Product, set the Download Location to Amazon S3, then pick any file from the S3 File box pulled straight from your bucket. A setup error here means something’s misconfigured upstream — fix it and the error clears. From then on, customers who buy this product download it securely from their account — and the file streams from Amazon S3, not your web host. It’s a great way to off-load the heavy burden of large downloads from your main server, distributing that load efficiently. Get the full rundown on setting up a downloadable product here.

💡 Plan required: All digital download features are part of the WP EasyCart PRO or Premium plan. View pricing here.

WP EasyCart — Download Options with Amazon S3

WP EasyCart product download options set to Amazon S3

Ready to Offload Your Biggest Files?

Amazon S3 keeps large downloads off your server and in customers’ hands fast. If any step above isn’t lining up, our support team can help you troubleshoot the connection.

Updated on July 20, 2026