ShipStation Extension

6 min read

Extension Guides

ShipStation Extension

ShipStation connects your WP EasyCart orders to ShipStation for shipping methods, label printing, and automated customer notices for all things shipping, tracking, and labeling. If you need a more automated way of shipping and tracking with your customers, ShipStation is a great way to streamline the fulfillment and shipping process.

Before You Begin

First, install the extension: all EasyCart extensions install as new plugins — a very easy task with WordPress. Click here to learn how to install a WordPress plugin and EasyCart Premium extensions. You’ll also need to sign up for a free trial account or acquire a new ShipStation account to utilize their services — check with them at www.shipstation.com. ShipStation also has a great guide like ours in their Knowledge Base Article.

Generate Your ShipStation API Keys

Inside your ShipStation control panel, visit Account Settings — the gear icon in the top right corner. From there, select Account and then API Settings.

ShipStation — API Settings Menu

ShipStation account settings menu with API Settings link

Next, generate API keys to acquire the API key and API secret. Simply click the button to generate those keys.

ShipStation — Generate API Keys

ShipStation generate API keys button in API settings

ShipStation — API Key & Secret

ShipStation generated API key and API secret values

Enter Your API Keys into WP EasyCart

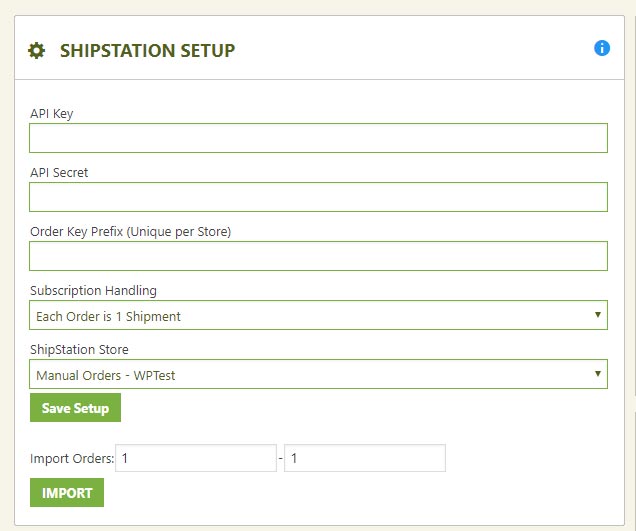
To finish the connection, go to WP EasyCart › Settings › Third Party. In the ShipStation settings, enter the API key and API secret you generated. Be sure there are no spaces at the end of your keys. You may also select which store to associate with this account so the webhooks talk back to just this store. When you save settings here, EasyCart registers a webhook with ShipStation for syncing back with your system.

WP EasyCart — ShipStation Settings

WP EasyCart third party settings with ShipStation API key and secret fields

💡 Note: You may enter an ‘Order Key Prefix’ if you have multiple stores, so you can tell which location/website each order is coming from.

Create a Store in ShipStation

You need to create a simple store for WP EasyCart to connect with and send orders to. Navigate to Store Setup in your account settings, click Selling Channels › Store Setup, then click the “Connect a Store or Marketplace” button.

ShipStation — Connect a Store or Marketplace
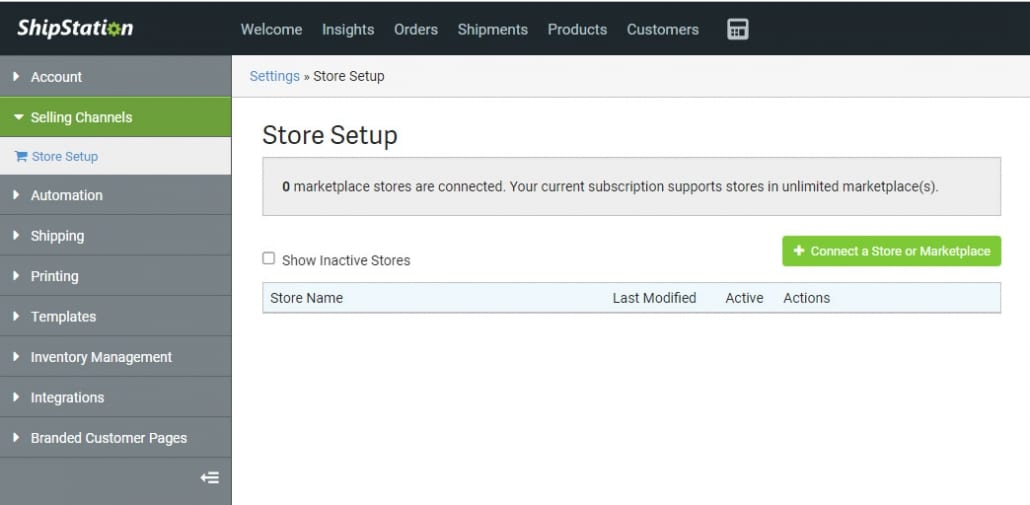
ShipStation store setup screen with connect a store or marketplace button

Now choose “ShipStation” as your store type. This store type is the most basic version — we use the ShipStation API to send all the orders, accounts, and products to your new store. When you ship an item, tracking codes and shipping methods are sent back to EasyCart automatically.

ShipStation — Choose Store Type
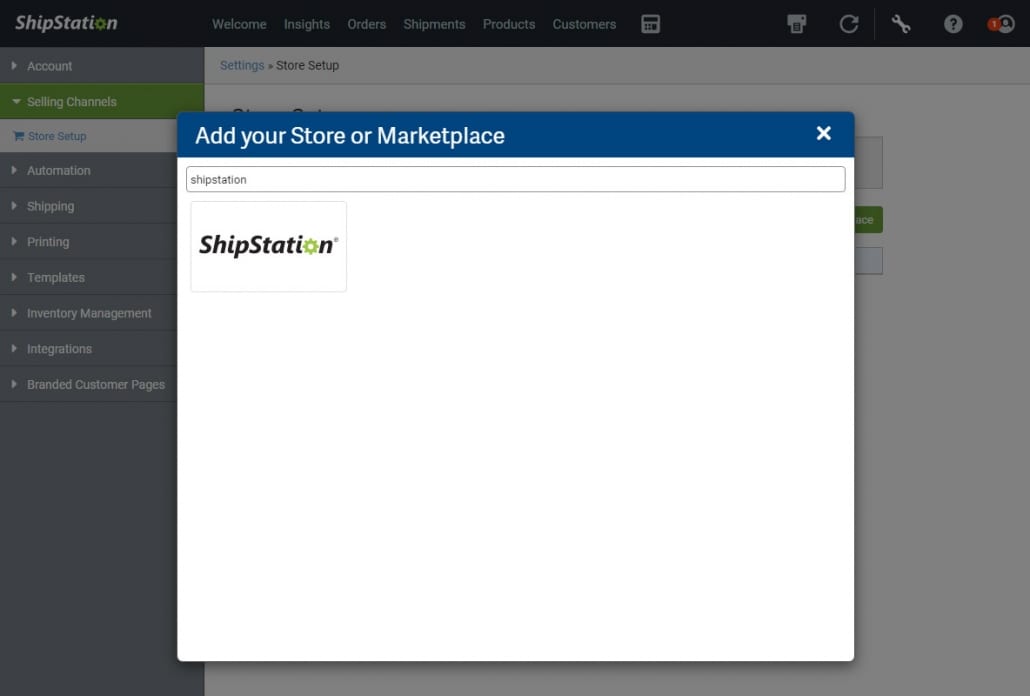
ShipStation store type selection with ShipStation chosen

Lastly, enter a store name and optionally set a manual starting order ID. This will be separate from EasyCart.

ShipStation — Store Name & Manual Options
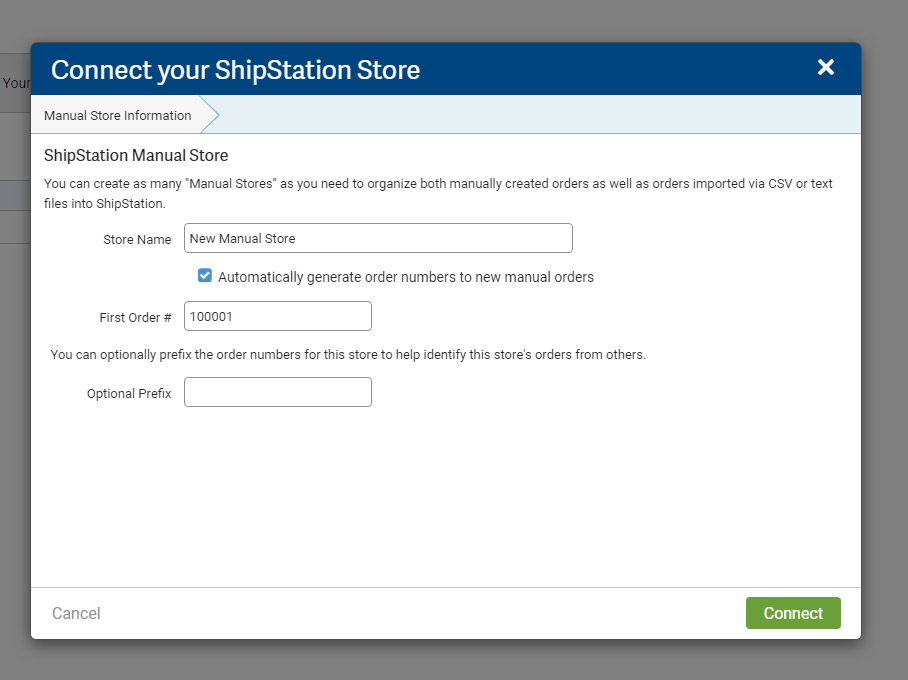
ShipStation store name and manual starting order id options

Importing Orders

Have previous orders you’d like inserted into the ShipStation manager? Simply enter the order number/range you want imported and select ‘Import’ to run the process — you should see the orders appear in ShipStation. ShipStation will let you brand your emails and shipment communications to your liking.

Special Notice — Duplicate Order Numbers

You cannot import orders or have orders go to ShipStation with the same order # that already exists in ShipStation. Example: if order 101 already exists in ShipStation, EasyCart will not send order 101. You can always go to Settings › Email Setup within EasyCart and adjust your starting order # so it has a unique range — for example, order #50000 instead of starting at order #1.

Key Features

What the ShipStation extension automates for you, out of the box.

  • Automatic order sync: Automatically adds your orders to ShipStation.
  • Automatic products: Products are automatically added on import.
  • Auto-filled shipping options: Set a product weight/size and preferred shipping method to have it automatically fill an order with a shipping option.
  • Batch processing: Batch similar orders, choose a shipping method, and batch print labels.
  • USPS deep discounts: Automatically get USPS deep discounts with ShipStation and print and pay for labels automatically.
  • Tracking emails: Automatically choose to send tracking emails when labels print.
  • Branded tracking page: Leverage a branded track-my-package page sent via email as a link.

💡 Products need setup too: To automate, ShipStation requires product dimensions, weights, and other settings. WP EasyCart sends your products to ShipStation, but you must go through the products and configure their specific settings on ShipStation — this lets them create more accurate packaging and shipping costs.

Power Feature

Branded Emails & a Branded Tracking Page

Instead of leveraging the WP EasyCart shipping emailer, we recommend using ShipStation’s — it’s more reliable in many cases (many servers are not set up properly for automatic email notifications that don’t go to spam) and offers additional options EasyCart does not. Visit the branding area in your ShipStation Account › Selling Channels › Store Settings, select Edit on your store, then open the Branding tab to set up your logo and color scheme. Once you do, ShipStation can notify customers with a link to track their package on a branded shipment tracking page. To us, this is a very cool feature that gives your customers peace of mind about their order and shipment.

ShipStation — Branded Shipment Tracking Page

Custom branded ShipStation package tracking page with store logo and colors

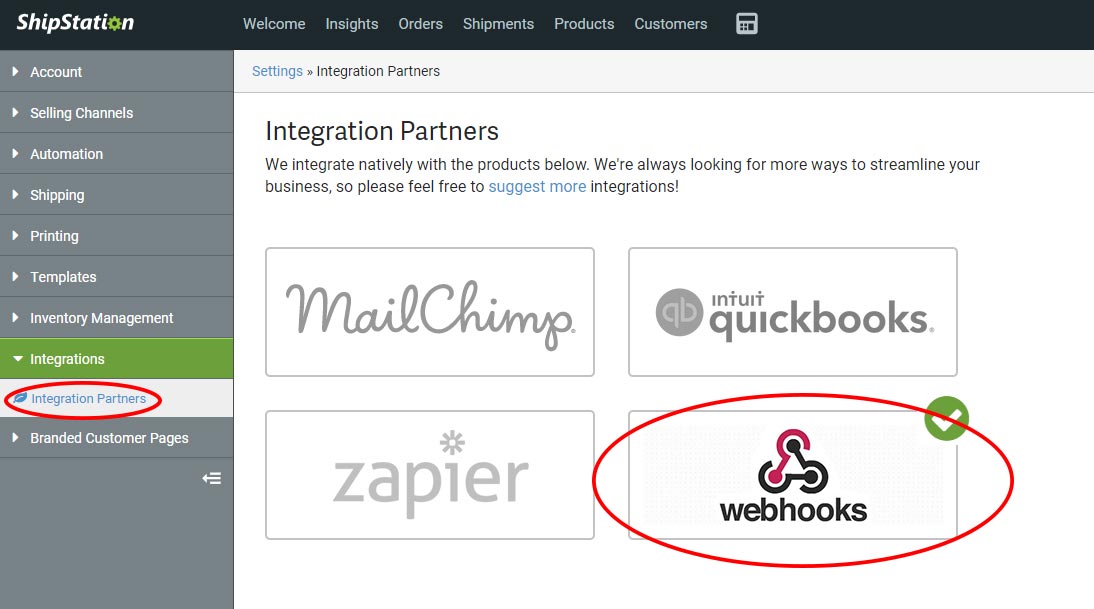
ShipStation Webhooks › WP EasyCart Orders

The extension sends orders to ShipStation — and talks back to your EasyCart when a shipment is created. When you save your settings, the webhook link is registered automatically. Here’s how to check that it’s set: open ShipStation Account › Settings › Integrations › Webhooks and look for your website URL registered there.

ShipStation — Webhooks Panel

ShipStation integrations webhooks panel location

You should see a URL similar to this, but with your address in it. You can always remove this webhook — or go back and save your settings in EasyCart to rebuild it should it be missing. Syncing back to EasyCart will not work if there is no webhook set here.

ShipStation — Registered Webhook URL
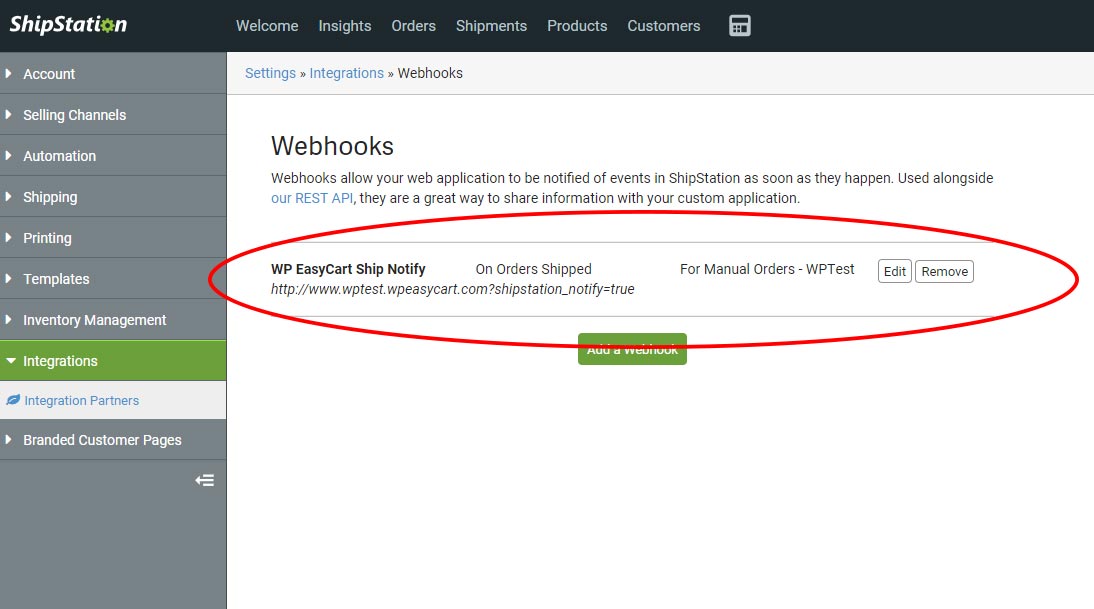
Registered webhook URL pointing back to the WP EasyCart website

Only label creation triggers the webhook

The only time ShipStation communicates back to your EasyCart system is when a label is created — that’s what triggers the actual sending that a shipment was created and shipped. Just changing an order in ShipStation to ‘Marked as Shipped’ will not trigger their webhook system!

ShipStation — Create Labels
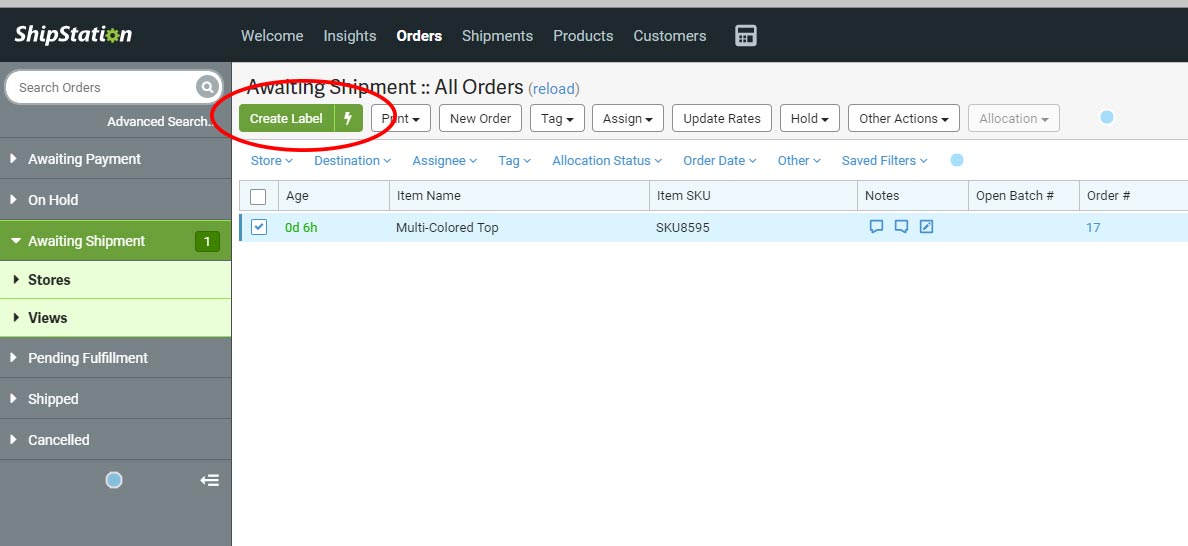
ShipStation create labels action that triggers the webhook back to EasyCart

Once the webhooks fire, you should see orders in EasyCart automatically change to ‘Order Shipped’ along with a ‘Carrier’ and ‘Tracking Number’ when applicable — not all shipments have tracking numbers. From here, you can let ShipStation send further emails to your customers about shipping and tracking information; their services are set up well for this type of communication. For more information on ShipStation and the options within your account, visit the ShipStation help guide.

WP EasyCart — Order Updated by ShipStation
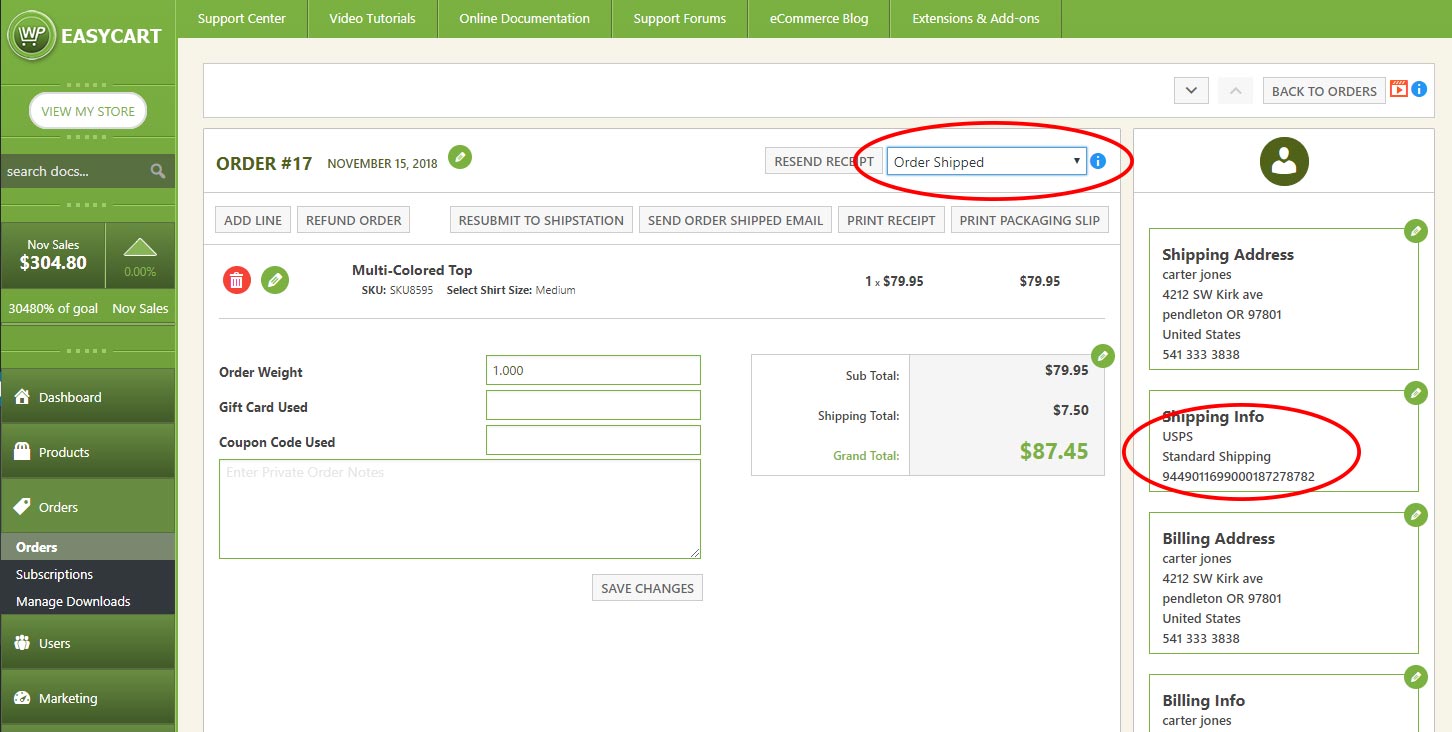
WP EasyCart order automatically marked shipped with carrier and tracking number

Automate Your Fulfillment Pipeline

Orders in, labels out, tracking synced back — automatically. If the connection or webhooks give you trouble, our support team is ready.

Updated on July 20, 2026