Extension Guides
Facebook & Instagram Extension
The Facebook & Instagram feed turns your WP EasyCart system into an online catalog and ad engine for both platforms. Facebook dynamically pulls your products into its catalog system for you — giving you scrolling Facebook & Instagram posts where customers click ‘Shop Now’ and land on your website to purchase. This extension provides several ways to get that feed into Facebook’s business system.
Watch the Walkthrough
Prefer to watch? This four-part video series takes you from Facebook pixel to finished advertisement, step by step.
Facebook & Instagram — 1 of 4
In this video we show you how to establish a Facebook pixel so you can begin tracking page visits and also ecommerce data — a great first step before using our Facebook & Instagram Feed Extension.
Facebook & Instagram — 2 of 4
In this second video in the series, we explain how to install the Facebook & Instagram extension and what to look for with the new extension installed.
Facebook & Instagram — 3 of 4
Walk through creating catalogs that allow you to create advertisement carousels to promote on Facebook & Instagram.
Facebook & Instagram — 4 of 4
Our final video in the series shows how to create a Facebook & Instagram advertisement using your new catalog of products. Now you can pull products from your WordPress EasyCart system into Facebook & Instagram with slideshow behavior and “Shop Now” actions.
Download & Install the Extension
First, you must install all EasyCart extensions as new plugins. This is a very easy task with WordPress, and we have a short guide to get you started. Click here to learn how to install a WordPress plugin and EasyCart Premium extensions.
Create a Facebook Business Account
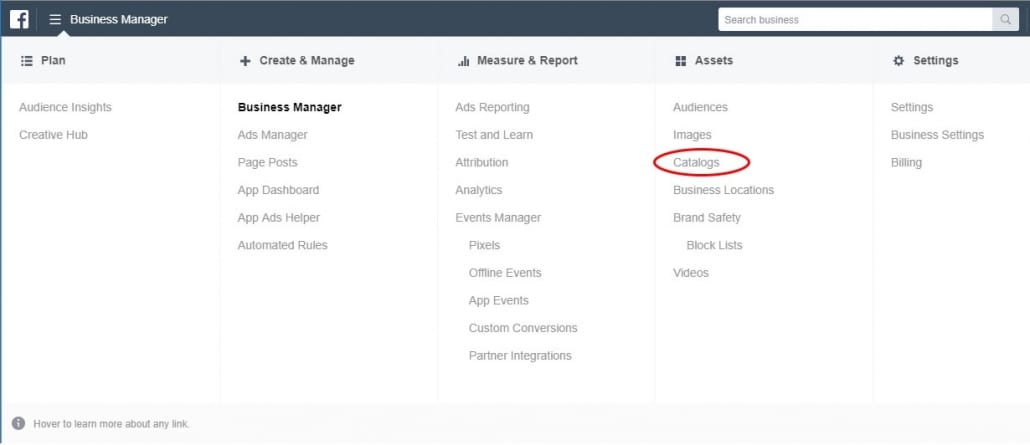
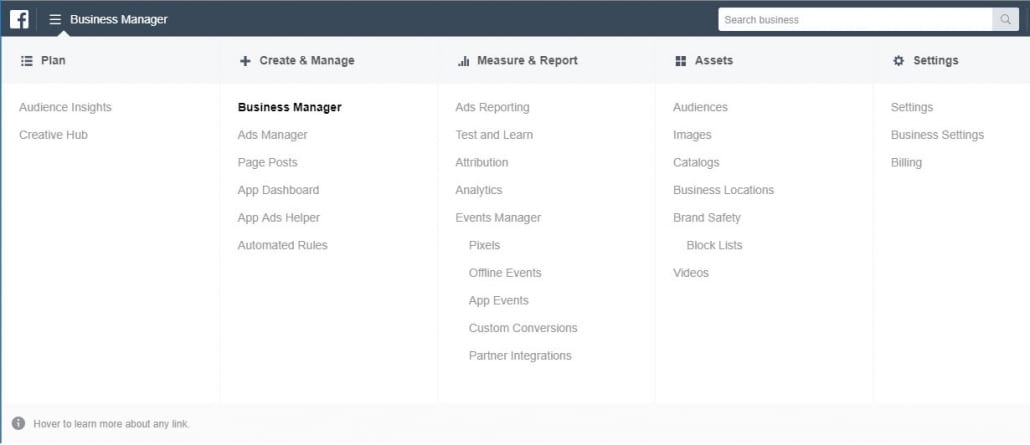
The first step to selling on Facebook & Instagram is building a Facebook Business account. Visit business.facebook.com and create your business account. Once you log in, familiarize yourself with the menu at the top left — this is where you’ll create a catalog of products, connect it to your EasyCart system, and build and monitor ads.
Facebook Business — Main Menu
Set Up Your Facebook Pixel
Facebook pixels track user events on your website and EasyCart system — a necessary step for the best possible ad performance and tracking. Set this up first.
Create a Facebook Pixel
Navigate to the Pixels section in Facebook Business manager and create a Facebook Pixel.
Add General Page Tracking
For general page tracking, we recommend the Official Facebook Pixel Tracking plugin.
Add Your Pixel ID to EasyCart
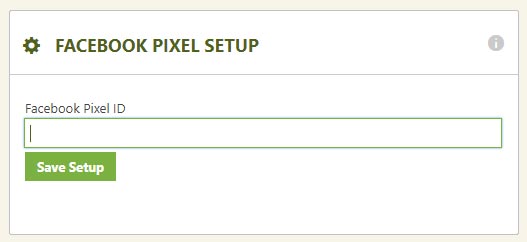
For ecommerce tracking of transactions, install your Facebook Pixel ID in EasyCart settings. Open WordPress admin › WP EasyCart › Settings › Third Party and enter your Pixel ID.
WP EasyCart — Facebook Pixel Settings
At this point, Facebook is tracking page clicks and ecommerce transactions — you’ll see them show up in your Facebook Business Analytics.
Create Your Facebook Catalog
The Facebook & Instagram extension feeds your Facebook catalog with products from your WP EasyCart system — a dynamic feed linking your site to Facebook.
Facebook Business — Catalog Menu

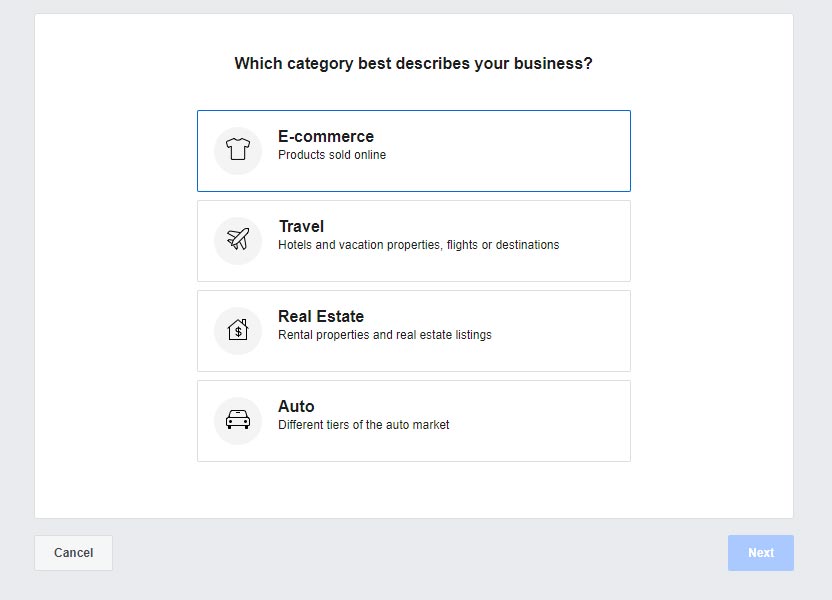
First, create a new catalog. Select E-Commerce when presented with the catalog type choice.
Facebook Business — Catalog Type
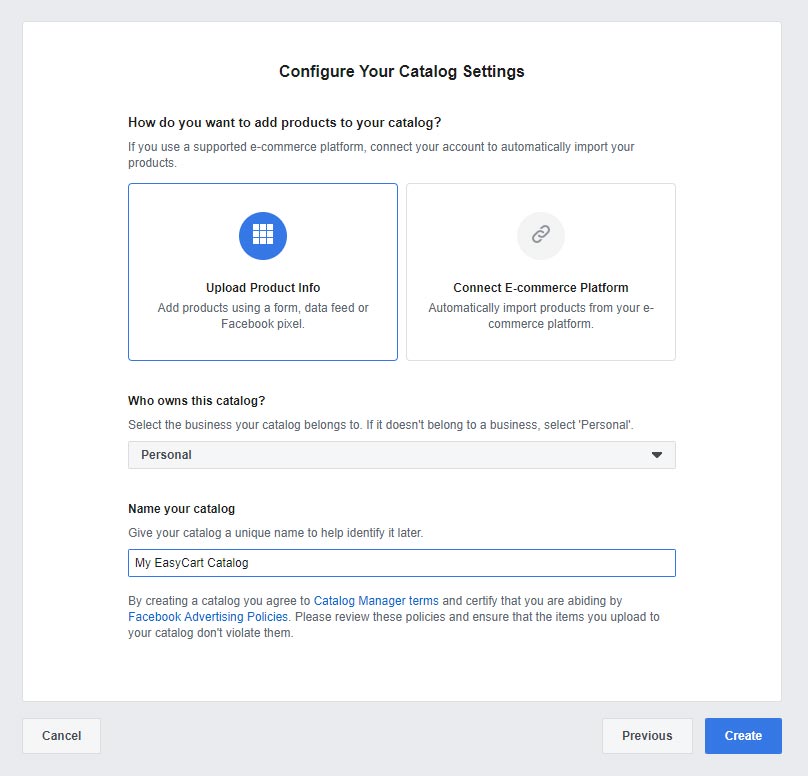
Next, you’ll be asked what type of configuration — select ‘Upload Product Info’. You can select a personal or custom owner (we just select a Personal owner), then give it a name, such as ‘My EasyCart Catalog’.
Facebook Business — Catalog Configuration
Point Your Catalog at Your Data Feed
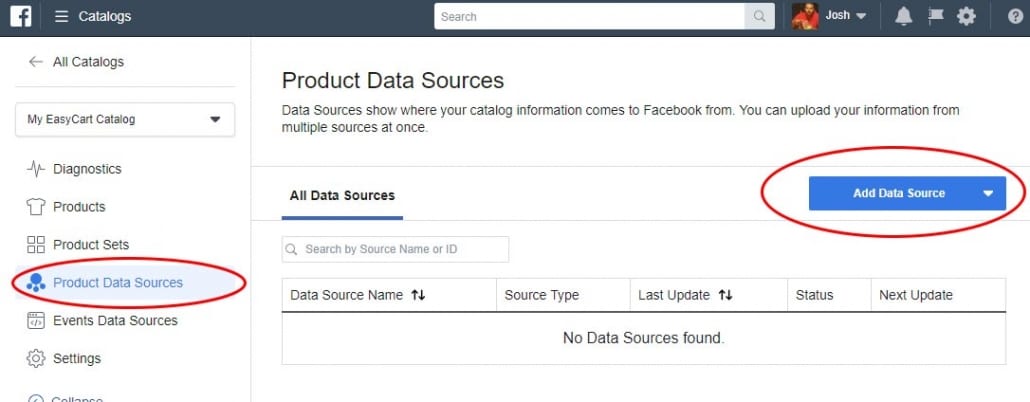
Now that you have a catalog, add a new Data Source — this is where you point Facebook at your dynamic EasyCart feed. Go to Product Data Sources › Add Data Source and create a new data source using the ‘Use Data Feeds’ method, so Facebook pulls from your website using the provided data feed.
Facebook Business — Add Data Source

Next, set a schedule. You can upload once if you make a custom CSV, or select ‘Set a Schedule’ and copy/paste your Facebook Feed URL. Your custom feed lives in WP EasyCart › Settings › Third Party under the Facebook feed. We also provide a manual download button to get a CSV file — customize it in mass or upload it manually one time — but most of the time it’s easier to just connect to your feed URL.
WP EasyCart — Facebook Feed URL
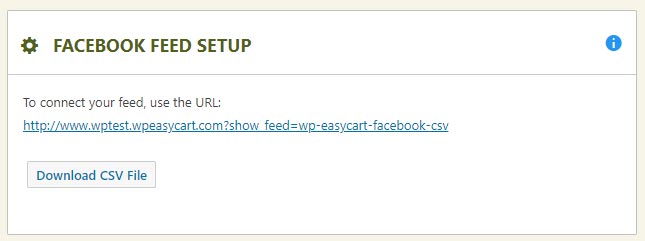
Copy and paste your feed URL into Facebook and set the appropriate schedule for grabbing new products. Typically a one-day schedule is plenty, but you can do a feed lookup every hour if you want. You can also choose Upload Once on this panel to provide a custom feed using our Download CSV File.
Facebook Business — Feed URL & Schedule
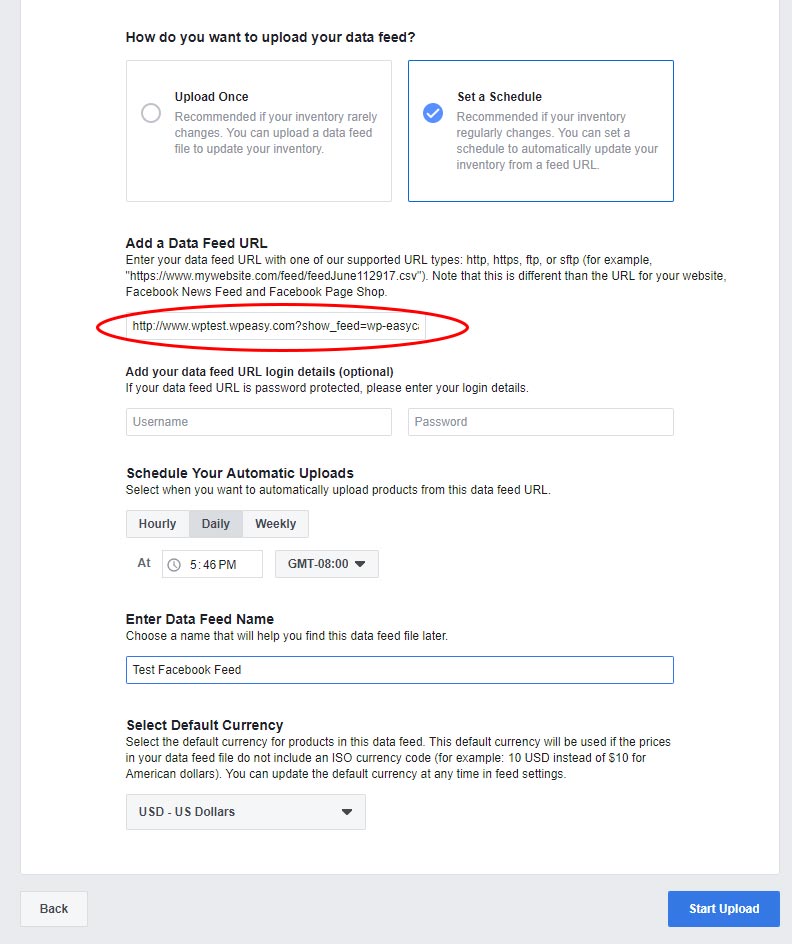
Once finished, click ‘Start Upload’ and Facebook begins grabbing your products from your website using this URL. Select ‘Done’ when finished.
View Your Products in Facebook
That’s it! You should see all your WP EasyCart products loaded into Facebook, ready for Facebook & Instagram ads built on your dynamic feed data. In this example, all of our demo products were found and loaded into Facebook under the Products section.
Facebook Business — Products Loaded from EasyCart
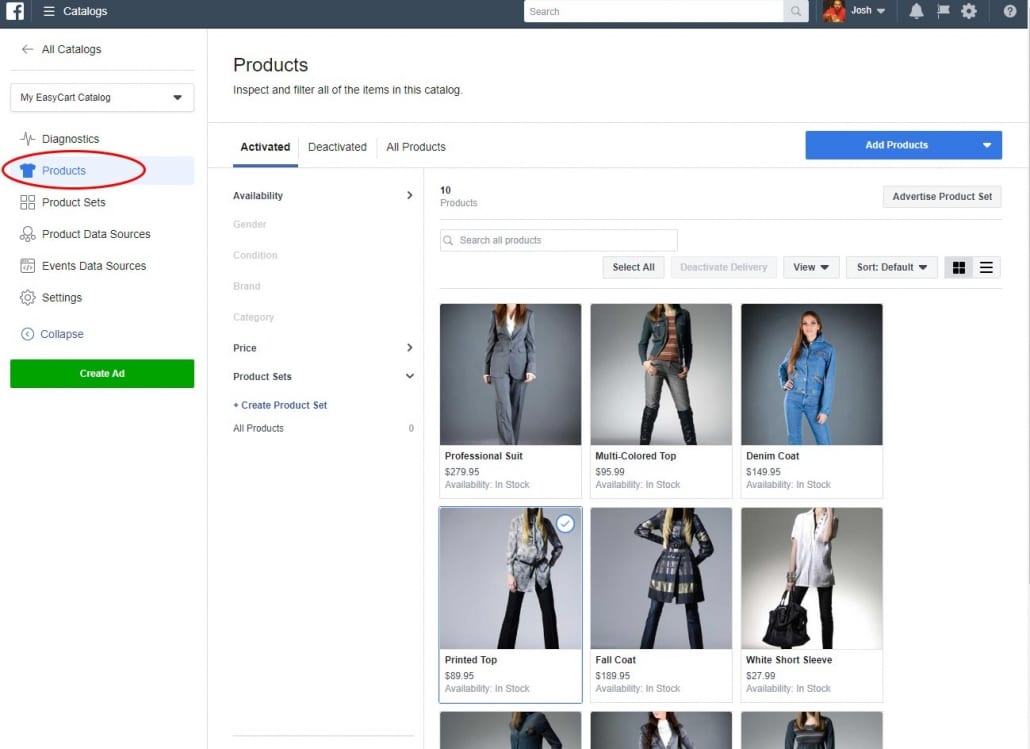
From here, click ‘Advertise Product Set’ or the ‘Create Ad’ button and begin advertising through Facebook & Instagram. You can also select Product Sets and construct product sets to break your catalog into groups or smaller sets of products. Please consult Facebook on how to build and manage ads from this point forward.
Power Feature
Customize Your Product Data Feed
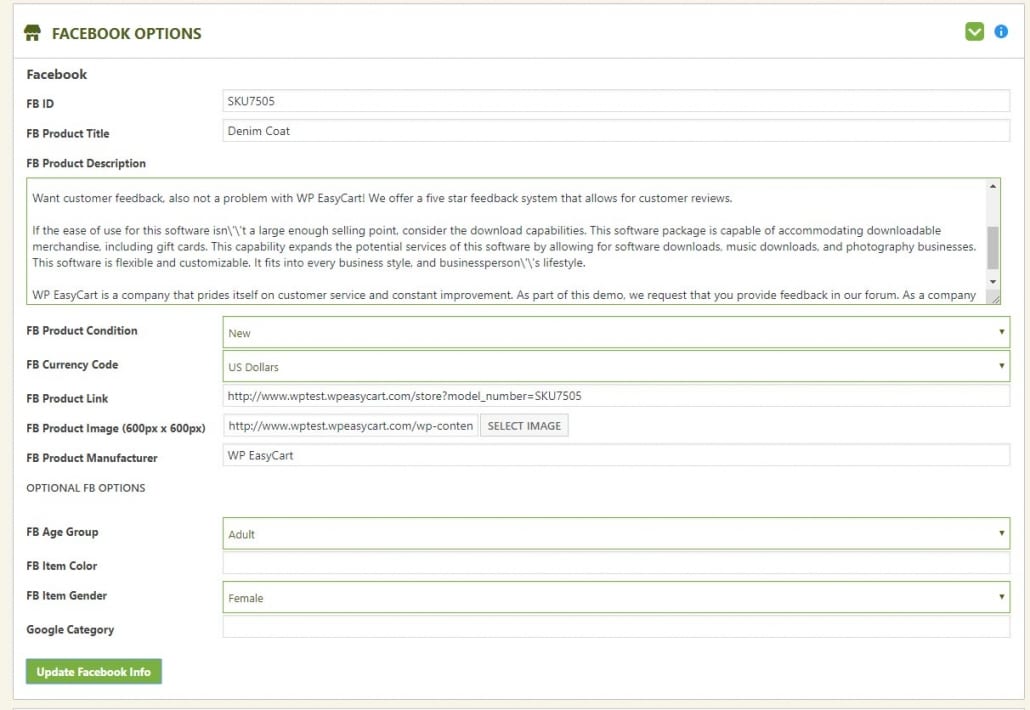
By default, we pull in your product titles, prices, descriptions, and stock information — but Facebook lets you segment product information even further, and we give you a very customizable way to do it. With the Facebook & Instagram extension installed in your Premium edition, edit any product and scroll to the bottom to find a Facebook panel with per-product customization. For each product you can customize the title, description, condition, currency code, URL, Facebook image, and manufacturer.
- Facebook image: Best provided as a 600px × 600px square image. If your product image 1 isn’t square, you may need to photoshop or customize a set of graphics just for this ad platform.
- Optional fields — Facebook Age Group, Item Color, Item Gender, and Google Category: The more specific you are, the better Facebook & Instagram can display your ads to the right customers during marketing campaigns. Leave these blank if they don’t apply.
- Google Categories: Especially good to fill in for every product — that way your Facebook feed won’t get any warnings on upload. Look up the best category in the full list of Google Product Categories and enter the Category ID.
💡 Example: 5082 — Animals & Pet Supplies › Pet Supplies › Cat Supplies › Cat Apparel. In this example, you enter 5082 as the Google category.
WP EasyCart — Per-Product Facebook Panel
Put Your Products in Front of Millions
Connect your EasyCart feed once, and Facebook & Instagram keep your catalog fresh automatically. Stuck on a step? We’re here to help.