WP EasyCart offers an easy way to connect to google analytics to track eCommerce conversions and data. Google eCommerce data is very different from typical Google page visit analytics.
Google Page Analytics – This is the most popular method people are familiar with to track page clicks and views. Typically you sign up for a Google analytics plugin and get a simple script or code to paste into your WordPress to track pages. Most themes & various plugins allow you a simple location to paste this coding so that all page, even non-EasyCart pages in WordPress will be tracked.
Google Site Kit is a good examples of a plugin that allow you to easily add google analytics to your site. Even most themes allow you to easily add tracking code to them in most well designed theme settings.
Google eCommerce Analytics – This adds to your existing google analytics the ability to see conversions and purchases from users. Google eCommerce even allows per product information along with all the data that associates with users coming to your site. See where users come from, how they navigate your site, and how they purchased during the entire website visit. Look at each product, monthly analytics, and much more when you use Google eCommerce Analytics.
WP EasyCart easily lets you track eCommerce data by sending after each order this data to your Google Analytics account. All you need to do is enter a few settings and start collecting data!
Step 1: Setup Google Analytics
The first step is to establish an actual Google account for analytics. Sign Up Here. This will get you started with page viewing and basic web analytics. Then install Google Site Kit plugin from here. It’s free and easy to use. Click Here for Google Site Kit.
Step 2: Add Code to EasyCart
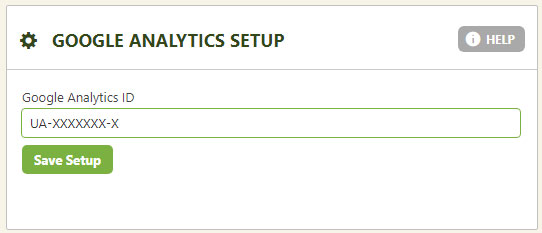
Now that you have page tracking working, or if you already do have page tracking working, it’s time to add your google code to EasyCart. Just visit the WP EasyCart -> Settings -> Third Party section in your WordPress admin to add your code here.

This will start sending your eCommerce transactions to google after each confirmed order.
Step 3: Enable eCommerce on your Google account
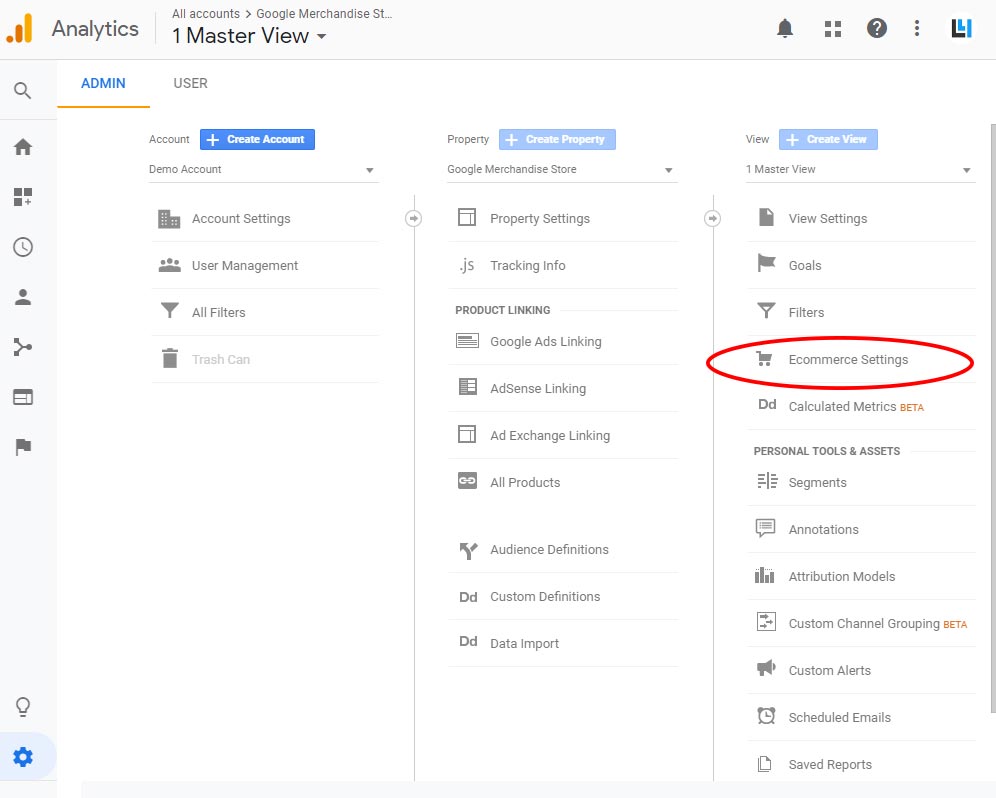
The last step will allow eCommerce data on your Google analytics system. Visit your analytics admin account page.

Open the ‘Ecommerce Settings’ section and enable both the eCommerce and Enhanced eCommerce reporting.

That’s It! you should be able to start collecting eCommerce transactions into your regular analytics account.
Where to find eCommerce Analytics Data?
Once you start collecting data and have a bit of data, you can start viewing your data by going to ‘Conversions’ -> ‘Ecommerce’ -> ‘Overview’ section of google’s analytic interface.

